FHB Logo Facebook LinkedIn Email Pinterest Twitter Instagram Tiktok YouTube Plus Icon Close Icon Navigation Search Icon Navigation Search Icon Arrow Down Icon Video Guide Icon Article Guide Icon Modal Close Icon Guide Search Icon Skip to content
Subscribe
Log In
  • How-To
  • Design
  • Tools & Materials
  • Videos
  • Blogs
  • Forum
  • Magazine
  • Members
  • FHB House
  • Podcast
Log In

Discussion Forum

Discussion Forum

Imperfect opening around exterior electrical outlet box

user-7419966 | Posted in General Discussion on February 28, 2022 12:11pm

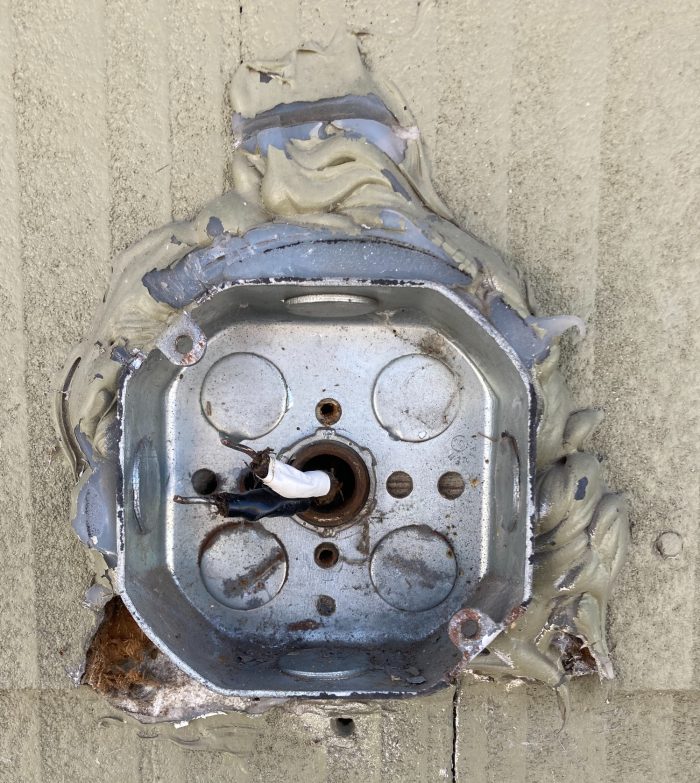
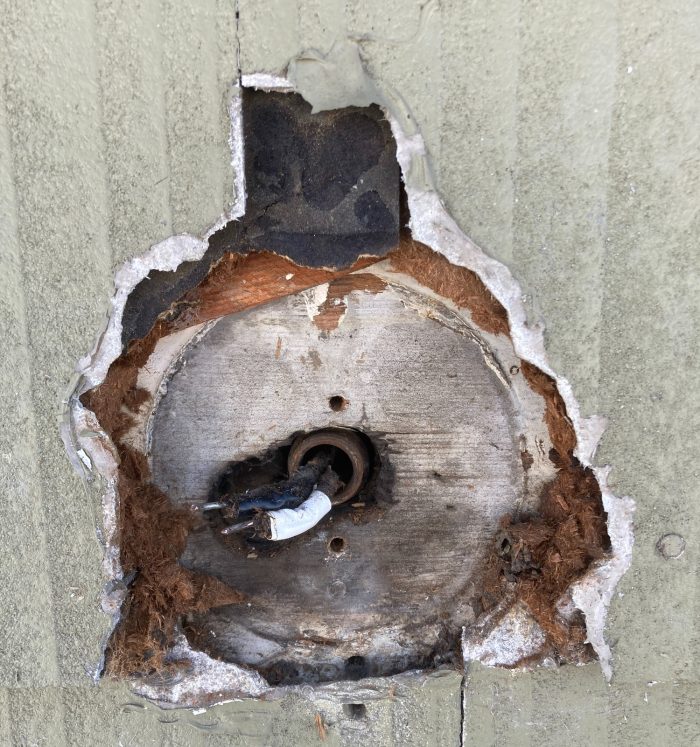
Yesterday I replaced an existing octagon box with a new round weatherproof electrical outlet box for a new LED yard light. Any recommendations to properly fill the gaps between the new box and asbestos siding? (see photos for what was there before and scope of the gaps.) Heavy caulking again? It is a north-facing exterior wall and is unprotected given the overhang above is very short and much higher up. Thank you.

Reply

Replies

  1. catmandeux | Mar 01, 2022 09:20am | #1

    I would install a mounting block
    A piece of PVC trim board, or rot resistant wood, with a hole sized for the electrical box will do. It should be the same thickness of the electrical box.

    Trim the sides and top of the existing opening large enough to remove the damaged edges, and be centered about and a couple of inches away from the new box. A manual grout saw will cut the siding easily, and not kick up dust. Wear PPE and safely dispose of the cuttings.

    Cut a mounting block to fit. Cut a rebate on the back so that it overlaps the lower row of siding by an inch or so. The block should sit flat on the wall sheathing ( substrate) and not touch the siding. Cut a hole just large enough for the electrical box to slip through. If made of wood, prime / paint all surfaces.

    Install flashing under the sides of the opening, and a piece of Z flashing at the top. Install the mounting block and electrical box. Seal all the gaps with good quality sealant. Finish paint to match. Install light fixture.

    1. user-7419966 | Mar 01, 2022 09:42pm | #2

      Thank you, catmandeux. This is very helpful and appreciated.

    2. user-7419966 | Mar 03, 2022 01:27pm | #3

      Hi catmandeux. Regarding flashing, I'm familiar with Z flashing for the top. For flashing under the sides of the opening, as you described, does this Fine Homebuilding video show what you're describing? That's the only part of your instructions I don't know how to do. Thank you.

      https://www.finehomebuilding.com/project-guides/windows-doors/replace-window-series-flash-new-window

  2. User avater
    deadnuts | Mar 03, 2022 02:37pm | #4

    Catmandeux's advice is excellent. The shingling of the aluminum had flashing and rabbeting of the block at the bottom will take care of 95% of bulk water shed in my opinion. The sides, particularly for asbestos siding, which is not very moisture or thermally reactive, can be reasonably caulked to shed water and will tend to last quite a while (no caulk last forever). If you take the rabbeting concept at bottom and apply this to the electrical device fixture block at the sides, you'd be even better off; but that takes the carpentry skill level required up a notch. Bed that side overlap in caulk to seal the deal.

    1. user-7419966 | Mar 03, 2022 02:59pm | #5

      Thank you, deadnuts. Much appreciated.

    2. user-7419966 | Mar 06, 2022 11:05am | #10

      Deadnuts, to avoid cutting into the siding that might have asbestos, what are your thoughts on the following approach? Cut a half-inch thick piece of PVC trim board to to place over the rough opening -- with maybe 2 - 3 extra inches extra beyond the top and both sides of the rough opening of the old opening someone hacked into the siding. The bottom edge of the trim could extend maybe an inch or two below that row of siding and would have about a half-inch of clearance above the row of siding below, so hoping that would be an effective drip edge. The electrical wiring could be extended through the PVC and into the new weatherproof electrical box, which would be attached on top of the PVC. I would still caulk around the PVC trim edges with a quality exterior caulk.

      I realize this would not provide as clean a finished look as catmandeux's approach, but it would take less time for me (single dad), eliminate the need for z flashing and eliminate exposure to asbestos since there would be no cutting into the siding. (Unless drilling through the PVC trim into the very old cement board siding would release asbestos or crack the siding.)

      Would you see any concerns with water shed, electrical issues or any other aspect of that approach? Feedback welcomed.

      1. User avater
        deadnuts | Mar 06, 2022 06:18pm | #11

        I don't see how your approach avoids the use of z flashing to shed bulk water from top of mounting block/fixture..and I don't see you extending those wires out to a new surface mounted weatherproof box; the wires are short as they are. Lastly, your approach relies on mounting everything directly to siding which I would question the structural integrity of as a mounting surface for fixture to and/or use of an outlet. I suggest you use Catmandeux's solution. Hire someone to do it for you if you don't have time to do it right yourself. If you can't afford someone to do it for you as a homeowner, well then that's another story I can't help you with.

  3. fireball | Mar 04, 2022 08:27am | #6

    Just get a pound of duct seal from the electrical department at Home Depot. We use it to seal around conduit penetrations on electrical services.

    1. User avater
      deadnuts | Mar 04, 2022 03:14pm | #7

      I've seen wall cavities rotted out and fire hazards created by the use of duct seal for shedding bulk water from wall penetrations; particularly service entry cables and exterior plug devices. It's a crude and cheap solution and (like most things in life) you get what you pay for.

  4. fireball | Mar 04, 2022 07:31pm | #8

    Fire hazards from duct seal? You're absolutely full of it.

    1. User avater
      deadnuts | Mar 04, 2022 09:10pm | #9

      Fire hazard from faulty duct seal application. Specifically water following SE cable into panel via failed duct seal. Definitely a fire hazard. The only one that is full of it is you; since you apparently stock and rely on the stuff.

Log in or create an account to post a comment.

Sign up Log in

Become a member and get full access to FineHomebuilding.com

Video Shorts

Categories

  • Business
  • Code Questions
  • Construction Techniques
  • Energy, Heating & Insulation
  • General Discussion
  • Help/Work Wanted
  • Photo Gallery
  • Reader Classified
  • Tools for Home Building

Discussion Forum

Recent Posts and Replies

  • |
  • |
  • |
  • |
  • |
  • |
View More Create Post

Up Next

Video Shorts

Featured Story

Replace Rotten Boards in a Roof Overhang

Readers and an expert consider the source of the problem and how to fix it without completely reroofing.

Featured Video

SawStop's Portable Tablesaw is Bigger and Better Than Before

The 10-in. Jobsite Saw PRO has a wider table, a new dust-control port, and a more versatile fence, along with the same reliable safety mechanism included in all SawStop tablesaws.

Related Stories

  • Convert a Porch to a Mudroom
  • Podcast 599: Trees Moving Buildings, Epic Thermal Bypasses, and Supplemental Dehumidification
  • Podcast 599: Members-only Aftershow — Tools That Changed Residential Construction
  • Remodeling Done Right

Highlights

Fine Homebuilding All Access
Fine Homebuilding Podcast
Tool Tech
Plus, get an extra 20% off with code GIFT20

"I have learned so much thanks to the searchable articles on the FHB website. I can confidently say that I expect to be a life-long subscriber." - M.K.

Get home building tips, offers, and expert advice in your inbox

Signing you up...

This site is protected by reCAPTCHA and the Google Privacy Policy and Terms of Service apply.
See all newsletters
See all newsletters

BOOKS, DVDs, & MERCH

Shop the Store
  • 2022 Fine Homebuilding Archive
    Buy Now
  • Code Check Complete 3rd Edition
    Buy Now
  • Pretty Good House
    Buy Now
  • 2023 Tool Guide
    Buy Now
  • Shop the Store

Fine Homebuilding Magazine

  • Issue 318 - October 2023
    • Make Mudsills Square and Level
    • Turn Up the Heat With Induction Cooktops
    • The Fine Homebuilding Interview: Lloyd Alter
  • Issue 317 - Aug/Sept 2023
    • Finishing Drywall With Seamless Results
    • A Flat Roof in a Cold Climate
    • Compact Cordless Shop Vacs
  • Issue 316 - July 2023
    • Timber-Framed Solar Canopies
    • Build a Transom Above a Stock Door
    • Understanding Toilet Design and Efficiency
  • Issue 315 - June 2023
    • How to Craft a Copper Roof
    • 5 Lessons from Building in a Cold Climate
    • The Advantages of Cellular PVC Siding
  • Issue 314 - April/May 2023
    • 7 Options for Countertops
    • Tool Test: Wood-Boring Bits
    • Critical Details for Ductless Heat Pumps

Fine Homebuilding

Follow

  • YouTube
  • instagram
  • facebook
  • pinterest
  • Tiktok
  • twitter

Newsletter

Get home building tips, offers, and expert advice in your inbox

Signing you up...

This site is protected by reCAPTCHA and the Google Privacy Policy and Terms of Service apply.
See all newsletters
See all newsletters

Membership & Magazine

  • Online Archive
  • Start Free Trial
  • Magazine Subscription
  • Magazine Renewal
  • Gift a Subscription
  • Customer Support
  • Privacy Preferences

Taunton Network

  • Green Building Advisor
  • Fine Woodworking
  • Fine Gardening
  • Threads
  • About
  • Contact
  • Advertise
  • Careers
  • Copyright
  • Terms of Use
  • Site Map
  • Do not sell or share my information
  • Privacy Policy
  • Accessibility
  • California Privacy Rights

© 2023 The Taunton Press, Inc. All rights reserved.

X
X
This is a dialog window which overlays the main content of the page. The modal window is a 'site map' of the most critical areas of the site. Pressing the Escape (ESC) button will close the modal and bring you back to where you were on the page.

Main Menu

  • How-To
  • Design
  • Tools & Materials
  • Video
  • Blogs
  • Forum
  • Reader Projects
  • Magazine
  • Members
  • FHB House

Podcasts

  • FHB Podcast
  • ProTalk

Webinars

  • Upcoming and On-Demand

Podcasts

  • FHB Podcast
  • ProTalk

Webinars

  • Upcoming and On-Demand

Popular Topics

  • Kitchens
  • Business
  • Bedrooms
  • Roofs
  • Architecture and Design
  • Green Building
  • Decks
  • Framing
  • Safety
  • Remodeling
  • Bathrooms
  • Windows
  • Tilework
  • Ceilings
  • HVAC

Magazine

  • Current Issue
  • Past Issues
  • Magazine Index
  • Subscribe
  • Online Archive
  • Author Guidelines

All Access

  • Member Home
  • Start Free Trial
  • Gift Membership

Shop the Store

  • Books
  • DVDs
  • Taunton Workshops

More

  • FHB Ambassadors
  • Reader Projects
  • Podcast
  • FHB House
  • Customer Support

Account

  • Log In
  • Join

Newsletter

Get home building tips, offers, and expert advice in your inbox

Signing you up...

This site is protected by reCAPTCHA and the Google Privacy Policy and Terms of Service apply.
See all newsletters
See all newsletters

Follow

  • YouTube
  • instagram
  • facebook
  • pinterest
  • Tiktok
  • twitter

Join All Access

Become a member and get instant access to thousands of videos, how-tos, tool reviews, and design features.

Start Your Free Trial

Subscribe

FHB Magazine

Start your subscription today and save up to 70%

Subscribe

We hope you’ve enjoyed your free articles. To keep reading, become a member today.

Get complete site access to expert advice, how-to videos, Code Check, and more, plus the print magazine.

Start your FREE trial

Already a member? Log in