A while back a carpenter replaced some joists and sistered other joists to raise the floor. Now I have to tear out the “new” joists, I’m trying to fix other things with the “fixed” floor. Principally the floor is not level (yeah I know) and will be taking cabinets, tiles and a tub. I’ve thought of installing new joists at the lowest level and planing everything down to this level. The problem is the floor was raised to cover a DWV pipe, so I can’t go down. The only option appears to be shimming everything up (I can at least install the new joists right, and they’ll be under the tub). I’ve been advised not to shim joists: wood shims compress and may slip off. I don’t understand the latter, if one screws down into the joists that should anchor shimming strips. The big disadvantage to me would surely be lack of gluing, unless one uses a thin layer of Titebond on either side of the shims.
Any opinions out there on shimming joists? I enclose a pic of how far joists are below the high point. Basically:
– all of the joists are out of level on their span by about 1/8″, I can tell that using the level I gave the carpenter…..
– joists #2-6 shrank and cupped as they dried, the TJIs did not, and joist #1 had a 2×4 sister that may have limited cupping, so you’ve got the right end higher than the rest.
I’ll be replacing TJI #1 and #2 and maybe Joist #1 (compromised by carpenter notches and plumber hole). Planning on 1/8″ hardwood, 3/16″ luan, 1/4″ ply shims. Perhaps that approach would not leave the joists in contact with the subfloor for sufficient lengths of their span.
Sorry for the long post, I do appreciate any feedback.
Edit: Oh there’s no data for TJI #1 because it no longer exists….
Edited 4/19/2005 8:27 pm ET by Taylor


Replies
Asphalt shingle scrap makes excellent shims. Can't rot; doesn't compress hardly at all; standard thickness is dang close to an eighth. You can stack 'em for those few places you've gotta fill in a quarter inch, and personally, I'd not worry too much about the places where you're out by a sixteenth. It's not going to be visible once you finish laying the subfloor, the backerboard, and the tile.
Did you do that height take-off with a laser level and a story stick?
Dinosaur
'Y-a-tu de la justice dans ce maudit monde?
Thanks. Guess glue is out, all the better for the schlub who needs to take this apart down the road.Yeah PLS2, very useful tool.
Here's a plan. Gotta do 2 things:
a. make the joists level along their length
b. make sure the floor is high enough to cover that DWVCurrent thinking is to plane down the joists to get them level (a). Then lay 1/8" asphalt strips (1 or 2 layers, depending on what is necessary to cover DWV) to bring the floor up (b).(a) has me nervous, gotta be careful not to overplane. Planing close to wall will be PITA. Guess 1/16" is not worth worrying about. At least planing avoids shims of differing heights which would leave stretches of subfloor out of contact with joist. Still worried about planed stretches of different heights, but at least I can massage height differences with planer.(b) use Gorilla glue to hold down the strips, then anchor them down when screwing in subfloor.
Don't worry about the Gorilla glue; just tack the shingle strips in place with an HT65 and screw your subfloor through them later.
You can't plane near the wall; you'll have to rough-out those spots with an old beater of a chisel. Planing and shimming together as a method to flatten and level joists before laying subflooring is a very common practice. You use a string line as a reference point, then mark the spots to plane with a lumber crayon and the spots to shim you mark with a thickness number (like +1/8; +¼).
It ain't rocket science. You'll be okay.
Dinosaur
'Y-a-tu de la justice dans ce maudit monde?
Thanks again, and thanks for the encouragement. It is hard not to feel discouraged when every pro that comes through this project leaves a set of problems to be fixed. I'd be in a sanotorium without this board's advice....
i was wondering about the level that you gave the carpenter,he didnt bring his own or???????????
Every time i shut the door on Reality. it comes in through the window!.
He just forgot it and I gave him a 4' Stabila. It clearly shows every joist out of level. I suspect he focused on leveling the floor in one direction only (perpendicular to the joists). No strings were strung.There is a world of difference between the careful meticulous techniques described here and the work I see out in the Real World.
If you do this job yourself, go buy a cheap laser level. You oughta be able to get one for about $40. You need one that comes with a tripod. You don't need a rotating model (they're not cheap), just an assistant to point it for you or to hold the target. Do a complete height take-off of the relative levels of each joist every two feet along it's length. Mark the results directly on each joist with a + or a -. Then you'll have a plan staring you in the face of what shimming and planing you need to do.
Dinosaur
'Y-a-tu de la justice dans ce maudit monde?
I got the PLS2, it's already paid for itself, it gives me a horizontal plane to measure from, better than strings. I have to do this myself, I couldn't take it if another carpenter came in and screwed it up again.
If you are going to do tile, who cares? As long as the floor is solid enough to take tile, L360 or better, then slap some stupid plywood on the floor, staple some tar paper and diamond lathe to the floor, and float a mud bed, which is a superior setting bed to any man made product and dead flat and level.I think trying to shim plywood with stupid pieces of paper or thin plywood is a PITA, doesn't result in the finished substrate being either flat, nor level, and therefore, makes the finished setting bed of CBU inaccurate as well.Float a mud bed, and all your problems will be solved, for less than a 1/2 day and $100 bucks.Regards,
Boris"Sir, I may be drunk, but you're crazy, and I'll be sober tomorrow" -- WC Fields, "Its a Gift" 1934
The plywood floor has to be level under the tub (that's the part I have to completely replace anyway). If the floor there is level and it's not elsewhere, the floor will have quite a roll at the transition.I don't plan to get the floor completely flat and level, at least approximately there so I can use a little SLC and not rely on 1" of mortar. These butchered joists couldn't take the load.
If the butchered joists can't take the load of an inch of mud, I shudder to think how it can take the load of ply, SLC, Hardi, and tile.My suggestion remains to:1. Determine if the joists are sufficient for tile, L360. I can point you to an on line structural graph for that purpose if you give me the size of the joist, thickness, width, and unspported length, and the spacing, like 16 or 26 on center. Assuming it is L360, then you have lots of choices from there. If it is not L360, you won't be doing tile.2. Assuming it is L360, mud will add no greater significant dead load than Hardi, and will immeasurable flatter and leveler. This is your house, and if you want to fool with shimming joists, have at it. This is my business, and I'm telling you, once the floor is L360, just mud it and forget it. Mud is about 10% of the price of SLC and about 50% of the price of backerboard, and immeasurably flatter and leveler.Regards,
Boris"Sir, I may be drunk, but you're crazy, and I'll be sober tomorrow" -- WC Fields, "Its a Gift" 1934
Well I was thinking of the load of mud on top of everything else. This is like, if you're buying a donut should you bother with skimmed milk in your coffee? Yes! It all adds up. There's also the height issue.I won't be using CBU, plan on Ditra over a layer of SLC that will cover heating cable. I think the SLC will add 200 lbs total to the overall weight (40sf of tile). I'd like to level the floor as much as possible beforehand to minimize the amount (weight) of SLC I'll need. Besides the transition at the (will be level) tub area, there's also the sharp rise in height on the left of the picture, necessitated by the DWV pipe there.The total sandwich is:- 2 layers of 3/4" Sturd-I-Floor
- heat mat
- 3/8" to 1/2" SLC
- 1/8" Ditra
- 5/16" tilewith some layers of thinset in there somewhere. The heavy overlayment of ply is because of the SLC, and because the previous tile job failed due to notching of joists and insufficient underlayment. I tried to get 5/8" Sturd-I-Floor, to meet TCA reqt of 1-1/8" Sturd-I-Floor, but not available in this neck of the woods.The joists are technically 2x10, but are notched to sit on 2x4 ledger. I guess that makes them 2x6s. Then there're the notches on top for DWV. The only thing that saves me is the width of the room, 5' to 5'8". For half of the room, the joists extend further to the main beam, but there's a wall (single top plate, of course) on the floor below that I guess takes away some of the load. At least I hope it does, that's the end where the vanity with engineered stone countertop will sit on top of tiled floor (over much notched joists). I have added blocking, 12ga strap ties and 8" screws to try to hold all that together.Edit: I forgot to mention that the joists sit on a 4x10 (2 by 2x10) beam that runs the 12' length of the room. Carpenter banged in a 16d at the tub end without predrilling, there's a dirty great split opening up there. Will try a 12ga strap tie to hold the grains together. Anyone wanna buy a fixer-upper?
Edited 4/20/2005 6:34 pm ET by Taylor
What is the unsupported length of your joists?What is the spacing of the joists, e.g., 12, 16, or 24 on center?Are they standard fir 2x10's, or someother species?If you don't know what your floor rating is, lets find out what the floor rating is before you go much further on this. You may have huge problems or none at all. First things first.Regards,
Boris"Sir, I may be drunk, but you're crazy, and I'll be sober tomorrow" -- WC Fields, "Its a Gift" 1934
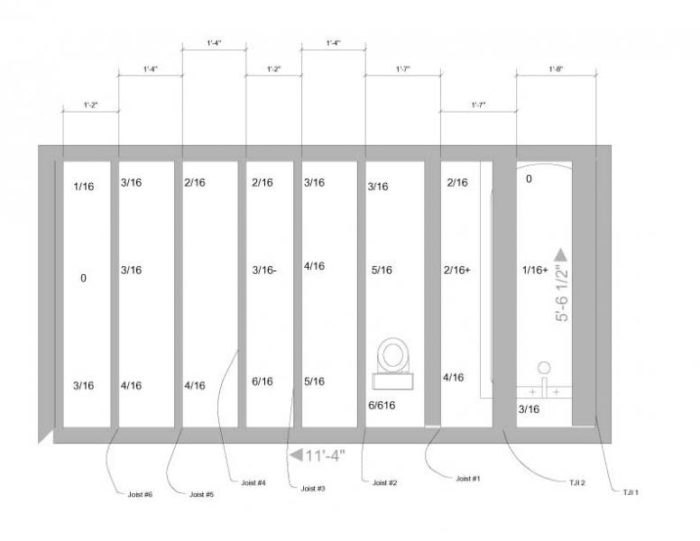
Sorry this has turned into a bit of an essay. You asked :-).Joists are 16oc on average (you know what it's like with old houses). There's actually a 16" gap between Joists #1 and #2, with a 2x4 sister on Joist #1 narrowing the gap (it gives room for the plumbing). Original joists were DF. Sisters attached with carriage bolts and raised a couple of inches, #2 grade DF. Let's say span is 5'8", although Joists #2-7 extend to a center beam (I think, I assume they don't go to the other side of the house), but as I said there's a wall underneath. 4x10 beam is wall along top of pic. 2x10 rim joist sits on top plate of first floor wall on bottom of pic, everything to right of Joist #2 is attached to that.DWV pipe goes through 2-1/2 x 2-1/2" notches in joist (sister) #7, 6 and 5 and then (at my insistence) goes through holes in remaining joist sisters #4, 3, 2. Holes are 1/2" to 1" from joist edge. Plumber added 5"Wx2"D notches to original joists #4, 3, 2 (I don't know why he needed 5"W notches for 2" waste pipe).There is 2x10 blocking between joists #3-7. Steam pipe prevents it between #3 and #2, 2x4 sister prevents it between #2 and #1.TJIs attached with (wrong type) of joist hanger to 2x10 ledger board. I'm taking out the TJIs and the ledger board. The TJIs are toast because the carpenter nailed horizontally through the flanges.Joist #1 is new #2 grade DF 2x10 with 2x4 sister, toe-nailed to 2x10 ledger and notched to sit on 2x4 ledgers. Plumber put DWV hole (for tub) in the wrong place and sawzalled it bigger, call it 2-1/2"W x 3-1/2"H. I may try to replace this with a TJI too.Joist #3 sister has two 1-1/2"W x 3"H notches on the bottom to fit over electric wires. I rewired, removed those wires, added a second 2x10 sister without the notches (remember, plumber added hole for DWV).Joist #4 sister has one 1-1/2"W x 3"H notch on bottom for wire. Joist #5 sister has one 1-1/2"W x 3"H notch on bottom for wire. Original joist has V-shaped 10"W x 3-1/2"H notch on top (!) left by earlier plumbers. After rewiring, I again added a second unnotched sister (remember, plumber added notch for DWV).Joist #6 sister has one 1-1/2"W x 3"H notch on bottom for wire. Original joist has V-shaped notch 9"W x 4"H on top (!), split in joist below the notch.Joist #7 actually goes under the floor of an adjoining room. Carpenter sistered 2 2x4s to that, then a 2x10 sister, then another 2x10 sister. The original idea was to lay the subfloor on that, but I've since extended the wall out to 2x6 (some of the studs were excessively notched or just plain cut in two for DWV). I was hoping to slide subfloor in underneath the studs that are dangling over the joist, but more realistically I guess I'll have to add ledgers between the blocking.All sisters rest at one end on 4x12 beam, notched to sit on 2x4 ledger. I found one sister already splitting at the notch. I've nailed 12ga strap ties (Simpson HRS6) to try to hold grains together, on every sister. I've also put strap ties in a few other places to try to bridge the notches.My understanding is that this notching is pretty much SOP in this neck of the woods. I've been told to my face that I'm crazy for adding in all the blocking. My dad, retired structural engineer, believes the floor would collapse without my additions. I haven't told him about the TJIs.....Edit: Mixed up width and height on notches for wires, fixed....
Edited 4/20/2005 8:52 pm ET by Taylor
Your floor is L2470, about 6 times what is necessary for tile, and about 3 times the deflection necessary for natural stone. This is an awesome floor, and yes, you are crazy to add blocking.That being said, there is no reason why you can not use mud to level this floor, other than you may not feel comfortable with the process. I can held with that (over the Internet) process. Like I say, for a floor of that size, it would take me and a single helper about 4 hours to level that floor and it would be a cost of about $100 for the sand and portland cement, lathe, and tar paper. It will result in a dead flat floor, flatter than you would ever get with SLC, and dead level, more level than SLC, too, at about 1/5th of the cost, and a similar savings in time.I think if I were to use shims under plywood then CBU or SLC, that this would be between a 2 and 3 day job, and would not be level, nor very flat. Your call, buddy. SLC is about $30 a bag, and you would need at least about 20-30 bags to bury your warm floor wiring in. You will need about a half inch to three quarters to bury the wires in. Don't try to attach the warm floor wires to plywood and then skim coat thinset over it, then tile. Thinset has no strength whatsoever over about a quarter of an inch, and the setting bed will just crumble. Like I say, a mud bed is the cheapest and best way to do this. All I do is old homes here in historic California, and I stopped shimming plywood about 15 years ago once I discovered the joys of mud beds.Regards,
Boris"Sir, I may be drunk, but you're crazy, and I'll be sober tomorrow" -- WC Fields, "Its a Gift" 1934
Well I do appreciate the advice and the offer of further help. Are you considering all the out-of-spec notching in those calculations? The notching above and below reduces the joist holding up the vanity to a 2x4. If an electrician ever climbed up on the vanity to work on a vanity light....I'm familiar with the John Bridge forum and his book, so I know something of mud beds from that. JB himself, an old mud guy, is a Ditra convert. I don't think I need as much SLC as you suggest, 1 50lbs bag of Levelquick covers 50sf at 1/8" depth, so 4-5 bags of that should be enough (the tiled area is about 8' x 5'6"). And there is that height issue with a mud bed.Let me ruminate on it, thanks again for the advice.
No, I used the raw numbers you gave me. I did not account for notching.For elevation issues, I have often put the final plywood floor BELOW the elevation of the joists, by running blocking joist to joist 3/4" below the joist and attaching 16 inch strips of plywood along the length of the joist. Then tar paper, diamond lathe, and mud above that. That would put your final elevation 1 inch and a quarter above the higest joist. I'm a poster over at J.Bridge, and there is a good structural engineer overthere, too, so go ahead and post something.Regards,
Boris"Sir, I may be drunk, but you're crazy, and I'll be sober tomorrow" -- WC Fields, "Its a Gift" 1934
Right it's the notching that makes things scary. Run your calculations with 2x4s instead of 2x10s. I suspect the floor would hold, because of the short span, but not much room for imperfections like knots etc. That's what has me worried about Joist #1 with the notching and then the dirty great hole, and all that bearing part of the weight of a 350lb CI tub.The traffic at JB is pretty intense these days. I've seen where people put one layer of ply between the joists, but it just seems like too much work to me :-). I know their engineers don't like shimming in general, I guess because of gaps between joists and ply that can add to deflection.
There is a "Deflecto-Meter" on the site, which is what I used to make your calculations. Since you know exactly the size, span and spacing of these rascals, I suggest you try it yourself. Here it is:http://www.johnbridge.com/vbulletin/deflecto.plRegards,
Boris"Sir, I may be drunk, but you're crazy, and I'll be sober tomorrow" -- WC Fields, "Its a Gift" 1934
I punched in numbers for 2x4.L275 for 6' span.
L440 for 5' span.Right on the edge for ceramic tile, at least where DWV is closest to the top. That's why I had the plumber bury the waste pipe as much as possible.
Yeah, I would sister some more 2x10's. You are not crazy after all. But, still very very close to L360, and well within the job for tile, with just a few fixes.Regards,
Boris"Sir, I may be drunk, but you're crazy, and I'll be sober tomorrow" -- WC Fields, "Its a Gift" 1934
Sistering 2x10s is not as easy as you think.I'm in North Joisey, where KD 2x10s are nowhere to be found. So to sister a 2x10 requires 4-6 weeks lead time to go get wet studs and let them dry out. I've tried drying them out in my boiler room, it was a disaster.If anyone knows a secret supplier of KD 2x10s in the greater NYC area....
Well I've planed down my joists into "ridges" which can be uniformly shimmed, and I've replaced 2 of the 3 joists that need to be replaced. I have a question on shimming: It looks like I'll be shimming by 1/8", 1/4" and in some places 3/8". I plan to use asphalt strips, as suggested. I've managed to install the replacement joists 1/8" higher than planned (mixed up two scales when estimating....). To shim up to this height would add another 1/8" to those numbers.My question is, is 3 or 4 layers of asphalt strip shims pushing it a little? At what point should I consider switching to say plywood strips for shims? Say 3/8" and 1/2"?An alternative is to allow 1/8" transition in floor height from old to new joists, then SLC away the difference. But I'm not commited to an SLC pour yet. Also I'm currently only clearing DWV line at its high point by 1/8", so the extra floor height might provide some peace of mind.
Edited 5/2/2005 2:16 pm ET by Taylor
Two shingle shims is acceptable, no problem. Three is pushing it, and I wouldn't do four. There will be too much squish factor.
You can use masonite strips, or plywood if you can get it in the thicknesses you want. But buying a while sheet of thin-veneer ply--the type sold to cabinet makers--just to cut up into shims strikes me as not too cost-effective. Look around the shop for some scraps of masonite or other hardboard.
Dinosaur
'Y-a-tu de la justice dans ce maudit monde?
Thanks again for the guidance. I have scraps of 3/8" and 1/2" (CDX) ply.