I am currently building a 14 x 16 storage building for myself and I have a question about the sill plates. I do all kinds of remodeling and framing, but I have not had to deal with sill plates.I was
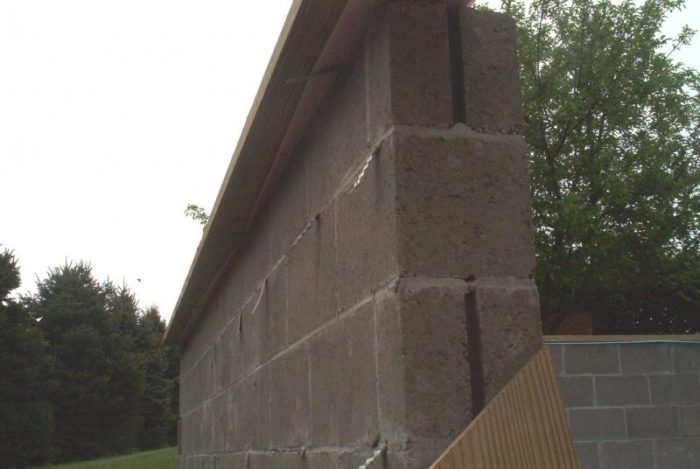
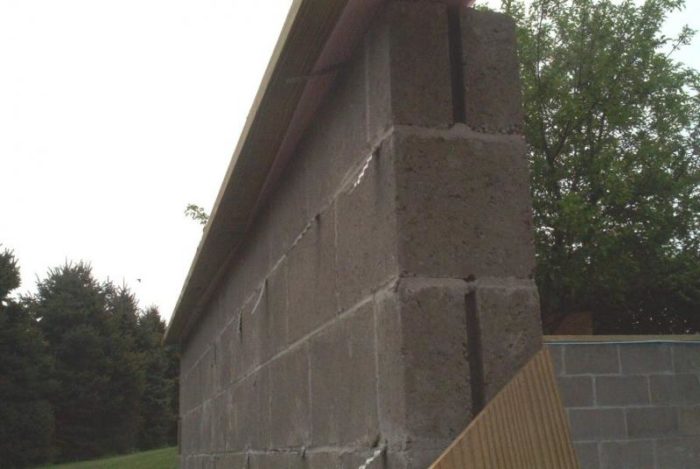
The foundation is block, 12″ and 8″ so there is a brick ledge. I put the 2×10 sill plates on with a 4″ overhang, so the framing will be flush with the brick. I had straps installed to hold the sill plate down, but the 2×10 was going to make the straps tough to use. I did fill some of the cores, so I could install 5/8″Simpson Titen anchors.
The floor will be 2×10 joists and subfloor, and 3′ knee walls and then 2×6 rafters. The framing will be on the unsupported 4″ of the sill plate. My question:
Is this the correct installation of the sills?
Dave Otto — Otto Construction — PA


Replies
Why do youi have the 2 x 10 overhanging the block so much?
Sills are normally 2 x 6 PT lumber. The PT for sill plates is a higher concentration than regular PT framing lumber.
If you deduct for that 4" overhang, you'd get (basically) a 2 x 6. I'd take those 2 x 10s off, and install 2 x 6s. And the sill is usually doubled up, 2 layers thick.
Get the sills leveled and squared, and the rest of your framing will go much easier.
I haven't ever seen double thick sill plates like you describe - must be a regional thing.I couldn't understand his 4" overhang from the text, but from the photo, it looks like he means the walls to finish flush over the exterior side of the brick surface, so it sounds like the right solution to me.
Welcome to the Taunton University of Knowledge FHB Campus at Breaktime. where ... Excellence is its own reward!
If he's running the brick up to that sill, that makes sense. I wasn't real clear from the OP's description.
Single sill? That's interesting! Pretty much all I see around here are doubles. We also rarely see trusses on residential work, and almost no poured foundations around here.
Hmm...Now I be more confused, because after writing that this AM, I got to thinking that the reason for the double would be so on an uneven poured foundation, you can bolt first plate down tight, then shim second level, but there shouldn't be much need for that type process with a laid up block wall. They tend to be more than level, right?
Welcome to the Taunton University of Knowledge FHB Campus at Breaktime. where ... Excellence is its own reward!
I thought normal practice was to bolt the mudsill down tight, tack the rim joist down and frame the floor deck, then shim the floor deck up if it needed it. The extra sill seems like a waste.
Yah, But I'd be interested in hearing why the guys who do it, do so
Welcome to the Taunton University of Knowledge FHB Campus at Breaktime. where ... Excellence is its own reward!
I'm not sure why it's done around here, now that you guys are asking about it.
Some kind of weird tradition?
You have your homework assignment for this week now!Find out.
Welcome to the Taunton University of Knowledge FHB Campus at Breaktime. where ... Excellence is its own reward!
Well, the guy who taught me to do that ( my dad) had been dead for 12 years.
So this may take a while.
Maybe Joe Carola has an answer.
Hey, Joe-
I guess this is a 2 part question.
Do you put a double sill down on foundations?
And if you do, do you know why?
If you don't, I'm gonna have to break out some of my old books.
Shep (and anyone else who's curious).... we do the double sill as well here. First is PT, second is KD. I don't really know why and have always assumed that the double sill was a 'close' match to what was used traditionally in our area for mudsills which is 4x6.
I like the double sill myself. A double sill does a good job of taking out minor imperfections (level) in our poured foundations. Additionally, I like to do my shimming between the two plates and then tighten the bolts once everything is good to go. Now that we're using ACQ I have more reason to like the double sill. I shoot the KD sill into the PT sill with galvy nails.... and then I can put them away. This way, I don't have to use galvy nails for the whole first deck framing package... just for the sill to sill connection because when I'm joisting I'm now shooting KD to KD. Once the first floor walls are sheathed I do run around one more time and shoot gavly nails around the bottom of the frame to connect the sheathing to the lowest sill... but I'd still have to do that anyway.View Image
What do you shim with? Between the dblsills that is.
Good points about nailing--galv into treated... seems like I'm always swapping nails so I usually end up using galv for everything. Waste.
Cedar shingles usually.View Image
Thanks also for your "DP does an adda level" post also.
In July my first 2nd story addt. and biggest remodel yet is such a job.
Plans call for pony walls above existing top plates so we should be able to leave the existing ceiling/joists in place. I may seek you out for direct questioning come July!
Pat
we don't do the double plates around here. It appears that double sills are all over the place
"and then tighten the bolts "So your bolts go through BOTH plates?
Welcome to the Taunton University of Knowledge FHB Campus at Breaktime. where ... Excellence is its own reward!
Yup... the bolts go through both plates.View Image
How do you shim accurately if the bottom plate isn't bolted down solidly yet? Sounds like an interesting technique.John
I can't speak for Brian, but we shim between double sills also, and leave bolts "finger tight" til it's straight as well. I generally don't start shimming til the rim is on. We pick up on the sill if there are any sags, and shim those roughly when we do it, but I find it's useless to really get the sill balls on straight without any weight on it....so we shim it all straight after the floor is framed and sheathed, so there's something of substance on it. Shimming with sill only, I find is frustrating when ya pick up here and it comes up over there too.
We use the double sill, PT over KD. We also strap our ceilings w/ 1x3 furring, and still use a double top plate too. I know that varies depending on where you go tho...
Bing
How do you tighten the bolts after the sheathing is on the floor ? Crawl it ?
They can't get your Goat if you don't tell them where it is hidden.
Uh, on a stepladder in the cellar, with an impact hammer, or if it's my kid, a ratchet. I haven't worked on a crawlspace foundation but 5 or 6 times in 25 years, ( thankfully :)
Bing
<G> , But of course.
They can't get your Goat if you don't tell them where it is hidden.
That make sense, shimming after the deck is framed since 2x10 can vary 3/8"!
Welcome to the Taunton University of Knowledge FHB Campus at Breaktime. where ... Excellence is its own reward!
John,
We actually tack the first sill down with a Hilti first. Then we add the 2nd sill and nail it at roughly 4' OC or so. Add the rim, shim where needed, and run the bolts down the rest of the way with the impact gun. Our poured foundations have been pretty decent lately though.... and they usually are unless poured in the dead of winter on a Friday at about 3pm. :) Seriously though, we don't normally have to shim much at all. If we did, I may reconsider my 'system'.... or maybe not.
On the occasional bad foundation I may start the shimmng before the rim even goes on. What I'll do is run the bolts down with the impact and set up the laser. Then I'll shim at every bolt using the laser (and audible detector as a reference). After the rim is on I'll touch it up where needed. If you're using an impact gun (we use an electric Dewalt) it's really not that big a deal to be running the nuts up and down during the process of trying to get it right.
How's that for a convoluted mess of an answer? I guess the bottom line is I take a "look" (laser) at each foundation and then decide how to proceed from there depending on what it does or doesn't need.
And regarding the Hilti on the first plate..... unless you guys are getting much better PT stock than I am (which is certainly possible), I really can't see how you keep the plate on your snap lines anyway. Even if were going with a single plate I might still shoot it down first. Even with bolts set at 4' OC, we still have to fight the nasty PT to the lines much of the time.
G'Night kids.View Image
You would think so, but I've seen plenty of block foundations that weren't level.
I don't know if masons don't know how to set up and read a transit (or level), but even the guy I had doing the block on my own house's addition was out about 1" over 18'. Not too bad, but I like closer.
And he was supposed to be a good one. At least the walls are plumb and straight.
Piffin,
That is exactly why I have the 4" overhang (a photo was worth more than all my words).
It just seemed like a lot of stress on the sill plate considering the knee wall will be on the overhanging 4".
I am glad I decided to add the bolts.
An aside: I am starting a pergola this week and, I did a little studying of one you had posted in the photo gallery I believe. Some of the pics showed a double dado detail that I think I will be using. I also liked the idea of using 3x cedar. Thanks for the info and pics. Dave Otto -- Otto Construction -- PA
Glad to help and thinks for the compliment.There won't be stress on the overhanging part, because the load will carry back on the floor joists
Welcome to the Taunton University of Knowledge FHB Campus at Breaktime. where ... Excellence is its own reward!
>>The PT for sill plates is a higher concentration than regular PT framing lumber.<<
Care to elaborate? You guys using direct ground contact .40 for sills?
>>And the sill is usually doubled up, 2 layers thick.<<
Only with bad block work or pour on this side of the river.
JimNever underestimate the value of a sharp pencil or good light.
OK, it seems like I'm in a minority with the doubled up plates. I haven't done any big framing for several years ( I concentrate on finish work now), but I'm gonna think twice about how I do it next time.
My regular yard sells 2 x 6 x 16' sill plates, #3 ACQ. They're not real pretty, but they are a higher concentration. I'm not sure what it exactly is. And they're about a buck apiece cheaper than the prettier 2 x 6 <G>. It could very well be overkill, but I guess I've been doing that with the double plates, anyway.
Lots of regional differences are hard to explain. Here we don't use Pt for our sills, just spruce with a foam sill gasket underneath. Which I guess is strange considering how wet our climate is.
In Eastern Canada I've seen a lot of sills bedded in mortar, and in Alberta they build a spruce 2x4 on edge into the top of the poured concrete walls and just nail their plate down into them.
Shep,
I intend to have the framing finish flush with the brick veneer. There will be a little siding installed, and doing this this way will let the siding cover the junction of brick to framing.Dave Otto -- Otto Construction -- PA
You are going to extend the joists and rim joist out to the edge of the 2x10 sill, right? No problem that I see, except you may want to straighten out that sill seal. Spike the sill up into the joists. You can drill a hole in the sill and pull the straps through it, then lay them down and attach to the sill. Use some anchors, too.
Beat it to fit / Paint it to match
The joists will be placed at the edge of the sills. I had a little trouble with the straps (too small a hole). That will be rectified.Dave Otto -- Otto Construction -- PA
I am not familiar with the use of brick veneers for just the foundation but I see no problem with what you are doing.
The wall load and floor load will be carried by the joists themselves so the overhanging plate is no problem. Just be sure to add blocking @24" O.C. between the rim and the first joist inside it on the walls that run parallel to the joists.
As another poster mentioned drilling holes for the ties and threading them up and through the PT then nailing them off should work just fine.
Dovetail,
I like the idea of the blocking, thanks.Dave Otto -- Otto Construction -- PA