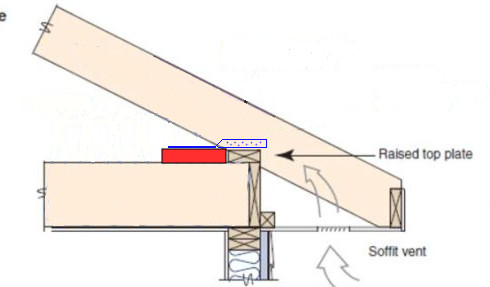
The attached picture shows how my rafters meet the wall. Rafter birdmouths on top of a raised top plate, on top of rim joist and ceiling joists, on top of the actual top plate of the exterior wall. I’m adding 2×8’s (red in figure) just inside the raised top plate and connecting the rafters to them with twist straps (blue in figure).
The roof will be insulated with unfaced batts with vent baffles. Vapor barrier (certainteed membrain) goes over the insulation, rafters, etc. Everything under the rafters is going to be interior space.
Question is, where does the vapor barrier go in the area pictured? Put a strip under the new 2×8’s and connect to it later? Seal between the 2x8s and the old raised top plate and run the vapor barrier to the inside edge of the 2×8? Certainteed recommends wrapping the barrier on the outside of the rim joist but that’s not happening. It won’t tie into a continuous envelope.


Replies
Why the new 2x8s? Are they the only framing you are installing?
Are you going to insulate and seal the inside of the rim joist?
I took a closer look and I lied: there's no rim joist at all. The raised top plate sits on the ceiling joists and what I thought was the rim joist is actually a wide 1x in line with the wall sheathing that sits on the outside of the top plate and joists. I really hope the joists are nailed to it for stability at least.
I'm filling the joist bays with mineral wool but I wasn't going to do anything special with the "rim joist." If I cut XPS to stick between the joists and foam around it, can I tie the membrane into it somehow or do I just leave the raised top plate exposed top and bottom?
The 2x8 and twist straps were recommended by a structural engineer to secure the rafters to the joists because I don't have rafter ties.
My thought was to do as you suggest, cut and foam-in-place XPS, then use some good tape (like that meant for housewrap) to seal the vapor film to the foam.
The goal is to slow down air and vapor movement from the occupied space into the insulation during the heating season. (So the vapor does not condense inside the insulation causing issues). Also saves that expensive conditioned air from escaping.
You could foam XPS into place along the perimeter of the attic floor joist space, then tape a foot or so wide strip of poly to the XPS, then install the 2x8 and strapping, and connect (or overlap) the film to the strip of poly.
another option is to extend the XPS not only on the side of the "rim joist", but under the top plate and your new 2x8. (then secure the vapor barrier on the occupied space side of the 2x8.)
On your sketch, draw a line where you will put the insulation and the vapor barrier. I would think that having the vapor barrier penetrated by the ties would present more work and challenges to seal the penetrations (compared with keeping them on the outside of the vapor barrier).
Changing the subject to structure, two things to consider:
First is either blocking or x braces between the joists to stiffen up the attic floor.
The other is to add some connections between the attic rafters and floor joists and the exterior wall. (but your engineer may have considered this connection and your environmental conditions)
I fixed the diagram so it's roughly to scale. The vapor barrier is the blue line. The black wavy lines are mineral wool fill. The XPS would be 2 in thick. The twist straps are in gray this time. The vapor barrier is going to be certainteed membrain: breaths in the summer, stops moister in the winter.
If I lay a strip under the new 2x8 attaching one side over the old raised top plate then I still have a 2-3 in strip of top plate with no vapor barrier. Is that unacceptable? Instead of attaching that strip on top of the top plate I could try to run it under by cutting slots in the plastic to go around the joists but that sounds like a colossal pain and not really feasible. Doing that or cutting XPS or vapor barrier piecemeal to go under the plate is fiddly and then I still have the joists running through the barrier.
There's always going to be some bridging through wood structure between interior and exterior space like the joists. How thick does it have to be before I don't need to put vapor barrier over it?
Re structure: There are x braces between the floor joists. What do you mean about adding connections between rafters, joists, and exterior wall? The twist straps connect rafters to joists. Do you mean something like adding brackets between joists and the top plate of the wall because there's no real rim joist?
EDIT: Just realized I can't run plastic under the new 2x8 because the engineer specified that it be glued and screwed to the joists. I could run it on top of the 2x8 and fasten the straps through it.
Your engineer suggested the ties to secure the rafters to the new 2x8, (with glue and screws to hold the 2x8 to the joists) to keep the rafters and roof from sliding down and past the walls over the years due to gravity.
Depending on where you live, keeping the roof secured to the wall during storms or earthquakes may or may not be an issue. Even if not called for, I might use some ties or metal strap to help this if the rafters are only toe-nailed in place. Just a thought while you have it open and plan to seal things up.
I do not think you will get much vapor or air movement through a solid piece of framing wood. So a good goal is to seal the edges where these members meet, since otherwise gaps will allow plenty of air to pass.
How does the following sound for an idea?
Foam in place to seal the XPS you cut to loosely fit. ( I just did this for my first floor joists as part of a basement remodel. And by the way, I found that the purchase of a pro foam gun to be worthwhile.)
While you are at this, run a short bead of the foam along each side of the joists, under the raised top plate.
When you install the new 2x8, run another bead of foam where it meets the raised top plate (or use a bead of construction adhesive. I want to think the foam would be cheaper)
You can then fasten the vapor barrier to the side of the new 2x8 and call it a day.
You want to be as complete as practical, but remember, you probably are going to put a couple hundred holes in the film as you staple it into place, so this will not be a perfect seal.
That sounds like a workable plan. Thank you. What does the short bead along the top of the joists do?
Also do all spray foam cans work with all guns? I wanted to use OSI quad window foam but it's hard to get OSI guns around here so I was looking at the great stuff one. I don't need the best one, it'll probably just clog up from disuse after I'm done with this job.
The bead of adhesive works with the screws to hold the 2x8 securely to the joists.
The bead of foam I suggested (which is probably what you are asking about) would seal the gap between the top of the joist and the raised top plate, to reduce air flow. Would probably want to include the inch and a half between the top plate and the joist, either when doing the XPS, or as part of sealing the new 2x8 to the raised top plate.
I purchased a gun from an online place,
https://www.google.com/search?q=pro+foam+gun
I got one of the AWF models and have used it off and on over the past few months with some Dow foam I ordered online, as well as several different types from the local big box home improvement store.
I think all the PRO guns and cans of foam work with each other. (they do not work with the ready-to use cans of foam)
like many useful tools, there is a bit of a learning curve and maintenance to understand.
If you get a can of the cleaner, and use it when the job is done, the gun should be happy to sit on your shelf for years.
I like the foam gun, and have used some plastic tips that reduce the bead size, and extension tubes, that extend the reach. I even cheated a bit and used some 1/4 inch tubing to let me keep the can vertical and reach some of the hard to get spots. A well-placed tie-wrap keeps extension tubes from slipping off the gun.
Thank you for the advice. I'll insulate the "rim joist" with XPS, seal between the new 2x8 and the raised top plate, and attach the smart vapor barrier to the inside edge of the 2x8.
The XPS is a vapor barrier. Tape the joints, foam the gaps, and you're good.