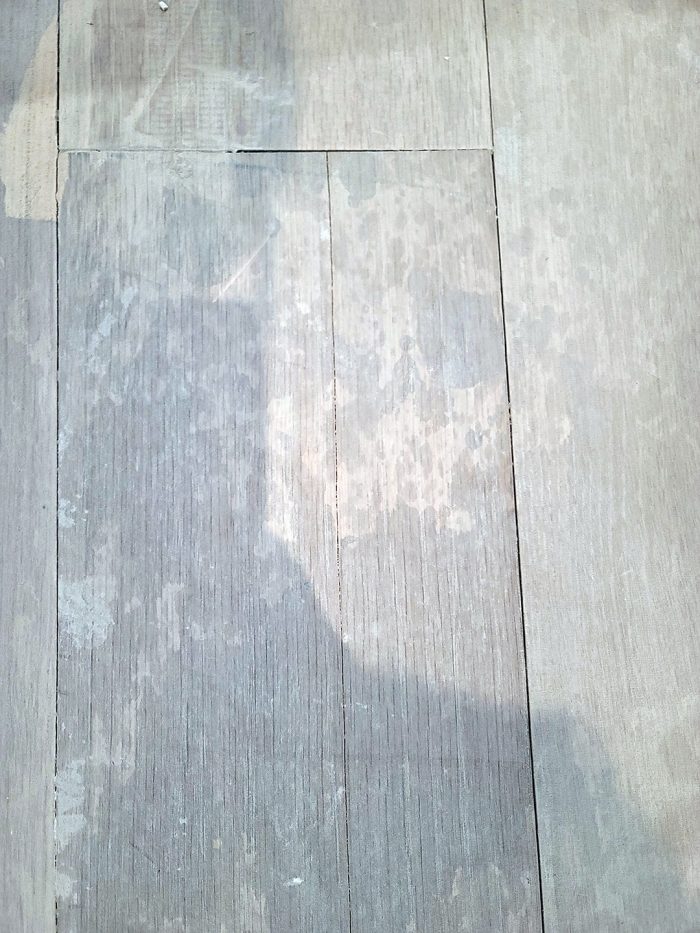
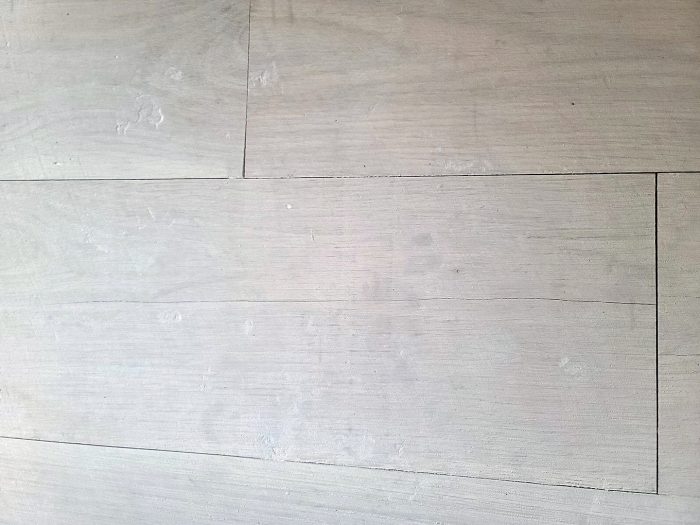
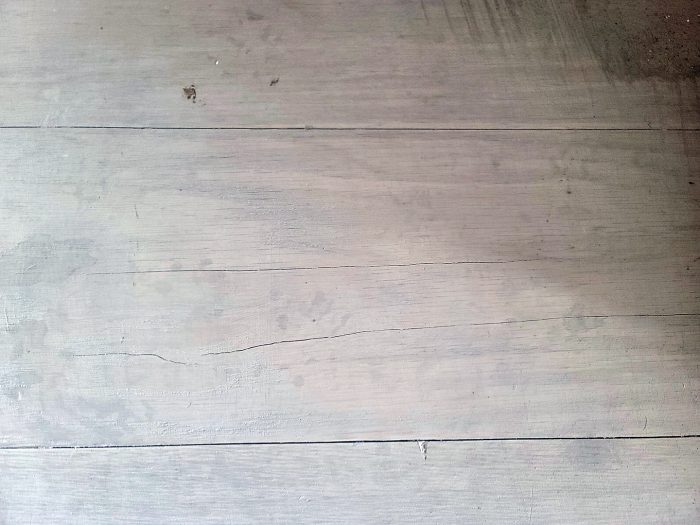
So I have a project that is being built in NYC. We decided to use put radiant heat using a tankless combi boiler and putting 1/2″ pex tubing into the floor when they poured the slab. About a year after they poured the slab and self leveled the floors we put down 7″ engineered american white oak (unfinished). The wood was onsite for about a month before it was installed. To saved on an already strained ceiling height we used an expensive 3 in 1 product that was a sound barrier , vapor barrier, and adhesive to lay the wood floor directly onto the slab. The GC and floor sub have used this product for many years on high end jobs with no issues so I agreed. In any case, the wood floor was installed unfinished probably 2 or 3 months ago with no issues. i wasnt crazy with the sub that did the concrete work as there were still some high spots even after the self leveler but whatever. about 2 weeks ago we got the HVAC working which was nice so we got the forced hot air working. we are finishing up construction and keep the thermostats at 68 degrees so the workers dont freeze. last week we got the radiant heat working on the 1st floor. we put it on for a few hours at first, gradually working up to a day, then 2 days. then the weekend. went in to the site today and was horrified to see see several of the boards on the floor had cracks on it! hair line cracks running down the middle. did i not notice this the last few days? the water temp from the boiler is set to 120 degrees. but the floor doesnt seem to get that warm because the tubes are buried about 3 inches under concrete (maybe more after self leveler). when they turned on radiant i remember complaining that floor was just warm and not hot enough to warm up the room, plumber said to give it time. anyway, as these things go, its finger pointing time and everyone is blaming everyone else. The flooring guys are blaming the plumber saying he cooked the floors , the plumber is saying the wood floor wasnt manufactured correctly. what do you guys think? i still have floors 2,3,4,5 to turn radiant heat on and now am scared to do so! all the floors are still unfinished so the gc says much of this will go away after filling, sanding and poly but i dont know. I will say i have done several projects with this plumber, floor guy and gc that involved wood floors and radiant and never had this issue before. is there something i can do to avoid this happening on the next floors in the building??


Replies
Tough to tell what the issue is, but leaving wood floors unfinished for 3 months may have something to do with it.
If its any consulation I agree with the comment that the cracks will be hard to notice once the floors are sanded and finished...
Is this a reinforced concrete structure? If so, adding radiant heat in the floor structure may have been a mistake. You have would have a huge thermal mass to heat up before it'll have any effect on room temperature.
The problem with wood is that it shrinks as its moisture content is reduce by dry air inside the building envelope. The wider the boards, the wider and/or more frequent the cracks.
Did your flooring contractor check the moisture content of the wood upon its arrival onsite? Was it checked again at the time of installation? Was it checked when the cracks were first noticed? Ideally real wood (not 'engineered') flooring needs to be brought into equilibrium with the indoor environment before installation.
As Sawdust_Steve says, once sanding & finishing is complete those cracks may blend in and not be prominent.
i hope you guys are right and it disappears! I would say they did not meter the wood at all, they just let it acclimate by leaving it on site.
I specifically asked if leaving it unfinished was an issue and they said no, but none of the other floors without the radiant heat have any cracking whatsoever yet?
Had a huge issue with the GC and the Struc engineer over the plans. My GC and subs never mentioned anything during pre planning , then once we broke ground started complaining at the amount of reinforcement the engineer called for (after one year of approving plans w the city and 100k$ spent buying the materials!). They werent wrong mind you, a 2' thick matt slab, dual#8 rebar cage is completely unheard of for a 25x60 building in this area , but the time to have brought that up was in pre planning not when the shovel was in the ground.
I think after what i am reading here and other places is the radiant just wont be super effective as a primary heat source, I am very happy i decided not to cheap out and went with hvac that also had forced hot air. My primary concern at this point tho is how to prevent or minimize cracking/crazing on floors 2 - 5. do you guys think i should run it hot and let it crack now before we sand and finish, or should we really be careful and ramp up as slowly as possible ? im worried if we do the latter that the end user of the condo will just crank up the radiant and then cracking will occur after we poly'd which would be worse i guess. thanks for your thoughts guys/gals
A question that I neglected to add: was the flooring stickered (air spaced between each layer of the bundle) as it was acclimated to the interior environment? If not, the middle layers/boards could have the same moisture content as it had just after sawing & finishing. Not good for their installation on the floor.
You've got to be careful with the term 'cracking/crazing' as it could just as easily be applied to the concrete.
I used to work with a few contractors in Brooklyn. Have no desire to repeat the experience.
Merry christmas!
Yes we did as some stick to the stack but def not every bundle.
but the floor has been installed for several months with no issues until we just turned on the radiant
Let's start with some basics. Wood shrinks as it loses moisture and swells when it picks up moisture. Standing timber or live trees are moisture saturated, and most of this moisture must be removed as the logs are converted into lumber. Shrinkage starts as wood starts losing moisture below 30% MC (MC is the ratio of moisture compared to the oven dry [0%] weight of the wood substance). There is a direct relationship between MC (moisture content) and RH (relative humidity). When a piece of wood reaches its lowest moisture content it stops shrinking. The total amount of shrinking is directly proportional with the width of a board (the axis that is perpendicular to the longitudinal axis) and the lowest MC. Bruce Hoadley's "Understanding Wood" provides an excellent description for a more complete context. You can purchase a copy from Taunton Press here https://www.tauntonstore.com/understanding-wood-2nd-edition-r-bruce-hoadley-070490 .
Wood is very strong when force is applied to compress (pushing) it, but when you apply force in tension (pulling) perpendicular to the grain direction (across the width of a board) the wood is not as strong. This tension force is created when wood shrinks. With a standard solid tongue and groove wood floor that is blind nailed along the tongue edge this shrinkage normally manifests as gapping between individual boards. This gapping occurs during the winter heating season as building interiors dry out. With blind nailed solid boards there is a single point of impingement which allows the individual boards to shrink and swell without any restraint.
The general rule of thumb with a piece of solid white oak that is plain sawn is that in the Northeastern US the wood will shrink and swell about 1% of its overall width. An 8" wide board will typically change dimension .08" or 1/12" or 2mm. If you were to prevent this theoretical 8" wide board from shrinking the resulting forces in tension perpendicular to grain will increase and when the tension force exceeds the internal strength perpendicular to grain the board will split at its weakest point.
If you have read this far you are likely mumbling to yourself. When is this dude going to get to the point? Here we go. When engineered flooring is manufactured part of the deal is to restrain the components to prevent dimensional change and changes in shape (warping). The adhesives used to hold the layers together simply don't allow any significant UNRESTRAINED dimensional change to occur. This attempt to improve on Mother Nature is incomplete unless the face veneer is dried to the lowest MC to which it will be exposed. Thus the sole method of preventing the excessive shrinkage of the exposed face of the engineered flooring is to PRESHRINK the face veneer before it is glued to the next layer.
"Engineered" wood flooring has kept my wood floor consulting business solvent for the past decade. Engineered wood flooring functions best in regions where interior RH never goes below 50%. In the Northern US this is not practical because of the way building envelopes are designed and heated. All building materials respond to the environment to which they are exposed. "Engineered" wood floor manufacturers universally void product warranties when building RH is not maintained within a specified range typically from 35% to 50%.
ty for the reply. WOuld it have been smarter to go with a 7 or 8 inch solid wood floor than for this area or that would have made the problem worse?
You never answered the question: "Is this a reinforced concrete structure?" That may make a world of difference in the quality of the responses you'll received.
What do you mean by "7 or 8 inch solid wood floor"? Are you implying wood structural floor joists with wood floor sheathing and finished wood flooring over that?
yes, mentioned b4, its reinforced w #8 rebar
From my experience, the issue at hand is acclimation of the wood. Although it was stacked onsite it was not being acclimated to the actual radiant heating itself, which is why you had an issue arise as soon as you turned on the heat. The wood dried out and therefore shrunk, cracked, etc. If the cracks are minor, I'd agree with the previous comment that it may get covered up when the wood is finished. If there was any warping in addition to the cracking the wood may need to be replaced. Ultimately it's your decision if you want to proceed as is or replace the wood.
would it be possible to acclimate to the radiant heat? eventually a homeowner would just crank it up full blast, wouldnt it crack then no matter how it was acclimated?
A. An engineered flooring product is better when the flooring is greater than 5" wide.
B. Unless you want the interior to be 120* the radiant heat should not be set so high. If the rooms are to be 70*, set radiant temperature to 70, maybe 74.
C. Radiant heat takes 3-5 days to get to temperature. It's a slow process. It's heating a lot of thermal mass. This should not be expedited by turning heat to 120*. Damage, as you have and haven't seen will occur.
D. Radiant heat gets turned ON at the beginning of the season and doesn't get turned OFF until the end of the season. Warm day mid-season - so what. Don't adjust heat. Adjustment won't take effect for 2 day and then you have to heat up the thermal mass again - 2 more days.
E. Hairline cracks in the floor are character. In time you will love them.
F. Even after finishing, a wood floor is not impervious to humidity. There will be movement year round.
Frankie
Frankie, excellent ideas. thank you
i remember asking him about the 120 degree thing, plumber said its standard. he lowered it to 110 bc i was concerned. i asked the very same question at the time, why not just set it to the temperature you want. he said when buried in concrete if u set it to 72 the surface would never get to 72. dont know if this is true or not but just relaying what he said
Not true. The thermostat sensor isn't in the concrete. So the floor will continue to heat until the ROOM reaches desire temp.
Radiant floors are not like cast iron radiators. They're a lot bigger and therefore don't need to be as hot to warm a room.
F