
Accent Lighting for Your Deck
Integrated with posts, railings, and stair risers, a new generation of exterior-light fixtures provides a wide range of deck-lighting options.
Synopsis: Deck illumination falls into three key categories: safety lighting, task lighting, and security lighting. Accent lighting for decks can serve all those functions, depending on how it is deployed. Assistant editor Justin Fink takes a look at what it takes to assemble an accent-lighting scheme for a deck, including power sources, wire connectors, bulb types, light-mounting options, and tips for lighting deck stairs. The article includes source listings for a variety of deck-lighting manufacturers.
From a purely functional point of view, a deck lighting scheme should serve a few different needs. Safety lighting lets you walk around after dark without tripping over a chaise longue. Task lighting enables you to see if the burgers on the grill are ready. Security lighting casts off the inky blackness on the other side of a sliding-glass door. But unless you plan to be interrogating intruders in your backyard, installing one or two wall-mounted floodlights to serve all these needs isn’t the classiest solution.
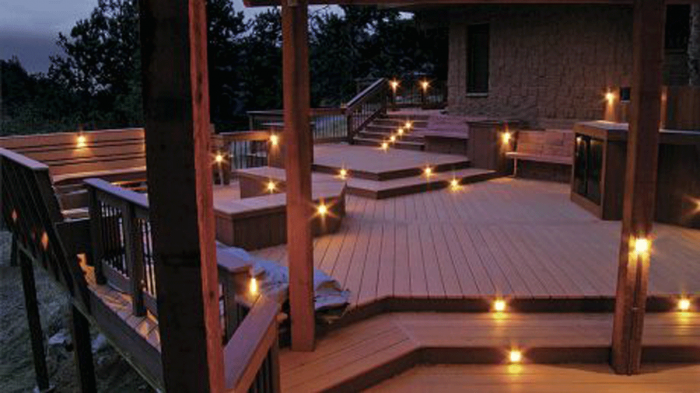
Accent lighting can help to answer safety, task, and security requirements, but its primary purpose is aesthetic. Rather than flooding deck areas with simulated sunlight, accent lighting integrates with posts, railings, stair risers, and other deck elements to create an inviting after-dark atmosphere. By taking advantage of the variety of accent lights available, you can create a lightscape that establishes edges, defines areas or elevations, and even highlights pathways or destinations.
Power sources: low, line, or solar?
The type of power source that you choose is dictated by lots of different factors, and each factor has upsides and downsides. Low-voltage lights are the most common type of accent lights. They are a safer alternative to line voltage, posing almost no threat of shock. Electrical connections are simpler, and you don’t need an electrical license or permit to install them. The downsides to low-voltage lighting are that they require a transformer and that unless the fixtures are divided into more than one run of wiring, they share the same 12v of power, which can lead to dim lights.
The installation of line-voltage fixtures is enforced more strictly. All connections must be made in an approved electrical box, and cables run in the open must be enclosed in proper conduit, such as schedule 80 PVC pipe. Also, if you’re a builder, most areas won’t allow you to install line-voltage deck lighting unless you have an electrical license.
 |
 |
| Low-voltage lights use a transformer to convert 120v line power to safer 12v. | Solar-powered deck lights rely completely on sunlight. No additional power source or wiring is required. |
Solar-powered deck lights require no electrical connections, timers, or light switches. You don’t need to drill routing holes, run wires, or make connections. But you do need steady exposure to sunlight, typically six hours a day, according to manufacturers. Each solar light has a photo cell that charges a set of NiCd batteries during the day, then uses the batteries to power the light after dark. This reliance on sun typically limits deck applications to post-cap fixtures, but recessed solar fixtures are available as well. Unfortunately, the amount of energy collected is also limited by the size of the photovoltaic panel (which is typically small on a deck fixture) and is dependent on the location of the fixture. Also, the NiCd batteries will eventually need to be replaced, which is generally as simple as changing the batteries in your television remote.
Low-voltage wire connectors: disk, snap, barrel, or wire nuts?
 Many deck-lighting packages rely on quick-connect fittings to tie each fixture to the main supply cable that runs from the transformer. Designs differ, but most quick connectors, like the Quic-Disc (photo top right) are designed to pierce the sheathing of the supply cable with two sharp prongs to create a connection. According to Gerry DeLaVega, president of TerraDek Lighting (www.terradek.com), “Disk connectors can allow water to get into the system, and are susceptible to loosening up over time.” Silicone-filled snap connectors are a better choice for weather resistance, and their small size and ability to join wires without stripping off the sheathing are both big bonuses. You just slide the wires into the holes of the connector, and snap down on the tab with a pair of pliers. Trouble is, they are compatible only with solid wires, and stranded cable is used for many deck-lighting applications.
If you’re wary of all quick-connect systems, wire nuts are still a great choice, as long as they are weather resistant. The trouble with wire nuts is that they create what DeLaVega calls “bunny ears,” which sometimes don’t stay hidden when you’re trying to run wire under a railing. For these situations, consider barrel connectors. These connectors allow two wires to be joined together, end to end, and then covered with a weather-resistant heat-shrink tube. They lie flatter than wire nuts or quick connectors and are great for spots where hidden connections are necessary.
Tips for lighting deck stairs

Lighting exterior stairs is a delicate process, so don’t install fixtures willy-nilly and hope for the best. In some ways, stairs with poor lighting can be more dangerous than stairs with no lighting at all. As a rule, you want to avoid creating shadows that can lead to uncertain footing, but you also don’t want to flood the area with light and blind someone climbing the stairs. Remember that light-colored stair materials, or treads and risers built from contrasting materials, require less illumination than dark stair materials. Also, unless beams of light overlap, avoid positioning fixtures on alternating sides of a staircase.

A. When mounting light fixtures on stair risers, select recessed fixtures to avoid trip hazards. Shaded or louvered fixtures direct light down rather than straight out and won’t distract people ascending the stairs.
B. When mounting light fixtures on stair stringers or near the bottom of stair railings, consider their height and placement in relation to the treads. If space allows, raising the fixture casts light over a wider area.
Bulb types: incandescent or LED?
The world of exterior accent lighting is dominated by incandescent bulbs and LEDs. Incandescent technology is well-established, and the bulbs are widely available in several different shapes and wattages for only a few bucks apiece, making replacement quick and easy. They cast a softer, warmer light (photo left) than LEDs, but are inefficient because 95% of the energy they consume is emitted as heat. Also, incandescent bulbs have a relatively short life span of 1000 to 2000 hours of use. LEDs (below) are more expensive because you are paying not just for the bulb, but also for the housing and circuitry that go with it. Their life span is longer—from 10,000 to 100,000 hours of use, depending on the quality of the unit—and LEDs produce little heat. Also, rather than burning out like ordinary bulbs, LEDs dim slowly over time. The trade-off is that unless mirrors or reflective surfaces are used, the light output is focused narrowly in only one direction and can be harsh on the eyes in contrast with a dark backyard.
 |
 |
| Obscure the bulb. According to John Davis, owner of Highpoint Deck Lighting, “No matter which type of light you choose, it should always be shaded by a louver or softened by frosted, swirled, or coated glass. You should never see the bulb.” | A versatile LED cap. De-Kor post caps use LEDs rather than incandescents, and they are sold in five different configurations, so you can choose how many sides of the cap will cast light. |
 From Fine Homebuilding #189 From Fine Homebuilding #189
For more photos and details on deck lighting, click the View PDF button below. |
Fine Homebuilding Recommended Products
Fine Homebuilding receives a commission for items purchased through links on this site, including Amazon Associates and other affiliate advertising programs.
Get Your House Right: Architectural Elements to Use & Avoid
Drill Driver/Impact Driver
Graphic Guide to Frame Construction
