FHB Logo Facebook LinkedIn Email Pinterest Twitter Instagram Plus Icon Close Icon Navigation Search Icon Arrow Down Icon Video Guide Icon Article Guide Icon Modal Close Icon Guide Search Icon Skip to content
Main Menu
Subscribe

In every issue you'll find...

  • Expert insights on techniques and principles
  • Unbiased tool reviews
  • Step-by-step details to master the job
  • Field-tested advice and know-how
Subscribe Now!
Subscribe
  • How-To
  • Design
  • Tools & Materials
  • Videos
  • Blogs
  • Forum
  • Magazine
  • Members
  • FHB House
  • Podcast
  • Join
  • Log In
Main Menu Subscribe

Fine Homebuilding Project Guides

Drywall

Guide Home
Chapter
  • Drywall Basics
  • Tools and Materials
  • Hanging Drywall
  • Taping and Sanding
  • Special Installations
  • Drywall Repairs
  • Plaster
How-To

Back-Blocking Butted Drywall Seams

Use this technique to minimize ridging between butted joints.

By Myron R. Ferguson
Article Image

Throughout this drywall guide, I have stressed the importance of trying to avoid butted seams between the untapered ends of panels. If, however, you have to have butted joints, make sure to keep them away from the center of the wall or ceiling and take time to feather the taped joints carefully. No matter how careful a job you do, however, the joints may still be visible after the room is painted. I’m embarrassed to say that I found this out when I returned to a job to take some photos for an article. What had looked like a perfect job on the day I finished had developed slight ridges at the center of the butted joints. The deformation, known in the trade as “ridging,” was visible only in certain lighting, but it was enough to bother me.

Ridging

Building materials expand and contract as the temperature and humidity inside a building change. As the building materials move, tension builds up against the drywall panels. The tension is relieved as the panels bend outward, usually at a joint.

Ridging can occur in regular tapered-edge seams, but it is much more common in butted end joints. After the ridging has stopped, typically in six months to a year, the ridged joint can be blended into the surrounding area by applying joint compound to both sides of the ridge and feathering it into the panel surface. There is, however, a way to minimize ridging in the first place: by back-blocking the butted seam.


WORK SMART: If ridging occurs on a finished wall, wait six months before refinishing the area. After six months, the area should have moved as much as it is going to move.
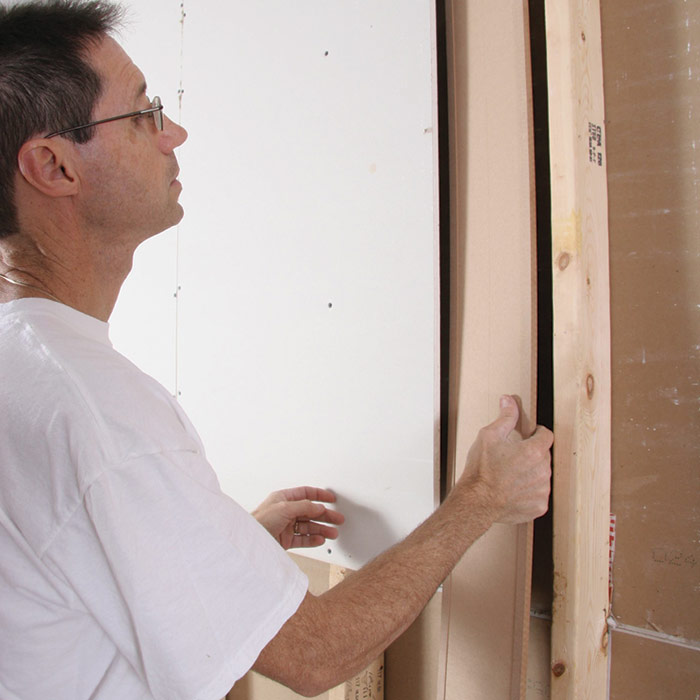
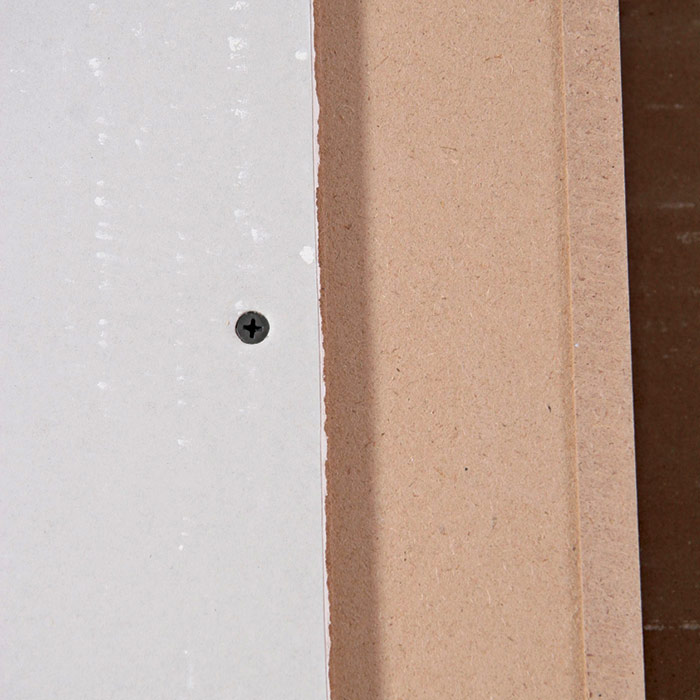
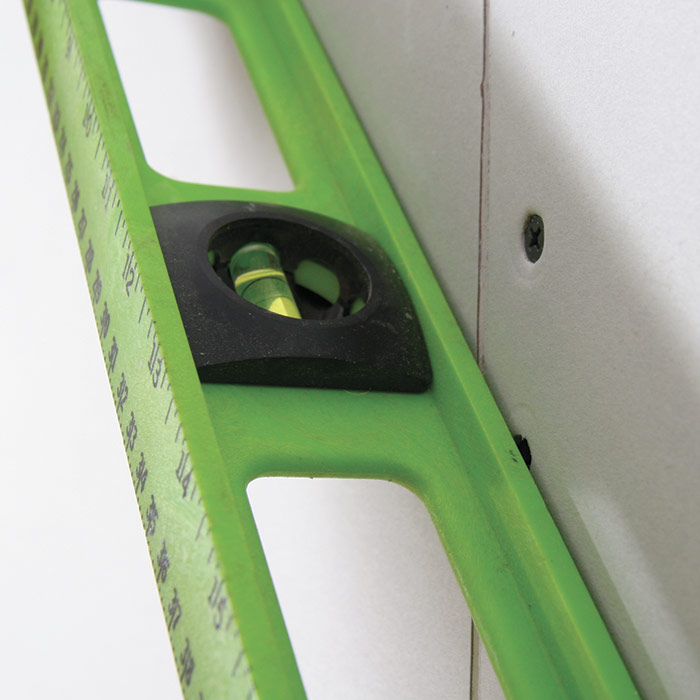
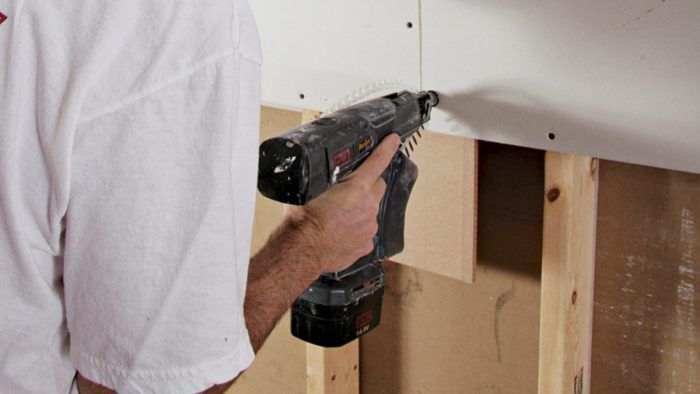
 

Back-blocking

Back-blocking is designed to minimize ridging by placing butt joints between framing members. The drywall is hung perpendicular to the framing members, so that the butt ends can be reinforced along the back of each panel, behind the joint. The panel seams can be reinforced by installing a drywall panel behind the seam (see the drawing below). But commercial products designed for back-blocking are much easier to use. For more on this process, see “Back-Blocking the Easy Way.”


The Benefits of Back-blocking

  • Finishes butt seams flat and smooth, simplifying the installation of counters, trim, and cabinets.
  • Produces finished seams that are the same width as beveled-edge seams.
  • Takes less time and materials to finish them than typical butted seams.
  • Allows the joint to float between the framing, virtually eliminating cracking and ridging.
  • Eliminates callbacks.


Back-Block with Drywall


Back-blocking the Easy Way

When butted seams on nontapered ends are inevitable, position them between framing and use a back-blocking device to recess the joint automatically.

Attach the back-blocking
Attach the back-blocking: After installing the first panel so that it ends between the studs, attach a back-blocking device (in this case, a product called RockSplicer; available from www.wilcotools.com) behind the seam you’re creating.

Seams recess automatically
Seams recess automatically: Here you can see the screw is set back from the edge to reduce damage to the drywall core. The raised edge of the RockSplicer helps recess the seam.

Attach the second panel
Attach the second panel: The butted edge of the second panel is screwed through the drywall into the back-blocker. And because it falls between framing members, it’s unlikely to crack or ridge.

A durable seam
A durable seam: The design of the back-blocker pulls the seam in, creating a recess and making it easier to conceal at the taping and finishing stage.


Sign up for eletters today and get the latest how-to from Fine Homebuilding, plus special offers.

Sign Up
X
X
Previous: Drywall Bending Form Next: Multilayer Drywall Applications

Guide

Drywall

Chapter

Special Installations

Log in or create an account to post a comment.

Sign up Log in

Become a member and get full access to FineHomebuilding.com

Drywall

Drywall

Trusted, comprehensive guidance for choosing, hanging, taping, sanding, and repairing drywall—the right way

View Project Guide

View All Project Guides »

Become a member and get unlimited site access, including the Drywall Project Guide.

Start Free Trial

Drywall Basics
  • Types and Uses of Drywall
  • Planning the Job
Tools and Materials
  • Hanging Tools
  • Taping Tools and Materials
  • Sanding and Finishing Tools and Materials
Hanging Drywall
  • Prep for Hanging
  • Measuring and Cutting Drywall
  • Guidelines for Hanging and Fastening Drywall
  • Hanging Ceilings
  • Hanging Walls
  • Hanging Airtight Drywall
  • Trim Accessories/Corner Beads
Taping and Sanding
  • Taping Basics
  • Taping Seams
  • Taping Inside and Outside Corners
  • Sanding
Special Installations
  • Tricky Transitions
  • Curved Surfaces
  • Other Special Installations
  • Decorating with Drywall
Drywall Repairs
  • Patching Holes, Cracks, and More
Plaster
  • Working with Lime Plaster
  • Plaster Repair
  • Classic Plaster Techniques

Fine Homebuilding

Follow

Newsletter

Get home building tips, offers, and expert advice in your inbox

Sign Up See all newsletters

Membership & Magazine

  • Online Archive
  • Start Free Trial
  • Magazine Subscription
  • Magazine Renewal
  • Gift a Subscription
  • Customer Support
  • Manage Preferences

Taunton Network

  • Green Building Advisor
  • Fine Woodworking
  • Fine Gardening
  • Threads
  • About
  • Contact
  • Advertise
  • Privacy Policy
  • Careers
  • Copyright
  • Terms of Use
  • Accessibility
  • CA Privacy Rights

© 2021 The Taunton Press, Inc. All rights reserved.

    Main Menu

  • How-To
  • Design
  • Tools & Materials
  • Video
  • Blogs
  • Forum
  • Reader Projects
  • Magazine
  • Members
  • FHB House
  • Podcasts

  • FHB Podcast
  • ProTalk
  • Account

  • Log In
  • Join

    Podcasts

  • FHB Podcast
  • ProTalk
  • Popular Topics

  • Kitchens
  • Business
  • Bedrooms
  • Roofs
  • Architecture and Design
  • Green Building
  • Decks
  • Framing
  • Safety
  • Remodeling
  • Bathrooms
  • Windows
  • Tilework
  • Ceilings
  • HVAC

    Magazine

  • Current Issue
  • Past Issues
  • Magazine Index
  • Subscribe
  • Online Archive
  • Author Guidelines

    All Access

  • Member Home
  • Start Free Trial
  • Gift Membership

    Shop the Store

  • Books
  • DVDs
  • Taunton Workshops

    More

  • FHB Ambassadors
  • Reader Projects
  • Podcast
  • Customer Support

    Account

  • Log In
  • Join

Newsletter

Get home building tips, offers, and expert advice in your inbox

Sign Up See all newsletters

Follow

Join All Access

Become a member and get instant access to thousands of videos, how-tos, tool reviews, and design features.

Start Your Free Trial

Subscribe

FHB Magazine

Start your subscription today and save up to 52%

Subscribe

We hope you’ve enjoyed your free articles. To keep reading, become a member today.

Get complete site access to expert advice, how-to videos, Code Check, and more, plus the print magazine.

Start your FREE trial

Already a member? Log in