FHB Logo Facebook LinkedIn Email Pinterest Twitter Instagram Plus Icon Close Icon Navigation Search Icon Arrow Down Icon Video Guide Icon Article Guide Icon Modal Close Icon Guide Search Icon Skip to content
Main Menu
Subscribe

In every issue you'll find...

  • Expert insights on techniques and principles
  • Unbiased tool reviews
  • Step-by-step details to master the job
  • Field-tested advice and know-how
Subscribe Now!
Subscribe
  • How-To
  • Design
  • Tools & Materials
  • Videos
  • Blogs
  • Forum
  • Magazine
  • Members
  • FHB House
  • Podcast
  • Join
  • Log In
Main Menu Subscribe

Fine Homebuilding Project Guides

Drywall

Guide Home
Chapter
  • Drywall Basics
  • Tools and Materials
  • Hanging Drywall
  • Taping and Sanding
  • Special Installations
  • Drywall Repairs
  • Plaster
How-To

Curved Walls and Barrel Ceilings

Depending on the radius of the curve, drywall can be applied wet or dry.

By Myron R. Ferguson
Article Image
Convex or concave surfaces: 1/4-in. drywall is flexible enough to bend around both concave and convex surfaces.

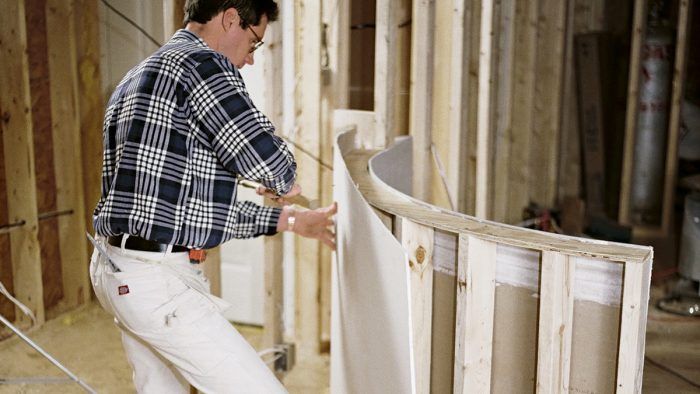
Drywall can be formed to fit almost any curved surface, whether convex or concave. The first curved surface I ever tried to drywall was a convex wall with a very short radius. At that time, the only advice I’d been given was to wet a regular 1/2-in. drywall panel and allow it to sit for a while before hanging it. Given my lack of experience, it’s not surprising that I didn’t have much luck with this job. I ended up having to cut the drywall, which I had wet on both sides, into narrow strips in order to get it to bend around the studs. After the narrow strips dried, I had to tape each seam and then skim-coat the entire surface.

Looking back, I realize what I did wrong. First, the wall was much too tightly curved to bend a 1/2-in. drywall panel around it. Second, I should not have wet both sides of the panel. Third, the studs were spaced too far apart for such a tight curve. If you are planning to attach drywall to a curved surface, here are a few important points to bear in mind:

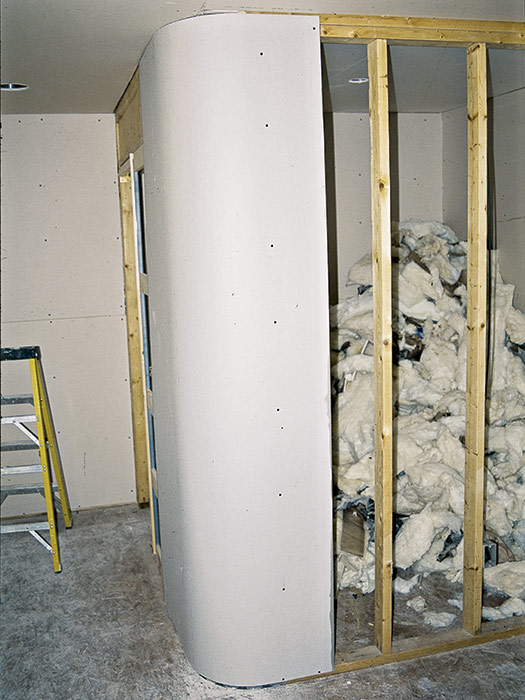
  • To avoid creating flat areas between studs, the framing should be closer together on curved walls than on straight walls. Maximum stud spacing is 9 in. o.c. for most curves; for really short radii, a maximum of 6 in. o.c. is recommended (see the chart below). Hopefully, the builder has not built an inside curve that has a radius less than 20 in. or an outside curve with one less than 15 in. Hanging these radii would be very difficult even with wet 1/4-in. flexible drywall.

Bending Drywall


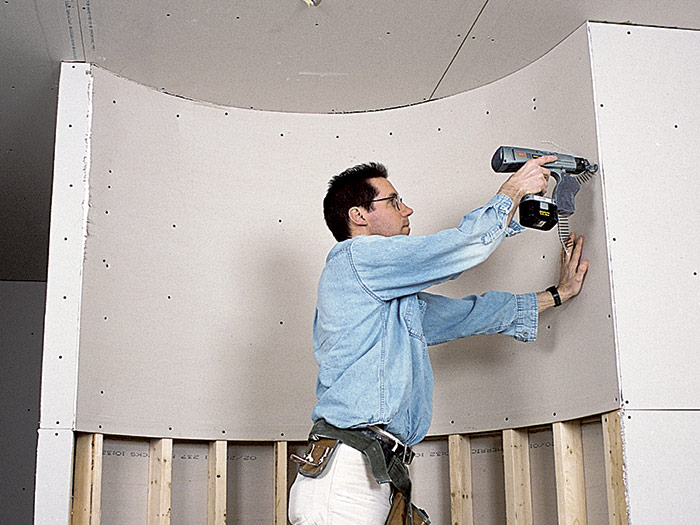
  • Use 1/4-in. flexible drywall on short-radius curves for both inside (concave) and outside (convex) curves. The drywall can be attached either parallel or perpendicular to the framing. Place the screws a maximum of 12 in. o.c. Two layers of 1/4-in. drywall are usually necessary for strength and to blend in with the 1/2-in. drywall used on straight sections of the wall. Apply one layer at a time, staggering the joints. If possible, avoid end joints butted on the curved surface of the wall.


Bend it slowly
Bend it slowly: When fastening drywall to a concave surface, gently and slowing push it into place. Begin fastening at the center and work toward each edge. For tighter bends, you may have to fasten starting at the edge to prevent cracking.

tight curve, drywall can be positioned either horizontally
Two ways to hang: When attached to a tight curve, drywall can be positioned either horizontally.

curved drywall positioned vertically
Two ways to hang: Or vertically. I prefer vertically.
Use two thin layers
Use two thin layers: When attaching drywall to a barrel ceiling, stagger the joints between layers. Here, multiple layers of 1/4-in. drywall are being attached with the curve to avoid butted seams.


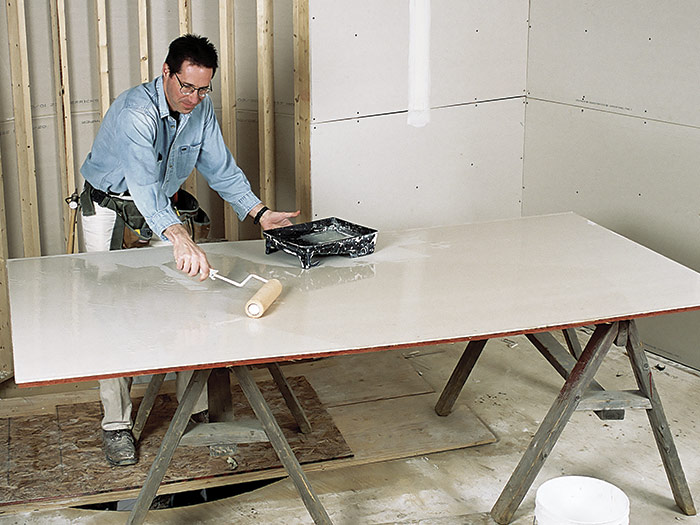
  • For curves with a tight radius (less than 32 in.), dampen the drywall so it can conform to the tight curve without breaking. Using a garden sprayer, a sponge, or a paint roller, apply water to the side that will be compressed around the curve (i.e., the back of the panel on convex curves). For a 1/4-in., 4×8 panel, use about 30 oz. of water (35 oz. for a 3/8-in. panel, 45 oz. for a 1/2-in. panel). Stack the panels with the wet surfaces facing each other and let them sit for at least one hour before you attach them. Covering the panels with plastic prevents the edges from drying out. When the panels dry, they will return to their original hardness.


WORK SMART: Drywall is more flexible along its length. However, it’s a good idea to hang it perpendicular to the framing, because it is easier to conceal the joints when taping with the curve.


Moisture helps it bend
Moisture helps it bend: For tight curves, dampen the side of the panel that will be compressed.


Sandwich the panels
Sandwich the panels: Place the wet sides of two drywall panels together and let them sit for about an hour before attaching them. Tightly covering the assembly with plastic prevents the edges from drying out.


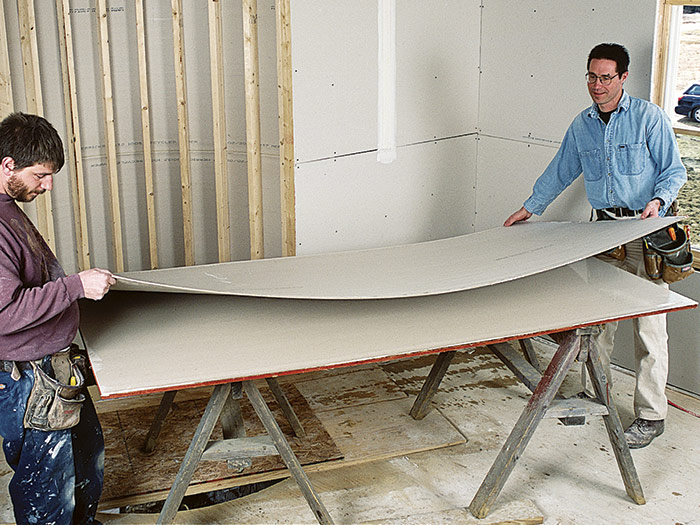
  • When attaching drywall to the outside of a curved wall, start at one end of the curve and fasten it to the studs as it forms around the bend. When drywalling the inside of a curved wall I was always told to start by attaching the panel at the center of the curve, but sometimes this will cause the panel to crack. I have had better luck working it over from an edge.
  • If the drywall is wet, allow enough time for it to dry thoroughly before taping.
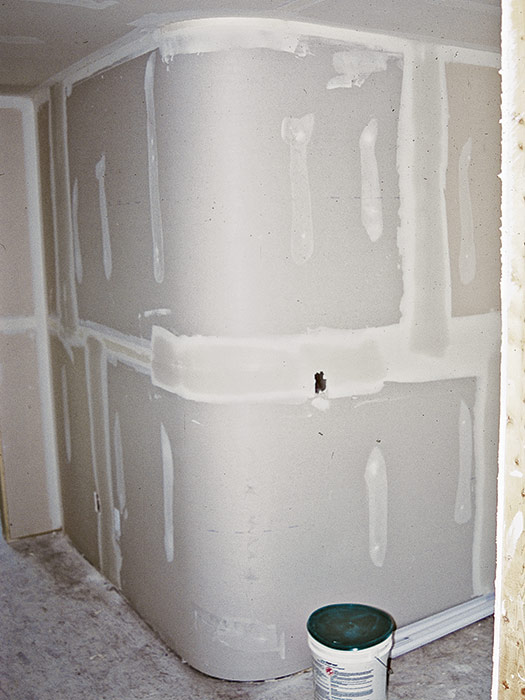
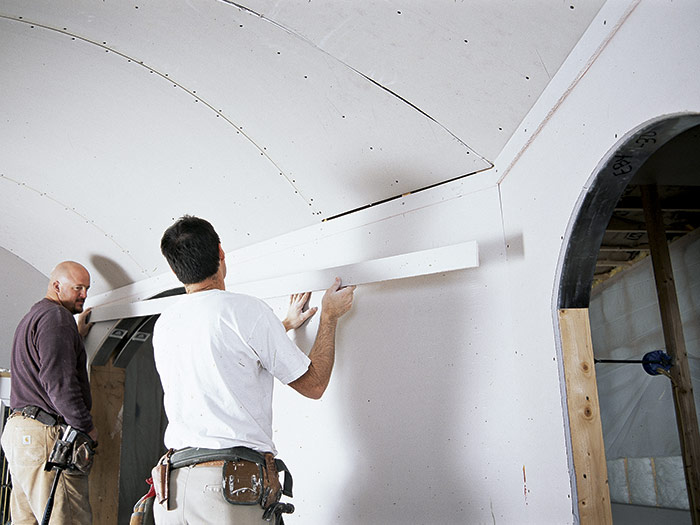
  • When taping a curved wall you may want to finish to a level 5, because it is a very visible area.


WORK SMART: Even if the radius of a curve is large enough to apply flexible drywall without wetting it, pre-bow the panels for easier installation.


A clean finish
A clean finish: The very visible upper portion of this curved wall was skim coated (given a level 5 finish).


Ease the transition
Ease the transition: To create a transition between the bottom of the barrel ceiling and the walls, the author attached an additional 3-in.-wide layer of drywall at the top of the wall.


Sign up for eletters today and get the latest how-to from Fine Homebuilding, plus special offers.

Sign Up
X
X
Previous: Create Sleek Drywall Transitions With Reglet Trim Next: Drywalling an Archway

Guide

Drywall

Chapter

Special Installations

View Comments

  1. user-132171 | Jun 29, 2020 01:49pm | #1

    Can't wet it no more....it develops mold

Log in or create an account to post a comment.

Sign up Log in

Become a member and get full access to FineHomebuilding.com

Drywall

Drywall

Trusted, comprehensive guidance for choosing, hanging, taping, sanding, and repairing drywall—the right way

View Project Guide

View All Project Guides »

Become a member and get unlimited site access, including the Drywall Project Guide.

Start Free Trial

Drywall Basics
  • Types and Uses of Drywall
  • Planning the Job
Tools and Materials
  • Hanging Tools
  • Taping Tools and Materials
  • Sanding and Finishing Tools and Materials
Hanging Drywall
  • Prep for Hanging
  • Measuring and Cutting Drywall
  • Guidelines for Hanging and Fastening Drywall
  • Hanging Ceilings
  • Hanging Walls
  • Hanging Airtight Drywall
  • Trim Accessories/Corner Beads
Taping and Sanding
  • Taping Basics
  • Taping Seams
  • Taping Inside and Outside Corners
  • Sanding
Special Installations
  • Tricky Transitions
  • Curved Surfaces
  • Other Special Installations
  • Decorating with Drywall
Drywall Repairs
  • Patching Holes, Cracks, and More
Plaster
  • Working with Lime Plaster
  • Plaster Repair
  • Classic Plaster Techniques

Fine Homebuilding

Follow

Newsletter

Get home building tips, offers, and expert advice in your inbox

Sign Up See all newsletters

Membership & Magazine

  • Online Archive
  • Start Free Trial
  • Magazine Subscription
  • Magazine Renewal
  • Gift a Subscription
  • Customer Support
  • Manage Preferences

Taunton Network

  • Green Building Advisor
  • Fine Woodworking
  • Fine Gardening
  • Threads
  • About
  • Contact
  • Advertise
  • Privacy Policy
  • Careers
  • Copyright
  • Terms of Use
  • Accessibility
  • CA Privacy Rights

© 2021 The Taunton Press, Inc. All rights reserved.

    Main Menu

  • How-To
  • Design
  • Tools & Materials
  • Video
  • Blogs
  • Forum
  • Reader Projects
  • Magazine
  • Members
  • FHB House
  • Podcasts

  • FHB Podcast
  • ProTalk
  • Account

  • Log In
  • Join

    Podcasts

  • FHB Podcast
  • ProTalk
  • Popular Topics

  • Kitchens
  • Business
  • Bedrooms
  • Roofs
  • Architecture and Design
  • Green Building
  • Decks
  • Framing
  • Safety
  • Remodeling
  • Bathrooms
  • Windows
  • Tilework
  • Ceilings
  • HVAC

    Magazine

  • Current Issue
  • Past Issues
  • Magazine Index
  • Subscribe
  • Online Archive
  • Author Guidelines

    All Access

  • Member Home
  • Start Free Trial
  • Gift Membership

    Shop the Store

  • Books
  • DVDs
  • Taunton Workshops

    More

  • FHB Ambassadors
  • Reader Projects
  • Podcast
  • Customer Support

    Account

  • Log In
  • Join

Newsletter

Get home building tips, offers, and expert advice in your inbox

Sign Up See all newsletters

Follow

Join All Access

Become a member and get instant access to thousands of videos, how-tos, tool reviews, and design features.

Start Your Free Trial

Subscribe

FHB Magazine

Start your subscription today and save up to 52%

Subscribe

We hope you’ve enjoyed your free articles. To keep reading, become a member today.

Get complete site access to expert advice, how-to videos, Code Check, and more, plus the print magazine.

Start your FREE trial

Already a member? Log in