FHB Logo Facebook LinkedIn Email Pinterest Twitter Instagram Plus Icon Close Icon Navigation Search Icon Navigation Search Icon Arrow Down Icon Video Guide Icon Article Guide Icon Modal Close Icon Guide Search Icon Skip to content
Subscribe
SUBSCRIBE TODAY

Save up to

70% off

the cover price

In-depth articles, up-close photography, and detailed illustrations in every issue.

Subscribe Now!
Subscribe
  • How-To
  • Design
  • Tools & Materials
  • Videos
  • Blogs
  • Forum
  • Magazine
  • Members
  • FHB House
  • Podcast
  • Join
  • Log In
Subscribe

Fine Homebuilding Project Guides

Framing

Guide Home
Chapter
  • Introduction to Framing
  • Framing Tools, Techniques, and Materials
  • Framing Floors
  • Framing Walls
  • Framing Stairs
  • Framing Roofs
  • Efficient Framing Methods
  • Timber Framing
How-To

Bay-Window-Roof: Final Installation

Once the bay window is in place, it's time to secure, insulate, and sheathe the roof unit.

By Rick Arnold

To prep the rough opening, the first thing we wanted to do was make sure the sill was straight and flat. The other thing was to put flashing tape around the bottom and the sides as well. We took the sash out of the window to make it lighter and easier to carry. If you spend a little extra time on the staging, the job goes easier. The goal was to get a couple of tiers here: one low so that we can step the window up, with the final top tier being even with the rough opening. Once the bay window is up on the top tier of the staging, we can slide it right into the rough opening without a problem. Because the top plank is going to bend a little bit with the weight, we have a couple of shims handy that we can shove right under there. Screws are temporary until we can get the sash back in place. Once the sash is in place, we level and plumb it, and put the permanent fasteners in place all the way around the inside.

All Videos in This Series


Introduction

Frame the Base

Build the Wall Cleat

Cut and Fit Rafters

Install Sheathing

Final Installation


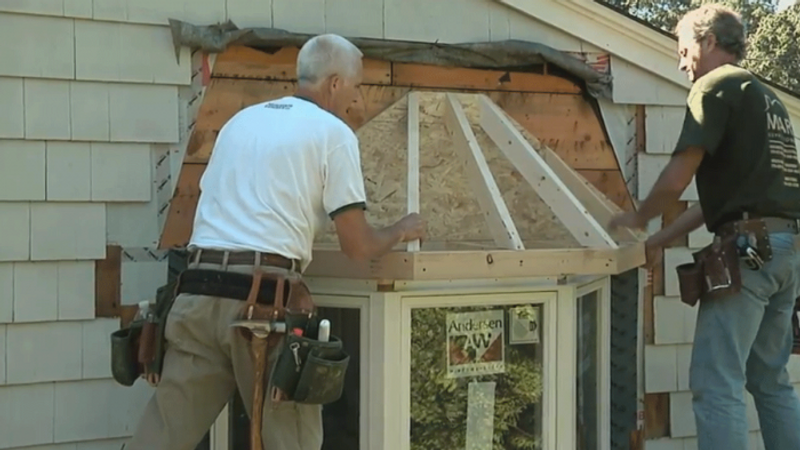
The insulation is very important-and it’s very easy. Before we put the roof assembly down, we put 1 inch of rigid insulation. It acts as a good insulating barrier and thermal break. Just before we put the roof unit in place, it’s critical to get the housewrap up and out of the roof area. The last thing we want is housewrap behind the roof we’re putting on. We’re measuring straight in-4½.

Now that we have the window in place, it’s plumb, level, and square. Long ago, to keep it from sagging, we used to put giant brackets underneath to hold it in place. Instead of doing that, we now use a manufacturer’s cable support system. The way it works is I’m going to feed this down through the top, and it’s going to fasten underneath, at the bottom, at both outside points. The cables come up, and we’re going to securely fasten them to the walls. This will keep the front end of the window from sagging over time. Now that the cable is in nice and tight, the next step is to insulate.

We tape the seams on the roof using a zip roof system. The nice thing about the system is that you don’t need any underlayment. All you have to do is tape the seams all the way around, and once you do that, the thing is completely dried in.

Now that we’re dried in for the night, we’ll come back tomorrow morning to finish.

The outside is finished. A little trimwork on the inside, and I’m done.

Sign up for eletters today and get the latest how-to from Fine Homebuilding, plus special offers.

Sign Up
Previous: Bay-Window Roof: How to Install Sheathing

Guide

Framing

Chapter

Framing Roofs

View Comments

  1. user-7105663 | Jul 01, 2018 11:45am | #1

    Thanks. This is a really nice and easy way to do this.
    It came out great.

  2. user-7105663 | Jul 18, 2019 06:57pm | #2

    Thanks for this no nonsense tutorial. I installed a 30 degree bay and did the roof like this and it came out awesome. :)

Log in or create an account to post a comment.

Sign up Log in

Become a member and get full access to FineHomebuilding.com

Framing

Framing

Trusted, in-depth guidance from the pros for framing a durable, code-compliant house

View Project Guide

View All Project Guides »

Become a member and get unlimited site access, including the Framing Project Guide.

Start Free Trial

Introduction to Framing
  • House Framing Concepts, Tips, and More
Framing Tools, Techniques, and Materials
  • Tools
  • Techniques
  • Framing Lumber
  • Steel
Framing Floors
  • Floor Framing
  • Engineered Floors
  • Floor Sheathing
Framing Walls
  • Wall Framing Basics
  • Layout
  • Wall Assembly
  • Raising and Straightening Walls
  • Framing Rough Openings
  • Blocking
Framing Stairs
  • Stair Layout
  • Building Stairs
Framing Roofs
  • Roof-Framing Basics
  • Roof Design
  • Laying Out and Cutting Rafters
  • Framing Valleys
  • Working with Trusses
  • Dormers
  • Special Situations
Efficient Framing Methods
  • Advanced Framing
  • Double-Stud Walls
Timber Framing
  • Timber-Frame Construction
  • Timber-Frame Design

Fine Homebuilding

Follow

  • twitter
  • facebook
  • instagram
  • pinterest

Newsletter

Get home building tips, offers, and expert advice in your inbox

Sign Up
This site is protected by reCAPTCHA and the Google Privacy Policy and Terms of Service apply.
See all newsletters

Membership & Magazine

  • Online Archive
  • Start Free Trial
  • Magazine Subscription
  • Magazine Renewal
  • Gift a Subscription
  • Customer Support
  • Privacy Preferences

Taunton Network

  • Green Building Advisor
  • Fine Woodworking
  • Fine Gardening
  • Threads
  • About
  • Contact
  • Advertise
  • Careers
  • Copyright
  • Terms of Use
  • Site Map
  • Do not sell my information
  • Privacy Policy
  • Accessibility
  • California Privacy Rights

© 2022 The Taunton Press, Inc. All rights reserved.

X
X
This is a dialog window which overlays the main content of the page. The modal window is a 'site map' of the most critical areas of the site. Pressing the Escape (ESC) button will close the modal and bring you back to where you were on the page.

Main Menu

  • How-To
  • Design
  • Tools & Materials
  • Video
  • Blogs
  • Forum
  • Reader Projects
  • Magazine
  • Members
  • FHB House

Podcasts

  • FHB Podcast
  • ProTalk

Webinars

  • Upcoming and On-Demand

Account

  • Log In
  • Join

Podcasts

  • FHB Podcast
  • ProTalk

Webinars

  • Upcoming and On-Demand

Popular Topics

  • Kitchens
  • Business
  • Bedrooms
  • Roofs
  • Architecture and Design
  • Green Building
  • Decks
  • Framing
  • Safety
  • Remodeling
  • Bathrooms
  • Windows
  • Tilework
  • Ceilings
  • HVAC

Magazine

  • Current Issue
  • Past Issues
  • Magazine Index
  • Subscribe
  • Online Archive
  • Author Guidelines

All Access

  • Member Home
  • Start Free Trial
  • Gift Membership

Shop the Store

  • Books
  • DVDs
  • Taunton Workshops

More

  • FHB Ambassadors
  • Reader Projects
  • Podcast
  • Customer Support

Account

  • Log In
  • Join

Newsletter

Get home building tips, offers, and expert advice in your inbox

Sign Up See all newsletters

Follow

  • twitter
  • facebook
  • instagram
  • pinterest

Join All Access

Become a member and get instant access to thousands of videos, how-tos, tool reviews, and design features.

Start Your Free Trial

Subscribe

FHB Magazine

Start your subscription today and save up to 70%

Subscribe

We hope you’ve enjoyed your free articles. To keep reading, become a member today.

Get complete site access to expert advice, how-to videos, Code Check, and more, plus the print magazine.

Start your FREE trial

Already a member? Log in