Detailing Walls with Rigid Foam
Navigating the challenges of exterior insulation isn’t the nightmare you might think it is.

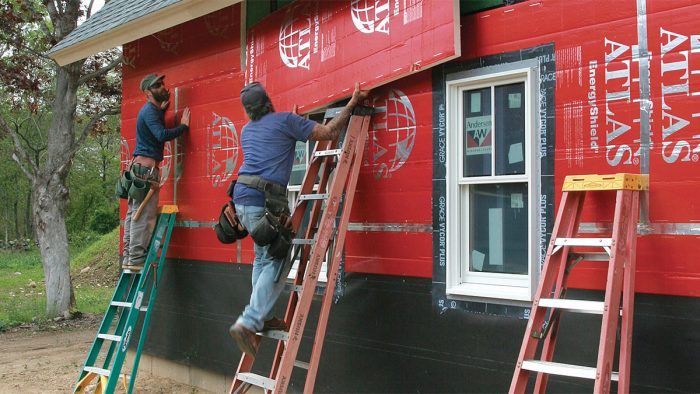
Synopsis: In this article, builder Steve DeMetrick shares construction and design details for efficient and trouble-free installation of exterior foam sheathing. His method employs Zip System sheathing for structure and air-sealing, 2-in. foil-faced foam for exterior insulation, and a felt-paper weather-resistive barrier behind a rain screen.
Wall construction has changed dramatically since I started in the trades 20 years ago. The 2×4 walls insulated with R-13 fiberglass batts that everyone built back then don’t come close to complying with today’s energy code in climate zone 5, where I live. And even with today’s stricter codes, building just to code is like settling for a D in school. A house that only meets the minimum standard is the worst that can legally be built.
On this house, the combination of 2-in. foil-faced polyisocyanurate exterior foam and 6 in. of fiber insulation create a high-performance wall that exceeds the IRC requirements. But even meeting the minimum wall R-values required by the new energy code can be hard to achieve with cavity insulation alone. In climate zone 5, walls are required to be at least R-20, and standard batts yield R-19. In cold climates, exterior insulation in addition to the cavity insulation is becoming a de facto code requirement. But there are pitfalls, including moisture condensation, detailing challenges around windows and other penetrations, and the lack of a solid base for attaching the siding. Here’s how I navigate them.
Walls that make sense

As a consultant on this build, I worked with carpenter Andrew Gallant of Gallant Builders on the wall details. Our combination of foil-faced foam and Zip System sheathing has created walls that are essentially impervious to moisture on the outside, meaning that they can only dry inward. To allow this, the wall cavities will be insulated later with unfaced fiberglass or mineral-wool batts, and the interior finish will be gypsum board, plaster, and vapor-permeable latex paint, all of which allow free movement of water vapor.
Because moisture generally moves from warm locations to cool ones, in this predominantly heating climate, the vapor drive is outward for most of the year. That makes controlling interior moisture a critical component of the house’s system. Otherwise, water could condense on the back of the sheathing, causing rot. Accordingly, interior moisture will be managed by a combination of timed bath fans, kitchen exhaust fans, and an energy-recovery ventilator (ERV). Not too many years ago, the standard approach would have been to use an interior Class I vapor retarder such as polyethylene sheeting. Today we know that having vapor-impermeable surfaces on both sides of a wall traps any moisture that does sneak in, often leading to rot.
In addition to keeping out exterior moisture and air, being able to dry, and reducing thermal conductivity, walls also should be simple to build. A goal in all of my projects is to detail walls so that carpenters can build with familiar materials and tools. The walls shown here are a good example of that approach. The studs are 2x6s on 16-in. centers. The Zip System sheathing, with its seams carefully taped, doubles as the air barrier. Although the sheathing could also function as the house’s water-resistive barrier (WRB), it was easier to detail the wall so that the WRB is just behind the siding.
Continuous foam significantly reduces thermal bridging through the studs and wall plates, increasing the total R-value of the wall. The assembly needs to be thought through before framing begins. The first step is to indicate on the plans exactly where the foam-insulation plane is located and then identify any places where there are connections that might break the continuity of the foam.

From Fine Homebuilding #256
To view the entire article, please click the View PDF button below.
Fine Homebuilding Recommended Products
Fine Homebuilding receives a commission for items purchased through links on this site, including Amazon Associates and other affiliate advertising programs.

Nitrile Work Gloves

Staple Gun

Respirator Mask


