FHB Logo Facebook LinkedIn Email Pinterest Twitter Instagram Plus Icon Close Icon Navigation Search Icon Navigation Search Icon Arrow Down Icon Video Guide Icon Article Guide Icon Modal Close Icon Guide Search Icon Skip to content
Subscribe

In every issue you'll find...

  • Expert insights on techniques and principles
  • Unbiased tool reviews
  • Step-by-step details to master the job
  • Field-tested advice and know-how
Subscribe Now!
Subscribe
  • How-To
  • Design
  • Tools & Materials
  • Videos
  • Blogs
  • Forum
  • Magazine
  • Members
  • FHB House
  • Podcast
  • Join
  • Log In
Subscribe

Fine Homebuilding Project Guides

Painting

Guide Home
Chapter
  • Intro to Painting
  • Tools & Materials
  • Prep Work
  • Painting Walls, Ceilings, and Trim
  • Wallpaper
  • Windows and Doors
  • Spray Painting Interiors
  • Exterior Painting
Building Skills

Prime Cedar Siding to Stop Bleeding Tannins and Water Stains

A quick-drying oil primer and a good paintbrush are all you need to deal with ugly blemishes on cedar shingles and keep them from coming back.

By Jim Lacey

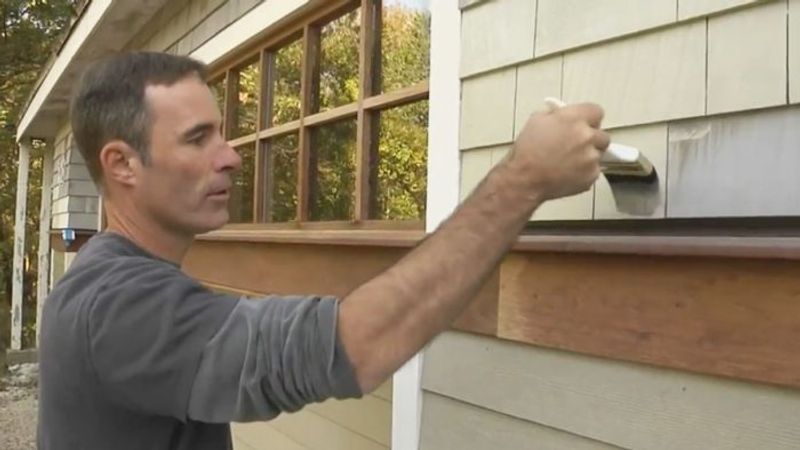
Cedar shingles are a good, long-lasting, traditional siding, but the tannins in the cedar can lead to staining down the road. So, how do you deal with this problem? We called Jim Lacey, a pro painter from Bethel, CT to show us how to get the job done right.

Jim’s offered these tips for a great priming job:

– Use a high quality, quick dry, stain blocking oil based primer

– Tint the primer to match your finish coat

– Work from top to bottom

– Use a metal paint pot

– Don’t overload your brush with paint

– Smooth out drips with a dry brush

– Don’t spot prime; prime the entire surface

– Caulk after priming

More painting tips and techniques from Jim Lacey:

Cutting in Trim and Corners

Drop Cloths: Plastic, canvas, or alternative products

Cleaning Paintbrushes and Roller Covers

Video: Paint Like a Pro

Prep Before You Paint

Sign up for eletters today and get the latest how-to from Fine Homebuilding, plus special offers.

Signing you up...

This site is protected by reCAPTCHA and the Google Privacy Policy and Terms of Service apply.
See all newsletters
See all newsletters
Previous: How to Back-Brush While Spray-Painting Siding Next: How to Fill Nail Holes and Paint PVC Trim

Guide

Painting

Chapter

Exterior Painting

View Comments

  1. User avater
    redoak | Dec 12, 2011 10:29am | #1

    As a professional painter out in the Pacific Northwest with over forty years of experience, several things caught my eye. I noticed that Mr. Lacey did not attempt to get the primer into the spaces between individual shingles. Though it certainly adds time and effort to the job, I make the commitment to get a coat of primer into those spaces as well so that the inside edges are also covered. Depending on the shingles themselves (trimmed, rough-cut, etc.) and how they've been nailed up, the spaces between shingles can vary. Sometimes there is little spacing (you see that in this video) and getting primer into those areas is much more difficult. Nevertheless, I still try to get at least some primer into those spaces as well. Also, I make sure to work the primer into the underside edge of each shingle because it is far more porous than the surface and usually requires more primer.

    Finally, I noticed that the wood trim around the windows as well as the belly board under the windows did not get masked off? Unless that wood was also going to get an eventual coat of paint, some masking, at least, would be necessary to avoid splatters. Those with little to no experience might not think to cover these vulnerable areas since no mention was made in the video to do so.

    Otherwise, a good, short introduction to priming wood shingles.

  2. ordjen | Jan 16, 2012 06:41pm | #2

    For years, when priming new or very dry existing shingles and cedar siding, I used Cabot's solid hide oil based stain as the primer, After a few days of drying, due to the high oil content, I would follow up with a matching color coat of Cabot's solid hide acrylioc stain. The advantage of acrylic stain is that it is much more color stable than oil stains. It will not become splotchy looking after a year or two.

    Using oil stain as primer is also better because it has less "build" and will not cover the texture nor cause beads to form between the narrow edges. As the previous post suggests, it is important to try to coat the edges. This is easier with the stain. Discloser: Cabot's calls for an oil primer under its stain, not stain. However, I have used this meathod for decades with very good results. As I had a repeat customer base, I got to see my work periodically.

    One final comment: when brushing anything, the bristles should be filled with paint/stain at least 3/4 their length!Why? Because there is a small wooden spacer in any good brush which forms a resevoir internally for the paint. If you do not fill that resevoir, you will be constantly dipping your brush. This is a very common mistake that amateurs make, thinking they will not make such a mess. In reality, the additional dipping means you will probably flip more paint!

Log in or create an account to post a comment.

Sign up Log in

Become a member and get full access to FineHomebuilding.com

Painting

Painting

Everything you need to know to get the perfect finish, from choosing the right paint to applying the final coat

View Project Guide

View All Project Guides »

Become a member and get unlimited site access, including the Painting Project Guide.

Start Free Trial

Intro to Painting
  • Painting Basics
  • Painting Inspiration
Tools & Materials
  • Paint
  • Brushes and Rollers
  • Caulks and Sealants
  • Spray Equipment
  • Prep and Cleanup
Prep Work
  • Getting Ready For Painting and Finishing
Painting Walls, Ceilings, and Trim
  • Painting Interior Surfaces
Wallpaper
  • How to Prep and Install Wallpaper
  • Removing Wallpaper
  • Wallcovering Choices
Windows and Doors
  • Painting Windows and Doors
  • Video Series: Finishing an Exterior Door
Spray Painting Interiors
  • How To Spray Walls, Trim, Cabinets, and More
Exterior Painting
  • Exterior Paint Prep
  • Exterior Painting Techniques

Fine Homebuilding

Follow

  • twitter
  • facebook
  • instagram
  • pinterest

Newsletter

Get home building tips, offers, and expert advice in your inbox

Signing you up...

This site is protected by reCAPTCHA and the Google Privacy Policy and Terms of Service apply.
See all newsletters
See all newsletters

Membership & Magazine

  • Online Archive
  • Start Free Trial
  • Magazine Subscription
  • Magazine Renewal
  • Gift a Subscription
  • Customer Support
  • Privacy Preferences

Taunton Network

  • Green Building Advisor
  • Fine Woodworking
  • Fine Gardening
  • Threads
  • About
  • Contact
  • Advertise
  • Careers
  • Copyright
  • Terms of Use
  • Site Map
  • Do not sell or share my information
  • Privacy Policy
  • Accessibility
  • California Privacy Rights

© 2023 The Taunton Press, Inc. All rights reserved.

X
X
This is a dialog window which overlays the main content of the page. The modal window is a 'site map' of the most critical areas of the site. Pressing the Escape (ESC) button will close the modal and bring you back to where you were on the page.

Main Menu

  • How-To
  • Design
  • Tools & Materials
  • Video
  • Blogs
  • Forum
  • Reader Projects
  • Magazine
  • Members
  • FHB House

Podcasts

  • FHB Podcast
  • ProTalk

Webinars

  • Upcoming and On-Demand

Account

  • Log In
  • Join

Podcasts

  • FHB Podcast
  • ProTalk

Webinars

  • Upcoming and On-Demand

Popular Topics

  • Kitchens
  • Business
  • Bedrooms
  • Roofs
  • Architecture and Design
  • Green Building
  • Decks
  • Framing
  • Safety
  • Remodeling
  • Bathrooms
  • Windows
  • Tilework
  • Ceilings
  • HVAC

Magazine

  • Current Issue
  • Past Issues
  • Magazine Index
  • Subscribe
  • Online Archive
  • Author Guidelines

All Access

  • Member Home
  • Start Free Trial
  • Gift Membership

Shop the Store

  • Books
  • DVDs
  • Taunton Workshops

More

  • FHB Ambassadors
  • Reader Projects
  • Podcast
  • Customer Support

Account

  • Log In
  • Join

Newsletter

Get home building tips, offers, and expert advice in your inbox

Signing you up...

This site is protected by reCAPTCHA and the Google Privacy Policy and Terms of Service apply.
See all newsletters
See all newsletters

Follow

  • twitter
  • facebook
  • instagram
  • pinterest

Join All Access

Become a member and get instant access to thousands of videos, how-tos, tool reviews, and design features.

Start Your Free Trial

Subscribe

FHB Magazine

Start your subscription today and save up to 70%

Subscribe

We hope you’ve enjoyed your free articles. To keep reading, become a member today.

Get complete site access to expert advice, how-to videos, Code Check, and more, plus the print magazine.

Start your FREE trial

Already a member? Log in