
How to Remove an Old Bathtub
Learn an easy way to disconnect and pull out an old cast-iron bathtub.
Synopsis: If you’ve ever had to pull out an old cast-iron bathtub, you know it’s not an easy job. But there are ways to make it easier that don’t involve a sledgehammer. Plumber Mike Lombardi joined us at the Fine Homebuilding Project House to show us how it’s done.
 Video Transcript: This tub surround area is almost prepped for us to remove the tub, but we still have a little work to do around the valve. First thing I’m going to do is make sure the water is shut off, and then we’re going to cut the handles off the valves. Next we’re going to cut the piping, so we can get it out of the way.
Now we’re going to cut the shower head pipe. Then, we’re going to go into the closet and cut the hot and cold water supply. I needed a longer blade so I could reach the hot pipe.
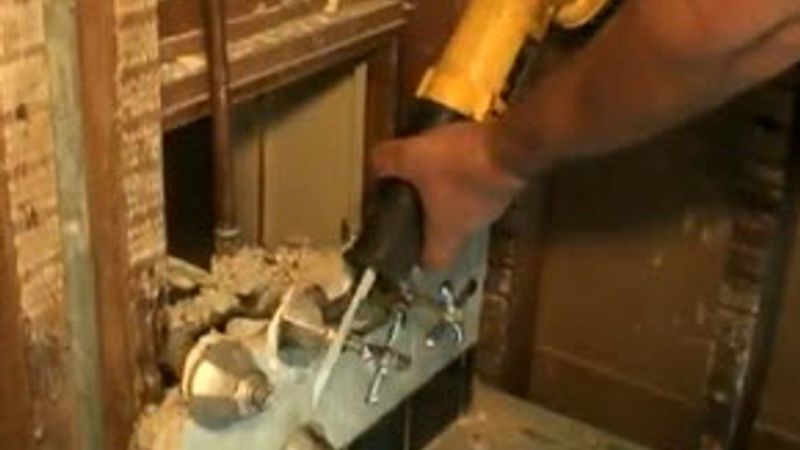
The pipes are cut, now we’re ready to go to the basement and disconnect the drain. I like to cut the bottom of the trap first and get rid of any water. Just be aware of a little spray. The trap is a soft brass/bronze mixture that is fairly easy to cut.
Once most of the water is out of the trap, you can finish the cut. Now we’re going to cut right through the tubular part of the shoe, which is the bottom-most connection of the tub drain. Because it’s tubular it cuts very easily.
When the tub drain is disconnected, we’re ready to go upstairs and get the tub out of its space. The last thing we’re going to do is remove the tub drain faceplate and lever. Just two screws hold it in place.
My favorite way to remove the tub is to roll it over onto the apron and onto a moving blanket. Then it is very easy to drag it right through the house.
More on Plumbing
- Connecting PEX Plumbing – A close look at the ever-expanding options for joining PEX plumbing.
- How to Remove an Old Bathtub – Get that cast-iron tub out of your bathroom with nothing more than a reciprocating saw, a screwdriver, and a moving blanket.
- How to Remove an Old Bathroom Sink – A demonstration of all of the steps required to disconnect and remove an old sink.
- How to Remove a Toilet – Tips for making a dirty job a little easier.
- Ten Common Plumbing Mistakes – From unvented traps to inadequate drain slopes, the author picks his top 10 in the world of plumbing done badly in this illustrated guide. It’s a helpful checklist that will save trouble down the road.
- Video Vault: How to Remove an Old Bathroom Sink – Want to remove an old sink? Let veteran plumber Mike Lombardi show you the way. In this video, he makes quick work of disconnecting a sink’s water and drain pipes as part of our Project House bathroom remodel. Learn how Mike makes sink removal so easy.

View Comments
You would never catch me with bare hands in anyone's toilet. Bleach or no bleach. That's what rubber gloves are for! And what's the point of taking apart a toilet that's headed to the dumpster? Most bathroom reno's are ready for a new low flow or dual flush toilet upgrade
Instead of the blanket, I rolled tub onto a flat furniture movers' dolly. Much more easier!
This video is a joke. Besides being sawzall happy on everything, why would you cut the handles off the tub valves? The tub is a lightweight porcelain steel unit not cast iron as stated in the title.
Ok a few points:
1. The Reciprocating Saw is not the only tool
2. You could quickly remove the fixtures without cutting them off
3. Why cut the drain? Undo the basket/stainer from the tub with a pair of channel lock pliers
4. You could remove the bath just as fast without cutting a single pipe.
5. Maybe Mike should get a cowboy hat to go with that sweet tool belt (sorry folded over apron).
agree with all comments.
this was a joke.
nothing new.
Actually, the tub is cast iron. It's from the 50's and weighs hundreds of pounds.
I can't imagine is faster to remove a drain with pliers than a recip saw.
Seperating the tank from the bowl makes it easier carry and safer to lift. We're saving the toilet for reuse. It's a relatively new Toto.
@ Patrick - My point isn't about all out speed.
If you remove the stainer which holds the drain to the bath then you save the drain underneath.
If you know you're going to completely remove the drain, by all means cut it out. However when you're working in condos etc the basement is often the ceiling of the occupants below or it's into a concrete slab.
Saving the drain means the plumber can tie into it at a later date and cut it where he/she wants it.
Also if you remove the taps but keep the valves intact the bath can still be removed. You don't have to shut off the water.
This means you can retain running water on site i.e. for a shower floor pour later. Cutting it out should be done just before the new valve is fitted.
Regards
The guy removing this tub must be saw happy. You can dis-connect it without hacking everything out with a sawzall. Just loosen the nuts. And, as far as getting the tub out without using a sledge hammer. No problem in the video, the bloody walls are gone!! Try to do that in a finished location, I thought I was going to see something new, but it's the same old BS. So to get the tub out you either put a mover's blanket over it & smack it with a sledge hammer or cut it up with abrasive discs.
As far as removing the crapper goes, I do it much the same way, but I fore go the bleach. I just sponge the water out, (bare handed) then un-bolt the whole thing from the floor. Pull it, remove old wax ring them move the crapper out of the way. Using rubber gloves? I can't stand them. I can't bend my fingers enough when I use them.
I was a industrial Journeyman Pipefitter for 38 1/2 years & I've removed my fair share of crappers & eeled out tons of drains & sewers. And, the only gloves I ever used were leather ones. You get a better grip with them on in relation to using gloves made out of a different product.
What a joke!
I will be removing a tub this winter to remodel my bathroom and thought this video is just what I need to help me do it "the right way". Wrong.
It was just another reminder why I do it myself rather than hire a professional.
Vegetable_Gardener,
"I will be removing a tub this winter to remodel my bathroom and thought this video is just what I need to help me do it "the right way". Wrong.
It was just another reminder why I do it myself rather than hire a professional."
Why do you say that?
In the 80s and 90s the wife and I built on average about one house per year by working evenings and weekends. We’d hire help to get it under roof and then finish most of the project ourselves. After spending countless hours waiting for plumbers to show up (or not show up), replacing structural components they had no business hacking into, redoing sloppy work; and generally cleaning up after them—I added plumbing to my skill set. Do-it-Myself plumbing saved us countless thousands of dollars and helped us to keep the projects on schedule.
We currently live in a 1930s farmhouse and I was hoping the video might contain some useful tips on removing a cast iron tub. Anybody can take a Sawzall and hack the plumbing up!
Thanks for the reply Veggie Gardner. I see no reason to save the plumbing in a full bath rehab with new fixtures in new locations as is the case with the project featured in this video. It just doesn't make sense to undo or work around plumbing you're going to cut out anyway.
I've met a lot of hack plumbers in my day too, but I can tell you, Mike Lombardi is not one of them. I visted several of his jobs before he took on the bath remodel in our Project House. The jobs were clean and well run and he cares deeply about his trade and his clients. It's not fare to lump all plumbers in the same basket.
No argument here.
I’m only lumping plumbers encountered by friends, relatives, neighbors, and myself. The video was useful in that it made me realize that there is no “magic method” to removing a cast-iron tub.
I must admit this did look like a steel tub rather than a cast iron tub. In any case, most of the baths I do don't have anywhere near this kind of room to maneuver, and second floor baths have no access from below. I find a sledge hammer the faster method for cast iron tubs, though I run the risk of nail pops in the ceiling below. I break them into four pieces and the drain assembly is in the middle of the crack so it falls out. For steel tubs I use a hammer to break off the porcelain and a recip saw to cut the steel at least in half.
As for the supply pipes, I don't use a recip saw on them, but I always cut out the whole assembly and cap off with shark-bite caps until the plumber rebuilds with the new valve. The shower head always needs to be raised anyway for the newer shower heads and to line up well with the tile. There's no sense in trying to save bits of the old assembly when it doesn't line up with the new valve.
For the drain pipes I usually leave the trap as long as possible just so I don't have sewer gas coming into my work area. Sometimes I can even reuse the trap if it is in good shape and in the right location. I don't cut a hole in the ceiling below until I know I can't reach from above or I know some section of pipe will need replacing. For shower bases with existing PVC pipe I almost never need to cut a hole in the ceiling.
There's actually a lot of things that one has to consider when we talk about the removal of ANYTHING in the bathroom! I'd much prefer to get a proper plumber in to help with moving things in the toilet out of the way!
So many things involved with the proper removal of a bathtub I think! If it were me, I'd rather leave things up to the professionals unless I'm doing a complete overhaul lest I smash some old pipes and cause an even bigger problem in the toilet!