FHB Logo Facebook LinkedIn Email Pinterest Twitter Instagram Plus Icon Close Icon Navigation Search Icon Navigation Search Icon Arrow Down Icon Video Guide Icon Article Guide Icon Modal Close Icon Guide Search Icon Skip to content
Subscribe

In every issue you'll find...

  • Expert insights on techniques and principles
  • Unbiased tool reviews
  • Step-by-step details to master the job
  • Field-tested advice and know-how
Subscribe Now!
Subscribe
  • How-To
  • Design
  • Tools & Materials
  • Videos
  • Blogs
  • Forum
  • Magazine
  • Members
  • FHB House
  • Podcast
  • Join
  • Log In
Subscribe

Fine Homebuilding Project Guides

Roofing

Guide Home
Chapter
  • Tools and Materials
  • Roof Replacement and Reroofing
  • Roof Ventilation
  • Waterproofing
  • Installing Asphalt Shingles
  • Installing Other Types of Roofs
  • Roof Maintenance and Repair
How-To

Bending Kickout Flashing

Divert water away from the siding at the bottom of the roof with this critical flashing detail.

By Andy Engel Issue 244 - June/July 2014
Photo: Andy Engel

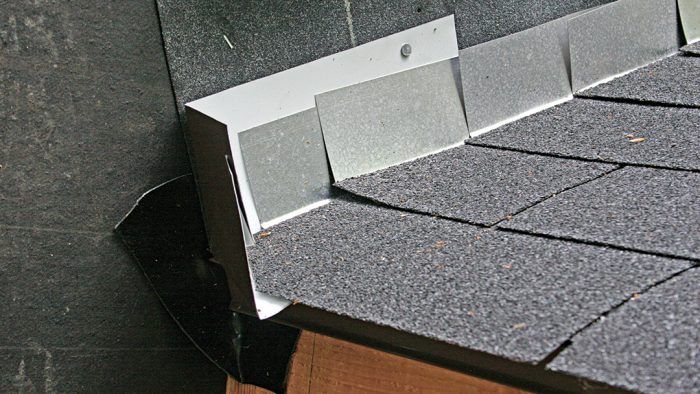
One flashing detail that’s often done wrong is where the flashing at the bottom of a roof meets a wall. When the bottom piece of step flashing is placed so that it drains out onto the face of the siding below, the regular dribble of roof water keeps the siding in this location wet, leading to peeling paint and rot. I’ve even seen the step flashing terminated behind the siding, which is a real recipe for disaster.

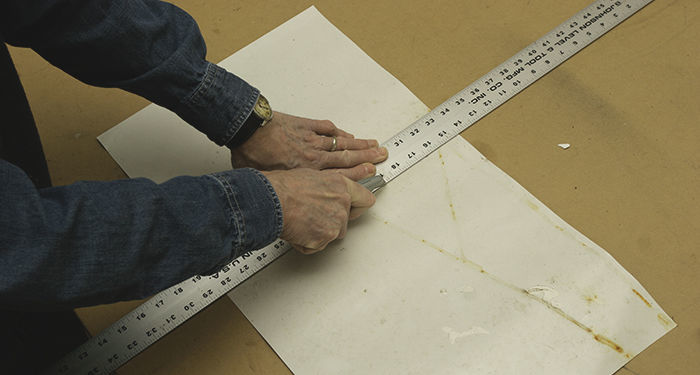
There’s a simple solution, though: Kickout flashing installed below the bottom piece of step flashing creates a dam to divert water away from the siding. A polypropylene version is available from DryFlekt and comes in a variety of colors. However, I never seem to have one on hand, or I’m using copper flashing and want the kick out to match, so I usually bend one from aluminum or copper coil stock. Galvanized flashing is too stiff to bend this way, but vinyl coil flashing can work, although a pop rivet or two might be needed to keep it from relaxing out of shape. I figured out the bending pattern by folding a piece of paper, which is a great trick for modeling any sort of flashing detail. For tools, you’ll need a pair of hand seamers and some tin snips.

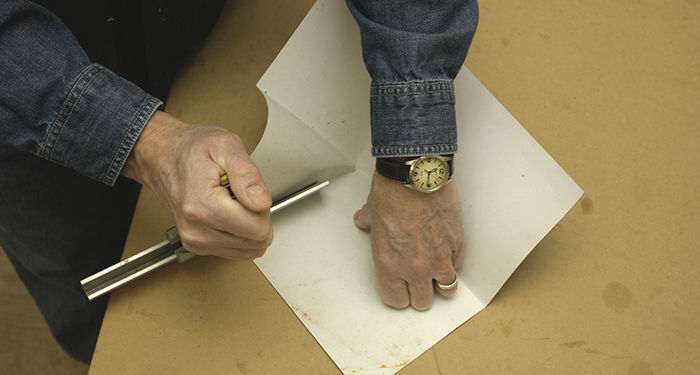
1. Start with coil stock

Use a knife and a straightedge to cut a 12-in. by 14-in. piece of flashing from the same metal used for the roof’s step flashing.
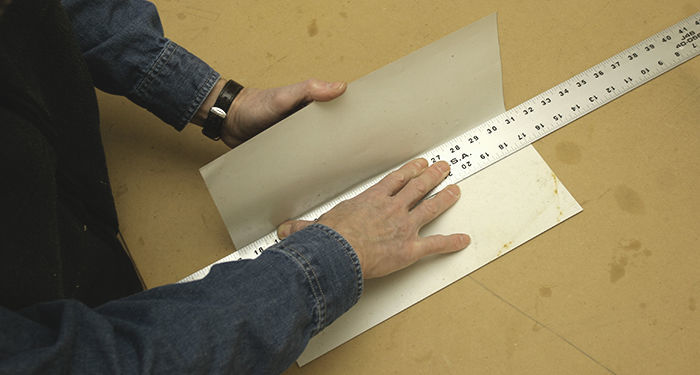
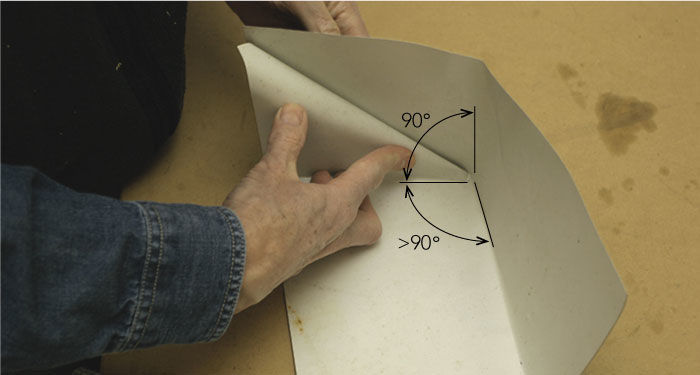
2. Make a 90° bend

Use a straightedge to make a bend that will leave 6 in. of flashing on the roof and 6 in. going up the wall.

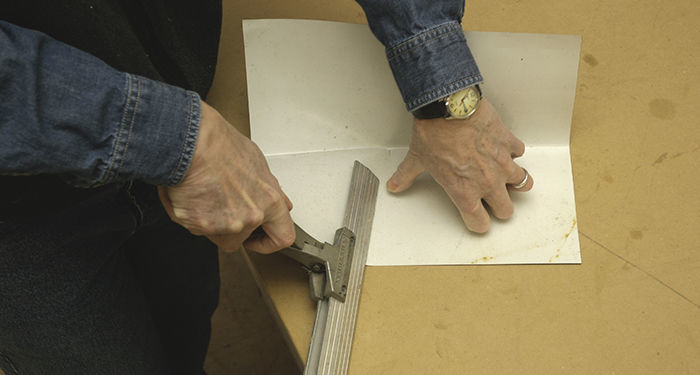
3. Measure the first bend

Mark the flashing 6 in. from the end to locate the approximate location of the first fold.

4. Position seamers for the next bend

Hold the seamers at an angle slightly beyond 90° in relation to the first bend so the bottom of the flashing will drain. Keep  the seamers away from the first bend or the metal might tear at the corner point.

5. Bend the flashing upward

As you push the seamers forward, the metal on the other side of the bend will follow, beginning to form the dam.

6. Fold the flashing like wrapping a present

Bend the leg that will abut the house at 90° and the roof leg a bit greater than 90° to encourage drainage.

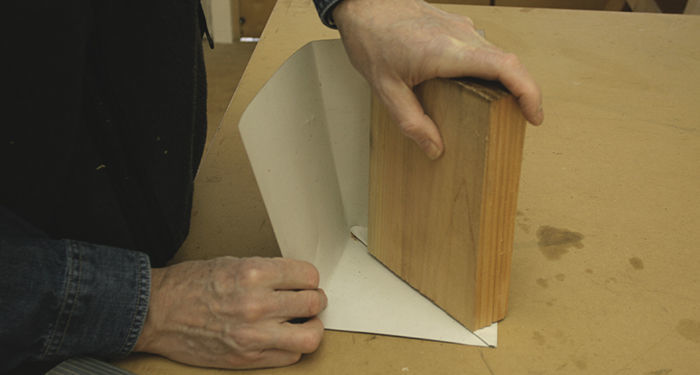
7. Flatten the bends

Use a block (and, if needed, a hammer) to make the flashing smooth and crisp.
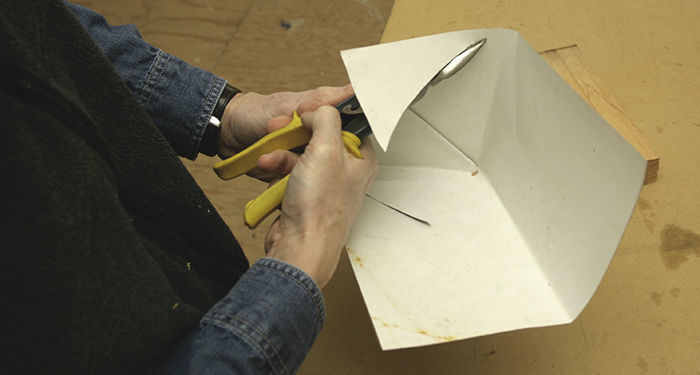
8. Make it pretty

You can leave the end square, but rounding it off with a pair of snips makes it look less obtrusive.
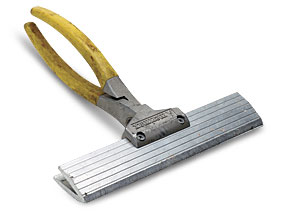
Making crisp bends

Hand seamers are like mini-brakes. They make crisp but short bends in sheet metal. The ones shown here are equipped with 10-in. jaws, but they will also accept a variety of narrower jaws. Seamers come in handy for flashing, as well as for gutter and duct work.

Photos by Charles Bickford, except where noted.

Sign up for eletters today and get the latest how-to from Fine Homebuilding, plus special offers.

Sign Up
Previous: Kickout Flashing: How to Flash Troublesome Roof-to-Wall Intersections Next: Direct Water Into Gutters With a Kickout Flashing Diverter

Guide

Roofing

Chapter

Waterproofing

Log in or create an account to post a comment.

Sign up Log in

Become a member and get full access to FineHomebuilding.com

Roofing

Roofing

A complete resource that includes the best materials and the right techniques to build a sturdy, leak-free, attractive roof on any house

View Project Guide

View All Project Guides »

Become a member and get unlimited site access, including the Roofing Project Guide.

Start Free Trial

Tools and Materials
  • Roof Coverings
  • Roofing Materials
  • Power Tools
  • Handy Helpers
  • Staging and Ladders
  • Safety Equipment
Roof Replacement and Reroofing
  • Preparing the Old Roof
  • Sheathing
  • Installing the New Roof
Roof Ventilation
  • Venting Basics
  • Installation
Waterproofing
  • Underlayment
  • Drip Edge
  • Flashing Adjoining Walls
  • Dormer and Skylight Flashing
  • Chimney Flashing
  • Vent Flashing
  • Gutters
Installing Asphalt Shingles
  • Calculating Shingles
  • Layout
  • Installation
  • Valleys
Installing Other Types of Roofs
  • Cedar Shingles
  • Metal
  • Low-Slope Roofs
  • Slate and Tile
Roof Maintenance and Repair
  • Assessing the Problem
  • Repairing Asphalt-Shingle Roofs
  • Other Roofing Repairs

Fine Homebuilding

Follow

  • twitter
  • facebook
  • instagram
  • pinterest

Newsletter

Get home building tips, offers, and expert advice in your inbox

Sign Up
This site is protected by reCAPTCHA and the Google Privacy Policy and Terms of Service apply.
See all newsletters

Membership & Magazine

  • Online Archive
  • Start Free Trial
  • Magazine Subscription
  • Magazine Renewal
  • Gift a Subscription
  • Customer Support
  • Privacy Preferences

Taunton Network

  • Green Building Advisor
  • Fine Woodworking
  • Fine Gardening
  • Threads
  • About
  • Contact
  • Advertise
  • Careers
  • Copyright
  • Terms of Use
  • Site Map
  • Do not sell my information
  • Privacy Policy
  • Accessibility
  • California Privacy Rights

© 2022 The Taunton Press, Inc. All rights reserved.

X
X
This is a dialog window which overlays the main content of the page. The modal window is a 'site map' of the most critical areas of the site. Pressing the Escape (ESC) button will close the modal and bring you back to where you were on the page.

Main Menu

  • How-To
  • Design
  • Tools & Materials
  • Video
  • Blogs
  • Forum
  • Reader Projects
  • Magazine
  • Members
  • FHB House

Podcasts

  • FHB Podcast
  • ProTalk

Webinars

  • Upcoming and On-Demand

Account

  • Log In
  • Join

Podcasts

  • FHB Podcast
  • ProTalk

Webinars

  • Upcoming and On-Demand

Popular Topics

  • Kitchens
  • Business
  • Bedrooms
  • Roofs
  • Architecture and Design
  • Green Building
  • Decks
  • Framing
  • Safety
  • Remodeling
  • Bathrooms
  • Windows
  • Tilework
  • Ceilings
  • HVAC

Magazine

  • Current Issue
  • Past Issues
  • Magazine Index
  • Subscribe
  • Online Archive
  • Author Guidelines

All Access

  • Member Home
  • Start Free Trial
  • Gift Membership

Shop the Store

  • Books
  • DVDs
  • Taunton Workshops

More

  • FHB Ambassadors
  • Reader Projects
  • Podcast
  • Customer Support

Account

  • Log In
  • Join

Newsletter

Get home building tips, offers, and expert advice in your inbox

Sign Up See all newsletters

Follow

  • twitter
  • facebook
  • instagram
  • pinterest

Join All Access

Become a member and get instant access to thousands of videos, how-tos, tool reviews, and design features.

Start Your Free Trial

Subscribe

FHB Magazine

Start your subscription today and save up to set_percent%

Subscribe

We hope you’ve enjoyed your free articles. To keep reading, become a member today.

Get complete site access to expert advice, how-to videos, Code Check, and more, plus the print magazine.

Start your FREE trial

Already a member? Log in