Dramatic Skylight
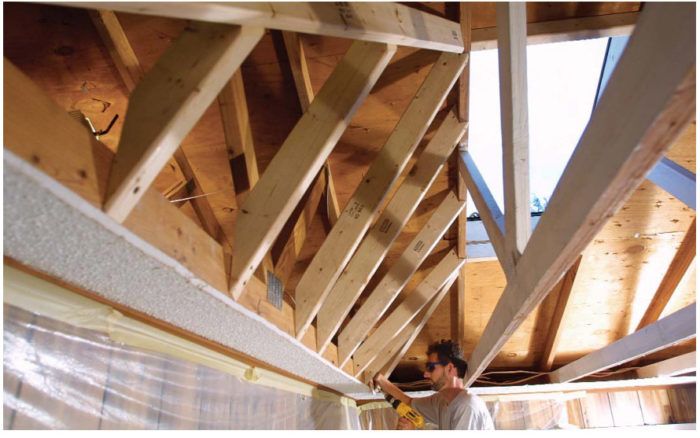
A skylight well with splayed sides lets in lots of light to transform a plain ranch.

Synopsis: Mike Guertin explains how to install a skylight in a truss roof, and provides stylish alternatives to dress up the garden-variety window shaft. Installing the window above the trusses — and adhering to code in the process — involves many steps, and Guertin thoroughly explains each of these steps with detailed instructions, pictorials, and illustrations. This article covers every aspect of the installation, from laying out and cutting the opening, to insulating the window and treating the trusses.
Skylight wells, or shafts, usually are boring. The straight-sided garden variety shaft isn’t much larger than the roof window itself. Plus, the small opening limits the light it lets in. Whenever it’s feasible, I splay all four of the shaft walls and flood the whole room with natural light.
Dealing with the truss dilemma
Building a skylight shaft is tricky in a truss roof. Building codes prohibit modifying the webs and chords of engineered trusses in the field without an engineer’s approved design. I prefer to leave the trusses and any bracing intact, with the webs and chords exposed as they run through the opening. When painted, the trusses add character to the opening. And I don’t have to modify the roof structure. For this project, I installed a pair of skylights spaced one truss bay apart (24 in.). The sides angle to the adjacent trusses on each side.
Lay out the opening before the skylights go in
I lay out the opening in the ceiling before locating and cutting the skylights in the roof. Keeping in mind which truss bays the skylights are going into, I poke holes through the ceiling to mark the inside edges of the trusses next to those bays. I snap chalklines through the holes to locate the sides of the skylight’s splayed opening.
Next, I decide how much of the existing flat ceiling I want to leave beyond the top and bottom walls of the splay. With the corners established, I snap chalklines to complete the layout for the opening and drill a hole through the ceiling at each corner to transfer its position to the attic. Now I can determine the location of the skylights.
To contain the mess, I do as much dirty attic work as possible before opening the ceiling. I remove the insulation from the area, install the skylights in the roof, and give the trusses that will be exposed a quick coat of primer. The final bit of prep is covering the floor and walls of the room with sheet plastic to contain the dust and debris from the skylight well. To collect the dust from cutting the drywall, I hold a vacuum hose next to the reciprocating saw blade. I follow the snapped line as closely as possible to make the drywall taping easier. When cutting the lines perpendicular to the trusses, I stop cutting before I hit the edges of the truss chord.
For more photos and information about installing a skylight, click the View PDF button below.
Fine Homebuilding Recommended Products
Fine Homebuilding receives a commission for items purchased through links on this site, including Amazon Associates and other affiliate advertising programs.

Peel & Stick Underlayment

Flashing Boot

Fall Protection


View Comments
Roof-truss caution
I found Mike Guertin’s article about fitting
new skylights around roof trusses very interesting
(FHB #164, pp. 92-97). I work for
a roof-truss manufacturer in Michigan and
will pass the information on to customers. I
did, however, find something missing.
When the rigid drywall was removed from
the bottom chord of the truss, the lateral restraint
also was removed from that critical
portion of the trusses. If proper bracing is
not in place, the bottom chord of the trusses
may bow out of plane and cause some cosmetic,
or even structural, problems. Whenever
the rigid bracing material is removed,
the manufacturer should be consulted for
replacement solutions. A simple 2x4 brace
attached to the bottom chord may be the
only thing required to do the job (along with
some X-bracing at either end of the lateral
brace).
—KEVIN HASKIN
via email
Wouldn't this mean you would need bracing on the finished product.