FHB Logo Facebook LinkedIn Email Pinterest Twitter Instagram Tiktok YouTube Plus Icon Close Icon Navigation Search Icon Navigation Search Icon Arrow Down Icon Video Guide Icon Article Guide Icon Modal Close Icon Guide Search Icon Skip to content
Subscribe
Log In
  • How-To
  • Design
  • Tools & Materials
  • Videos
  • Blogs
  • Forum
  • Magazine
  • Members
  • FHB House
  • Podcast
Log In

Fine Homebuilding Project Guides

Roofing

Guide Home
  • Tools and Materials
  • Roof Replacement and Reroofing
  • Roof Ventilation
  • Waterproofing
  • Installing Asphalt Shingles
  • Installing Other Types of Roofs
  • Roof Maintenance and Repair

Using Pneumatic Nailers

Follow these field-tested tips to nail down asphalt shingles safely and effectively.

By Mike Litchfield
Nailing schedule: four nails per shingle is standard; six nails for high-wind areas. Trimmed-down shingles must have at least two nails. Place the first and last nails in from the edges at least 1 in. All nails must be covered by the shingle above. Wear safety glasses when nailing.

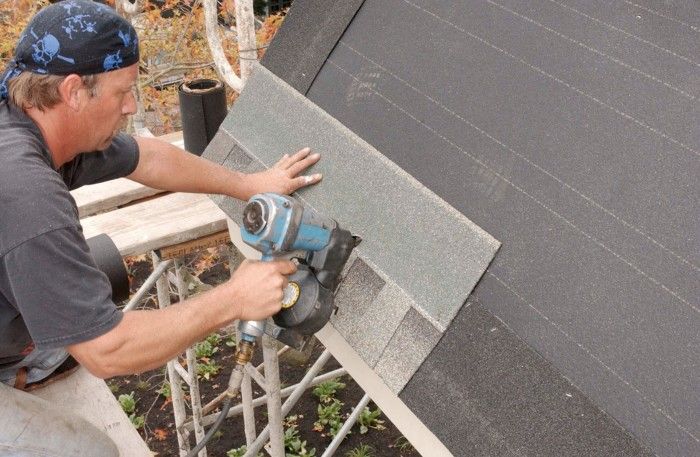
Because pneumatic nailers can easily blow nails through composition shingles, always test-fire and adjust nail depth before you start a job. (For this reason, some codes specify hand nailing.) As a safety measure, many pros prefer to hand nail the first five or six courses along the eaves, where stepping on a pneumatic hose could roll you right off the roof.

Those concerns noted, pneumatic nailers are great tools if used correctly. Here’s how:

  • Don’t bounce-fire a nailer till you’re skilled with it. (To bounce-fire, you hold the trigger down and press the nailer’s nose to the roof to fire the nail.) Shingles must be nailed within a small zone–below the sealer strip but above the cutouts, if any–and it’s hard to hit that zone if the nailer is bouncing around. Instead, position the nailer nose where you want it, and then pull the trigger.
  • Trigger-fire the first nail of every shingle. Do this to keep shingles from slipping, even if you’re skilled with pneumatic nailers. Once the first nail is in, you can bounce-fire the remaining ones.
  • Hold the nailer perpendicular to the roof so nails go in straight, and keep an eye on nail depth as the day wears on. Nail heads should be flush to the shingle; if they’re underdriven or overdriven, adjust the nailer pressure.
  • Follow a standard nailing schedule of four nails per shingle or six nails for high-wind areas. Trimmed-down shingles must have at least two nails. Place the first and last nails in from the edges at least 1 in. All nails must be covered by the shingle above.

—

This tip is just one of the thousands of field-tested tips and techniques that you’ll find in Renovation 5th Edition. New from Taunton Press, R5‘s 656 pages include 250+ technical drawings, 1,000 photos selected from the 40,000 that I’ve taken over the years, and lifetimes of experience that builders shared with me. I hope you find it useful. -Mike

© Michael Litchfield 2013

Sign up for eletters today and get the latest how-to from Fine Homebuilding, plus special offers.

Signing you up...

This site is protected by reCAPTCHA and the Google Privacy Policy and Terms of Service apply.
See all newsletters
See all newsletters
Previous: Easy Shingle Cutting With a Pneumatic Cutter Next: RN46 Roofing Nailer Review

Guide

Roofing

Chapter

Tools and Materials

View Comments

  1. LocalHero | Mar 18, 2013 05:13am | #1

    The guy in the pic isn't wearing safety glasses. In fact, I've never, ever seen a roofer wearing safety glasses...

  2. User avater
    ReynaldoCarter | Sep 07, 2015 07:43am | #2

    i like your work

  3. User avater
    MishaEasterling | Oct 30, 2015 03:17am | #3

    I appreciate yur work

  4. User avater
    WandeyDawson | Nov 07, 2015 03:35am | #4

    Interesting!!!

Log in or create an account to post a comment.

Sign up Log in

Become a member and get full access to FineHomebuilding.com

Roofing

Roofing

A complete resource that includes the best materials and the right techniques to build a sturdy, leak-free, attractive roof on any house

View Project Guide

View All Project Guides »

Become a member and get unlimited site access, including the Roofing Project Guide.

Start Free Trial

Tools and Materials
  • Roof Coverings
  • Roofing Materials
  • Power Tools
  • Handy Helpers
  • Staging and Ladders
  • Safety Equipment
Roof Replacement and Reroofing
  • Preparing the Old Roof
  • Sheathing
  • Installing the New Roof
Roof Ventilation
  • Venting Basics
  • Installation
Waterproofing
  • Underlayment
  • Drip Edge
  • Flashing Adjoining Walls
  • Dormer and Skylight Flashing
  • Chimney Flashing
  • Vent Flashing
  • Gutters
Installing Asphalt Shingles
  • Calculating Shingles
  • Layout
  • Installation
  • Valleys
Installing Other Types of Roofs
  • Cedar Shingles
  • Metal
  • Low-Slope Roofs
  • Slate and Tile
Roof Maintenance and Repair
  • Assessing the Problem
  • Repairing Asphalt-Shingle Roofs
  • Other Roofing Repairs

Fine Homebuilding

Follow

  • YouTube
  • instagram
  • facebook
  • pinterest
  • Tiktok
  • twitter

Newsletter

Get home building tips, offers, and expert advice in your inbox

Signing you up...

This site is protected by reCAPTCHA and the Google Privacy Policy and Terms of Service apply.
See all newsletters
See all newsletters

Membership & Magazine

  • Online Archive
  • Start Free Trial
  • Magazine Subscription
  • Magazine Renewal
  • Gift a Subscription
  • Customer Support
  • Privacy Preferences

Taunton Network

  • Green Building Advisor
  • Fine Woodworking
  • Fine Gardening
  • Threads
  • About
  • Contact
  • Advertise
  • Careers
  • Copyright
  • Terms of Use
  • Site Map
  • Do not sell or share my information
  • Privacy Policy
  • Accessibility
  • California Privacy Rights

© 2023 The Taunton Press, Inc. All rights reserved.

X
X
This is a dialog window which overlays the main content of the page. The modal window is a 'site map' of the most critical areas of the site. Pressing the Escape (ESC) button will close the modal and bring you back to where you were on the page.

Main Menu

  • How-To
  • Design
  • Tools & Materials
  • Video
  • Blogs
  • Forum
  • Reader Projects
  • Magazine
  • Members
  • FHB House

Podcasts

  • FHB Podcast
  • ProTalk

Webinars

  • Upcoming and On-Demand

Podcasts

  • FHB Podcast
  • ProTalk

Webinars

  • Upcoming and On-Demand

Popular Topics

  • Kitchens
  • Business
  • Bedrooms
  • Roofs
  • Architecture and Design
  • Green Building
  • Decks
  • Framing
  • Safety
  • Remodeling
  • Bathrooms
  • Windows
  • Tilework
  • Ceilings
  • HVAC

Magazine

  • Current Issue
  • Past Issues
  • Magazine Index
  • Subscribe
  • Online Archive
  • Author Guidelines

All Access

  • Member Home
  • Start Free Trial
  • Gift Membership

Shop the Store

  • Books
  • DVDs
  • Taunton Workshops

More

  • FHB Ambassadors
  • Reader Projects
  • Podcast
  • FHB House
  • Customer Support

Account

  • Log In
  • Join

Newsletter

Get home building tips, offers, and expert advice in your inbox

Signing you up...

This site is protected by reCAPTCHA and the Google Privacy Policy and Terms of Service apply.
See all newsletters
See all newsletters

Follow

  • YouTube
  • instagram
  • facebook
  • pinterest
  • Tiktok
  • twitter

Join All Access

Become a member and get instant access to thousands of videos, how-tos, tool reviews, and design features.

Start Your Free Trial

Subscribe

FHB Magazine

Start your subscription today and save up to 70%

Subscribe

We hope you’ve enjoyed your free articles. To keep reading, become a member today.

Get complete site access to expert advice, how-to videos, Code Check, and more, plus the print magazine.

Start your FREE trial

Already a member? Log in