
Install a Full-Frame Replacement Window: How to Remove Old Window Sashes and Jambs From a Brick Wall
The next step in this full-frame window installation is for remodeler Mike Sloggatt to remove old window sashes and jambs.
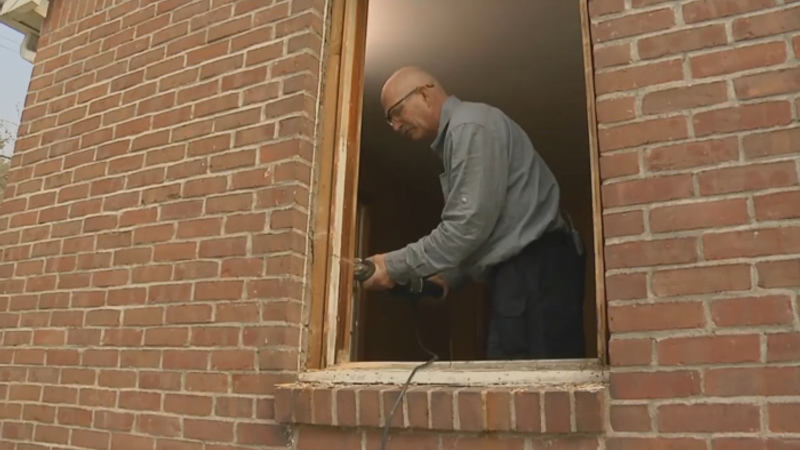
Remodeler Mike Sloggatt: Well, the window came in and we’re ready to install it today. Let’s take out the sash, pull the rest of the frame out, and get the installation started.
Narrator: This window has aluminum jamb liners with friction balances, but weights, springs, and other balance systems are also common. Once the window sashes are removed, Mike removes the storm windows and then pulls off the window stool. Then he attacks the storm window frame. Mike says this frame, which likely dates from the 1950s, is unusual because it’s nailed in place. Most storm windows are screwed to the exterior window trim.
Mike: I’ve got the interior stripped out pretty good now, but before I go any further, I want to come outside and see what’s going on behind this brick wall. This is really going to make or break how we install this window.
One of the reasons we decided to replace the entire window with its frame was because we found rot in the corners. Let’s get this brick mold off to give us a good idea of how to get the rest of the window off.
OK, this is why I’m being so careful. Because this window was installed before the brick was put on the house, this 1×4, which is part of the framing of the window, is actually behind this brick. We might want to preserve that; when we install the new window, we might want to use it as a foundation. I’ll take the brick mold off before I remove the rest of the window from behind it.
I use a reciprocating saw with a metal blade to cut the nails out so that I can easily remove the brick molding. This is a little safer for the interior. Now it’ll be easier to get the rest of the window out.
I have to get in and try to integrate the new window with the weather barrier. I was hoping the weather barrier would be a little farther out, but it’s not. I’ll have to pull this whole frame out completely and start from scratch.
Inside, I need to keep an eye on the plaster before I pull the window frame apart. I really don’t want to get into repairing plaster. I’ll cut the nails out from behind this flange to try to get this out in pieces.
Narrator: Mike had hoped to leave this 1-by nailer in place so that he could easily integrate the new window into the home’s existing drainage plane, but as with any remodeling project, you don’t know quite what you’ll find until you start taking things apart.
Mike: Got that 1×4 out. That’s going to give me good access to get in behind the weather barrier. There’s the original house sheathing right here. The 1×4 went into it, so obviously the window was put in first, and then the brick went on top of it. The weather barrier is on top of the sheathing and it’s not in the best of shape, but I’m going to do my best to integrate it so that the window doesn’t leak.
The interior plaster was installed after the window was, and was keyed into the window frame. Don’t cut too deeply into the sill; you want to get it out without destroying the plaster. I take out the sill in sections. Take your time; this is the best way to integrate the new window.
Now that I’ve got the window completely exposed and have pulled all the nails out, I can get a really good look at what I’m going to do here. Number one, I need to build up the sides and the sill to take the new window. Really, the most important thing I’m worried about right now is how to integrate the old weather barrier into the new window. It’s going to be tough because the barrier has started to deteriorate. I’m not going to peel it back. Instead, I’ll come in behind it and establish another drainage plane, and work my way into establishing a new plane down at the bottom here, but I’ve got a lot of debris in the way. I’m going to grind out the mortar, chip it away, and try to stay away from this old weather barrier so I can slip in a new piece right on top of it, and that’ll give me drainage to the outside.
Narrator: Using a small angle grinder with a diamond wheel and a chisel, Mike removes mortar from the bottom of the opening. This will allow him to integrate the new window flashing with the home’s felt paper weather barrier.
Mike: I have to be really careful when I pull out this masonry, because the paper has bonded to the back of it and I’m losing the weather barrier here. It seems like I’m doing a lot of work to be able to access this weather barrier, but I’m doing a redundant system here. You might wonder why I don’t just shove a whole load of caulking in here and call it a day. But with caulking, there will be a lot of movement, and problems with it. I need a mechanical way to get the water out. So I’ll establish one barrier here, and then also shed the water from underneath the window on top of the brick ledge here.
Next thing, I have to clear the plaster out of the way to make room for a 2×4. If the plaster is fragile, you might not want to chisel it.
Take a few measurements with a level and find the center of the window. Then figure out how much you’ll have to pack in the sides and raise the sill a little bit.
Videos in the Series
-
 Install a Full-Frame Replacement Window: Removing Old Trim and Measuring for a New Window in a Brick Wall
 -
 Install a Full-Frame Replacement Window: How to Remove Old Window Sashes and Jambs From a Brick Wall
 -
 Install a Full-Frame Replacement Window: How To Flash a Window Rough Opening in an Existing Brick Wall
 -
 Install a Full-Frame Replacement Window: How to Install and Air-Seal a New Window in an Old Brick Wall
 -
 Install a Full-Frame Replacement Window: How to Install a PVC Exterior Casing on a Window in a Brick Wall
 -
 Video Series: How to Install Interior Extension Jambs and Window Trim
