FHB Logo Facebook LinkedIn Email Pinterest Twitter Instagram Plus Icon Close Icon Navigation Search Icon Navigation Search Icon Arrow Down Icon Video Guide Icon Article Guide Icon Modal Close Icon Guide Search Icon Skip to content
Subscribe
SUBSCRIBE TODAY

Save up to

set_percent% off

the cover price

In-depth articles, up-close photography, and detailed illustrations in every issue.

Subscribe Now!
Subscribe
  • How-To
  • Design
  • Tools & Materials
  • Videos
  • Blogs
  • Forum
  • Magazine
  • Members
  • FHB House
  • Podcast
  • Join
  • Log In
Subscribe

Fine Homebuilding Project Guides

Wiring

Guide Home
Chapter
  • Working with Electricity
  • Tools and Materials
  • Receptacles and Switches
  • Lights and Fans
  • Rough-In
  • Outdoor Wiring
  • Panels and Subpanels
How-To

Tools and Materials for Outdoor Wiring

Aside from something to dig with, most of the electrical tools you'll need for outdoor work are the same as those you'd use inside, but outdoor receptacles and circuits have some specific requirements.

By Mike Litchfield, Michael McAlister

The tools you need to install outdoor wiring are pretty much the same ones needed to wire a house interior. The big exceptions, obviously, are digging and earth-moving tools. A square-nosed shovel or spade is the most useful tool when you’re making a shallow slot for low-voltage cable A. If you’re actually digging a trench, use a trenching shovel with a pointed nose and a reinforced shoulder that you can stamp on with a boot to drive it deep.

A  Use a square-nosed shovel to create shallow slots so you can tuck lo-vo cable into the ground.
A) Use a square-nosed shovel to create shallow slots so you can tuck lo-vo cable into the ground.

B  Rent a ditch-digging machine, also known as a trencher, to save time and avoid a sore back.
B) Rent a ditch-digging machine, also known as a trencher, to save time and avoid a sore back.

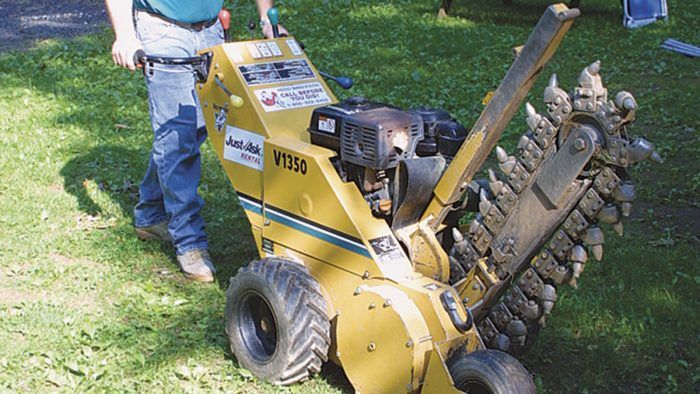
Digging trenches is hard work, however; so when the pros have to dig a long or deep one, they rent a gas-powered ditch-digging machine, also known as a trencher B. A trencher looks like a cross between a powered garden tiller and a chainsaw and typically cuts a trench 4 in. to 6 in. wide and as deep as 24 in. Spread sheet plastic on either side of the trench so you can place the dirt from the trench nearby—which makes refilling the trench easier. Wear heavy boots, heavy gloves, safety glasses, and ear plugs when operating a trencher.

Materials

The NEC requires that all exterior outlets and circuits have GFCI protection. This protection includes the following:

  • A GFCI receptacle installed in a weather-proof box.
  • A standard receptacle installed in a weatherproof box protected by a GFCI receptacle installed upstream (toward the power source).
  • A circuit protected by a GFCI breaker.

Exterior light fixtures do not need GFCI protection. If the box is surface mounted, it needs to be raintight. If the box is recessed in the wall, it does not. The fixture must be listed for damp locations if under eaves and listed for wet locations if directly exposed to weather.

There are two common types of weatherproof covers (also called raintight covers). A weatherproof while-in-use cover has a plastic cover that shuts over an electrical cord, such as that used for holiday lights. A weathertight cover is a gasketed cover that shuts tight over the receptacles when not in use. For any receptacle exposed to rain or splash, the NEC requires covers to be the “weatherproof in-use” type, per NEC 406.9(B)(1). For receptacles in damp locations but not subject to beating rain or water runoff, a simple weathertight cover is required, but an in-use cover is not required, per 406.9(B). Also, all exterior receptacles are required to be of the “weather-resistant” type.

Raintight (weatherproof) covers
Raintight (weatherproof) covers include a weatherproof while-in-use receptacle cover with adapter plates (left) and a weatherproof box with gasketed cover (right). Plastic adapter plates enable you to use the cover with a duplex or GFCI receptacle. The weatherproof box gasket is precut, so it accepts either a duplex or GFCI receptacle.


Aboveground, electrical cable must be housed in conduit with raintight fittings (see the photo). You can use polyvinyl chloride (PVC), thin-walled electrical metallic tubing (EMT) conduit, threaded intermediate metal conduit (IMC), or rigid steel conduit (RSC). PVC fittings are glued together to achieve a raintight fit; EMT conduit uses compression fittings; and IMC and RSC use threaded fittings or compression fittings. Note: Common EMT conduit fittings (both setscrew and compression type) are intended for interior use, are not raintight, and therefore are not suitable for exterior use. Look for compression fittings that are identified as raintight.

exterior conduit types
Overview of exterior conduit types, fittings, and boxes: A, 1⁄2-in. PVC pipe; B, PVC elbow; C, PVC box with unthreaded openings (for slip-in fittings); D, male adapter (MA) PVC fitting, which can be used with a threaded box or conduit; E, RSC pipe; F, RSC elbow; G, LB condulet; H, RSC coupling; I, EMT pipe; J, EMT elbow; K, bell box with three threaded holes; L, threaded EMT compression fitting; M, EMT compression coupling. Note: The LB conduit and bell box accept any 1⁄2-in. (trade size) threaded fitting—whether PVC adapter, EMT, or RSC.


Belowground, you can run flexible underground feeder (UF) cable at a depth acceptable to local codes—typically, 18 in. deep. Some codes allow you to dig a shallower trench if the cable runs in steel conduit, but because threading steel conduit requires special equipment and advanced skills, it’s not a reasonable option for most nonprofessionals.

Safety Alert: Avoid plugging or unplugging devices into exterior receptacles—or using corded power tools outside—when it’s raining or snowing.


Wiring Complete, 3rd Edition

Excerpted from Wiring Complete, 3rd Edition (The Taunton Press, 2017) by Michael Litchfield and Michael McAlister

Available in the Taunton Store and at Amazon.com.

Sign up for eletters today and get the latest how-to from Fine Homebuilding, plus special offers.

Sign Up
Previous: Running Power to an Outbuilding Next: Protect Your Outdoor Electrical Outlets

Guide

Wiring

Chapter

Outdoor Wiring

Log in or create an account to post a comment.

Sign up Log in

Become a member and get full access to FineHomebuilding.com

Wiring

Wiring

Trusted, code-compliant guidance from the pros for working safely on any wiring project

View Project Guide

View All Project Guides »

Become a member and get unlimited site access, including the Wiring Project Guide.

Start Free Trial

Working with Electricity
  • Basics
  • Safety
  • Troubleshooting and Upgrades
Tools and Materials
  • Electrical Tools
  • Electrical Boxes
  • Cables and Wires
Receptacles and Switches
  • Materials
  • Wiring Receptacles
  • Wiring Switches
Lights and Fans
  • Lighting Design
  • Installing Lights
  • Fans
Rough-In
  • Planning
  • Installing Electrical Boxes
  • Running Cable
  • Retrofit Work
  • Making Connections in Boxes
  • Electrical Conduit
Outdoor Wiring
  • Basics
  • Outlets
  • Installing Lighting
Panels and Subpanels
  • Understanding Panels
  • Circuits
  • Installing a Subpanel

Fine Homebuilding

Follow

  • twitter
  • facebook
  • instagram
  • pinterest

Newsletter

Get home building tips, offers, and expert advice in your inbox

Sign Up
This site is protected by reCAPTCHA and the Google Privacy Policy and Terms of Service apply.
See all newsletters

Membership & Magazine

  • Online Archive
  • Start Free Trial
  • Magazine Subscription
  • Magazine Renewal
  • Gift a Subscription
  • Customer Support
  • Privacy Preferences

Taunton Network

  • Green Building Advisor
  • Fine Woodworking
  • Fine Gardening
  • Threads
  • About
  • Contact
  • Advertise
  • Careers
  • Copyright
  • Terms of Use
  • Site Map
  • Do not sell my information
  • Privacy Policy
  • Accessibility
  • California Privacy Rights

© 2022 The Taunton Press, Inc. All rights reserved.

X
X
This is a dialog window which overlays the main content of the page. The modal window is a 'site map' of the most critical areas of the site. Pressing the Escape (ESC) button will close the modal and bring you back to where you were on the page.

Main Menu

  • How-To
  • Design
  • Tools & Materials
  • Video
  • Blogs
  • Forum
  • Reader Projects
  • Magazine
  • Members
  • FHB House

Podcasts

  • FHB Podcast
  • ProTalk

Webinars

  • Upcoming and On-Demand

Account

  • Log In
  • Join

Podcasts

  • FHB Podcast
  • ProTalk

Webinars

  • Upcoming and On-Demand

Popular Topics

  • Kitchens
  • Business
  • Bedrooms
  • Roofs
  • Architecture and Design
  • Green Building
  • Decks
  • Framing
  • Safety
  • Remodeling
  • Bathrooms
  • Windows
  • Tilework
  • Ceilings
  • HVAC

Magazine

  • Current Issue
  • Past Issues
  • Magazine Index
  • Subscribe
  • Online Archive
  • Author Guidelines

All Access

  • Member Home
  • Start Free Trial
  • Gift Membership

Shop the Store

  • Books
  • DVDs
  • Taunton Workshops

More

  • FHB Ambassadors
  • Reader Projects
  • Podcast
  • Customer Support

Account

  • Log In
  • Join

Newsletter

Get home building tips, offers, and expert advice in your inbox

Sign Up See all newsletters

Follow

  • twitter
  • facebook
  • instagram
  • pinterest

Join All Access

Become a member and get instant access to thousands of videos, how-tos, tool reviews, and design features.

Start Your Free Trial

Subscribe

FHB Magazine

Start your subscription today and save up to set_percent%

Subscribe

We hope you’ve enjoyed your free articles. To keep reading, become a member today.

Get complete site access to expert advice, how-to videos, Code Check, and more, plus the print magazine.

Start your FREE trial

Already a member? Log in