TRENDING ON FINEHOMEBUILDING

previous
  • 12 Remodeling Secrets
    12 Remodeling Secrets
  • Clever daily tip in your inbox
    Clever daily tip in your inbox
  • 2013 HOUSES Awards
    2013 HOUSES Awards
  • 7 Smart Kitchen Solutions
    7 Smart Kitchen Solutions
  • What’s the best decking?
    What’s the best decking?
  • 7 Small Bathroom Layouts
    7 Small Bathroom Layouts
  • Remodeling in Action
    Remodeling in Action
  • All about Roofing
    All about Roofing
  • 9 Concrete Countertops Ideas
    9 Concrete Countertops Ideas
  • 2014 HOUSES Awards
    2014 HOUSES Awards
  • Read FHB on Your iPad
    Read FHB on Your iPad
  • 15 Coffered-Ceiling Ideas
    15 Coffered-Ceiling Ideas
  • The Hobbit House and More
    The Hobbit House and More
  • Outdoor Kitchen Inspiration
    Outdoor Kitchen Inspiration
  • Basement Remodeling Tips
    Basement Remodeling Tips
next
Pin It

Finger-grip notch for fine-tuning crown molding in place

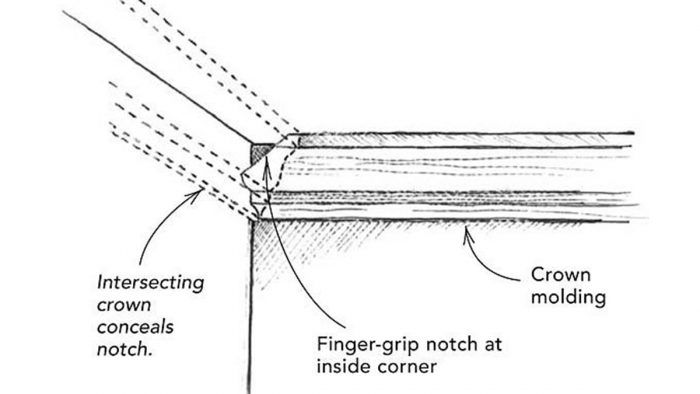
When I install crown molding, I cope the inside corners. Consequently, most pieces have one end that butts into a corner. I like nice, tight joints, so I generally cut the crown a little long. Because of this tight fit, the butt end sometimes jams into the corner, which means I need a pry bar to move it around when the time comes to fit the next piece’s coped end to the butt end. Even if I have a pry bar on hand, wielding it without marring the wall is difficult. A better way is to nip the upper corner off the butt end before putting the piece on the wall. You gain a handy finger-grip notch, which the coped end of the next piece covers, as shown in the drawing.


Andy Engel, Roxbury, CT
From Fine Homebuilding 172, pp. 28 July 1, 2005