previous
  • Energy-Smart Details
    Energy-Smart Details
  • 10 Basement-Remodeling Tips and Techniques
    10 Basement-Remodeling Tips and Techniques
  • 7 Solutions for Kitchen Layout and Design
    7 Solutions for Kitchen Layout and Design
  • 15 Coffered Ceiling Design Ideas and Tips
    15 Coffered Ceiling Design Ideas and Tips
  • Buyer's Guide to Decking
    Buyer's Guide to Decking
  • 7 Small Bathroom Floorplan Layouts
    7 Small Bathroom Floorplan Layouts
  • 2012 HOUSES Awards
    2012 HOUSES Awards
  • 12 Remodeling Secrets Revealed
    12 Remodeling Secrets Revealed
  • Complete Kitchen and Bath Guide
    Complete Kitchen and Bath Guide
  • Outdoor Kitchen Design Inspiration
    Outdoor Kitchen Design Inspiration
  • Meet the Fine Homebuilding Project House!
    Meet the Fine Homebuilding Project House!
  • Roofing articles, videos, tools, and materials
    Roofing articles, videos, tools, and materials
  • Fine Homebuilding: The Digital Issues
    Fine Homebuilding: The Digital Issues
  • The Inspector Game: Decking Dos and Don'ts
    The Inspector Game: Decking Dos and Don'ts
  • Painting Ideas, Tips, and Techniques for a Professional Finish
    Painting Ideas, Tips, and Techniques for a Professional Finish
  • How it Works
    How it Works
  • Guide to Paperless Drywall
    Guide to Paperless Drywall
  • 9 Design Ideas & Tips for Concrete Countertops
    9 Design Ideas & Tips for Concrete Countertops
  • Deck Design & Construction Showcase
    Deck Design & Construction Showcase
  • 13 Door Design and Installation Tips
    13 Door Design and Installation Tips
next


Holding a level plumb

comments (1) January 31st, 2011 in Project Gallery        
44 users recommend

Click the thumbs up button above to vote for this tip. Help us choose Fine Homebuildings top-10 window and door tips. Click To Enlarge

Click the "thumbs up" button above to vote for this tip. Help us choose Fine Homebuilding's top-10 window and door tips

Photo: Drawing by Chuck Miller

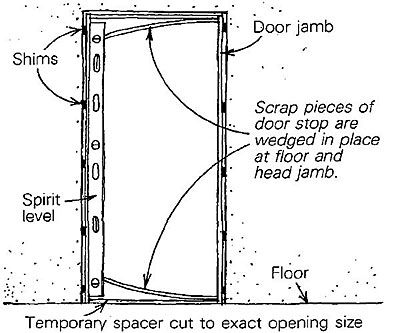
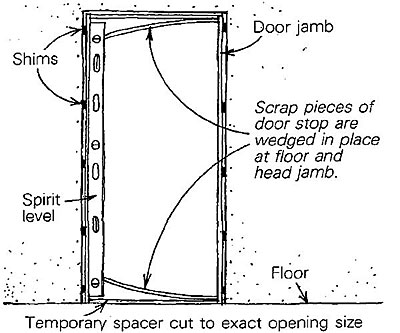
I use a 6-1/2-ft. spirit level to plumb and straighten interior door jambs. In order to leave both hands free to handle the shims and to drive nails, I wedge the level against one of the jambs to hold it in place. This lets me monitor the jamb continually as I make fine adjustments with the shims, rather than having to check and recheck the alignment with a hand-held level.

Once I've assembled all the jambs for the house, I cut a spacer the exact width of the door opening out of 1x6 or jamb offcuts. As shown in the drawing, the spacer rests on the floor between the jambs, maintaining the correct dimension at the bottom of the door opening.

Spacer in place, I temporarily shim the jamb in its rough opening. Then I wedge the level against one of the jambs with scrap pieces of door stop. The spaces above and below the level should be equal. Now I can plumb and straighten the jamb in the usual manner, tapping shims in and out until the jamb is straight up and down and true as an arrow. Then I nail the jamb to the jack studs with a pair of 10d finish nails through each set of shims. After double checking for alignment and making any necessary adjustments, I repeat the procedure on the opposite jamb.


D. B. Lovingood, Portsmouth, VA 

From Fine Homebuilding 39, pp. 14


posted in: Project Gallery, windows, doors

Comments (1)

stosh22 stosh22 writes: Maybe a combination of another tip (plumb bob sliver) would work equally as well here...keep you from having to "wedge" the level....could have used this tip 3-4 weeks ago!
Posted: 8:04 am on February 8th

You must be logged in to post comments. Click here to login.