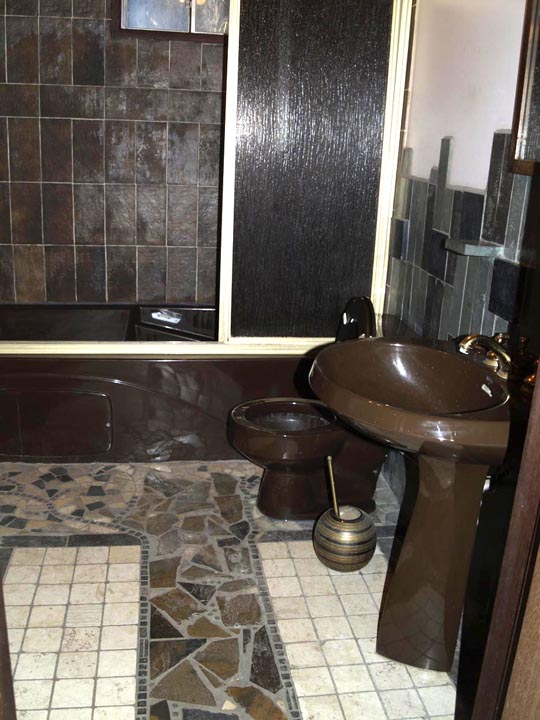
previous
  • The Inspector Game: Goofs on a Roof
    The Inspector Game: Goofs on a Roof
  • Top 10 Videos of 2011
    Top 10 Videos of 2011
  • Replacing a Roof : Installing a Ridge Vent
    Replacing a Roof : Installing a Ridge Vent
  • 10 Basement-Remodeling Tips and Techniques
    10 Basement-Remodeling Tips and Techniques
  • How to Avoid Complicated Fractions
    How to Avoid Complicated Fractions
  • 7 Small Bathroom Layouts
    7 Small Bathroom Layouts
  • Your Guide to Energy Smart Homes
    Your Guide to Energy Smart Homes
  • How to Figure Out Concrete Volume with Sketchup
    How to Figure Out Concrete Volume with Sketchup
  • The Self-Taught MBA: Inspired Reading
    The Self-Taught MBA: Inspired Reading
  • VIDEO: Stop Paint from Bleeding
    VIDEO: Stop Paint from Bleeding
  • Wanted: Plumber for a Bathroom Remodel
    Wanted: Plumber for a Bathroom Remodel
  • Patrick's Barn: A Perfect Place for a Party
    Patrick's Barn: A Perfect Place for a Party
  • Fine Homebuilding: The Digital Issues
    Fine Homebuilding: The Digital Issues
  • Seven Steps to Choosing the Perfect Circular Saw
    Seven Steps to Choosing the Perfect Circular Saw
  • How To Make a Reciprocating-Saw Blade Guide Block
    How To Make a Reciprocating-Saw Blade Guide Block
next


Bathroom

comments (0) March 8th, 2010 in Project Gallery        
wood4loretta wood4loretta, member
no recommendations


This old bathroom had good fixtures, albeit in dark brown, that needed an update from the lino floor. By buying a crate of broken tiles we kept under budget and were able to do the floors and walls (including portions that stuck out from the wall for the soap dish and the towel rack) for under $750.00


Design or Plan used: My Own Design - Loretta Puckrin
posted in: Project Gallery, tilework, bath, original

Comments (0)

You must be logged in to post comments. Click here to login.