previous
  • Buyer's Guide to Decking
    Buyer's Guide to Decking
  • Energy-Smart Details
    Energy-Smart Details
  • 7 Small Bathroom Floorplan Layouts
    7 Small Bathroom Floorplan Layouts
  • Deck Design & Construction Showcase
    Deck Design & Construction Showcase
  • 2012 HOUSES Awards
    2012 HOUSES Awards
  • Roofing articles, videos, tools, and materials
    Roofing articles, videos, tools, and materials
  • Guide to Paperless Drywall
    Guide to Paperless Drywall
  • Outdoor Kitchen Design Inspiration
    Outdoor Kitchen Design Inspiration
  • Painting Ideas, Tips, and Techniques for a Professional Finish
    Painting Ideas, Tips, and Techniques for a Professional Finish
  • Fine Homebuilding: The Digital Issues
    Fine Homebuilding: The Digital Issues
  • 7 Solutions for Kitchen Layout and Design
    7 Solutions for Kitchen Layout and Design
  • 10 Basement-Remodeling Tips and Techniques
    10 Basement-Remodeling Tips and Techniques
  • 13 Door Design and Installation Tips
    13 Door Design and Installation Tips
  • 9 Design Ideas & Tips for Concrete Countertops
    9 Design Ideas & Tips for Concrete Countertops
  • Meet the Fine Homebuilding Project House!
    Meet the Fine Homebuilding Project House!
  • How it Works
    How it Works
  • Complete Kitchen and Bath Guide
    Complete Kitchen and Bath Guide
  • The Inspector Game: Decking Dos and Don'ts
    The Inspector Game: Decking Dos and Don'ts
  • 15 Coffered Ceiling Design Ideas and Tips
    15 Coffered Ceiling Design Ideas and Tips
  • 12 Remodeling Secrets Revealed
    12 Remodeling Secrets Revealed
next


Quick, accurate shims

comments (0) January 31st, 2011 in Project Gallery        
14 users recommend

Click the thumbs up button above to vote for this tip. Help us choose Fine Homebuildings top-10 window and door tips. Click To Enlarge

Click the "thumbs up" button above to vote for this tip. Help us choose Fine Homebuilding's top-10 window and door tips

Photo: Drawing by Chuck Miller

Obtaining the right-size shims for a job can be quick, easy, and precise if you put in about 10 minutes’ preparation. Begin with the shim stock.

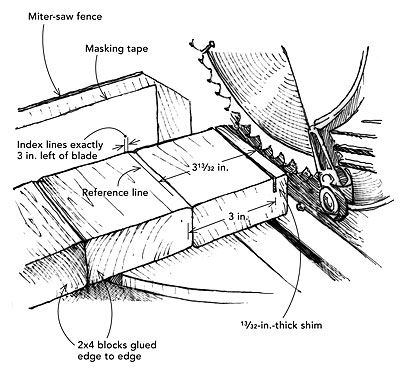
A proper shim has grain running its entire length—no end grain allowed. To that end, I glue 3-1/2-in.-long 2x4 blocks together edge to edge, as shown in the drawing. The number of blocks depends on the length of bar clamps available for gluing. I label the glued pieces “Shim Material” so that this wood isn’t used for something else.

Next, on a piece of masking tape affixed to the miter-saw fence, I draw index marks exactly 3 in. left of the blade. These marks represent both sides of the sawcut. If I wanted to cut a shim 13/32 in. thick, I would mark the shim material at 3 plus 13/32 in. from the right end, as shown. Then I would align the mark on the wood with the right index mark on the miter saw. When I cut the wood, a piece exactly 13/32 in. thick is the result.

It’s also easy to cut wedged shims this way. A useful rule of thumb is that for every mitered degree you cut through a 3-1/2-in.-wide piece, the wedge becomes 1/16 in. thicker on one end than it is on the other.


Nils Omholt, Sterling Heights, MI 
From Fine Homebuilding 184, pp. 26


posted in: Project Gallery, windows, doors

Comments (0)

You must be logged in to post comments. Click here to login.