
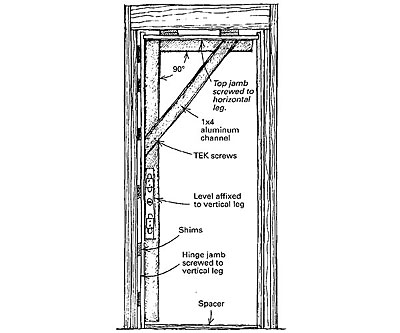
Faced with installing some 60, 3-ft. by 8-ft. prehung doors, I developed the jamb-setting fixture shown in the drawing. Not only did the fixture keep the hinge jamb and the head jamb at 90°, but it also helped keep the finger-jointed jambs straight during installation.
I made the fixture out of 1-in. by 4-in. architectural aluminum channel. This material, which is .115 in. thick, has square inside corners (structural channel has rounded inside corners). The vertical leg of the fixture is 94 in. long, and the horizontal leg is 34 in. long. A diagonal brace connects the two legs, ensuring that the assembly stays square. I carefully cut away the flanges where the pieces of channel overlap one another, and affixed them with Tek screws driven into pilot holes. Then I clamped a spirit level to the fixture by running a couple of screws through the vertical leg into a pair of wooden blocks. The screws pass through the cutouts in the level’s frame, sandwiching the level between the aluminum channel and the blocks.
To use the fixture, I first removed the door from its jamb. Then I screwed the hinge-side jamb to the fixture with 1-in. drywall screws that were run through predrilled holes in the channel flange. Next I screwed the head jamb to the fixture in the same manner. I was surprised at how bowed and twisted the jambs were on these doors, and this step really helped to straighten them out during installation.
I placed the fixture and the attached jamb into the rough opening with a spacer board on the floor between the trimmers. The spacer is equal in length to the top jamb, and its purpose is to make sure the rough opening is wide enough.
When the bubble read plumb, I added the appropriate shims between the hinge jamb and the trimmer and nailed the jamb to the framing. Next I shimmed the head jamb and affixed it to the framing, secure in the knowledge that it had to be at 90° to the hinge jamb because it was in the grip of the fixture. To finish up, I hung the door and shimmed the strike-side jamb to fit.
Walt Dean, Boynton Beach, FL
Click the "thumbs up" button above to vote for this tip. Help us choose Fine Homebuilding's top-10 window and door tips.


View Comments
Great Instructions.Thanks