previous
  • Buyer's Guide to Decking
    Buyer's Guide to Decking
  • How it Works
    How it Works
  • Outdoor Kitchen Design Inspiration
    Outdoor Kitchen Design Inspiration
  • Energy-Smart Details
    Energy-Smart Details
  • Painting Ideas, Tips, and Techniques for a Professional Finish
    Painting Ideas, Tips, and Techniques for a Professional Finish
  • Fine Homebuilding: The Digital Issues
    Fine Homebuilding: The Digital Issues
  • 12 Remodeling Secrets Revealed
    12 Remodeling Secrets Revealed
  • 7 Small Bathroom Floorplan Layouts
    7 Small Bathroom Floorplan Layouts
  • Meet the Fine Homebuilding Project House!
    Meet the Fine Homebuilding Project House!
  • Complete Kitchen and Bath Guide
    Complete Kitchen and Bath Guide
  • 7 Solutions for Kitchen Layout and Design
    7 Solutions for Kitchen Layout and Design
  • Deck Design & Construction Showcase
    Deck Design & Construction Showcase
  • 2012 HOUSES Awards
    2012 HOUSES Awards
  • Roofing articles, videos, tools, and materials
    Roofing articles, videos, tools, and materials
  • The Inspector Game: Decking Dos and Don'ts
    The Inspector Game: Decking Dos and Don'ts
  • 15 Coffered Ceiling Design Ideas and Tips
    15 Coffered Ceiling Design Ideas and Tips
  • 13 Door Design and Installation Tips
    13 Door Design and Installation Tips
  • 10 Basement-Remodeling Tips and Techniques
    10 Basement-Remodeling Tips and Techniques
  • 9 Design Ideas & Tips for Concrete Countertops
    9 Design Ideas & Tips for Concrete Countertops
  • Guide to Paperless Drywall
    Guide to Paperless Drywall
next


Hinge-mortising jig

comments (2) January 31st, 2011 in Project Gallery        
15 users recommend

Click the thumbs up button above to vote for this tip. Help us choose Fine Homebuildings top-10 window and door tips. Click To Enlarge

Click the "thumbs up" button above to vote for this tip. Help us choose Fine Homebuilding's top-10 window and door tips

Photo: Drawing by Chuck Miller

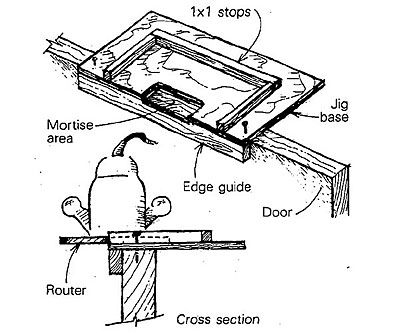
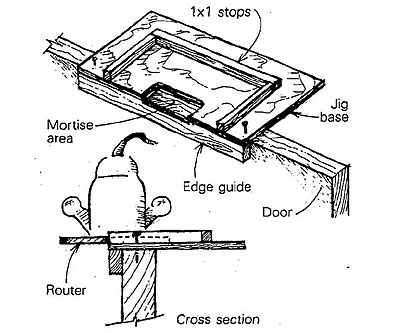
I use a router and a jig to mortise hinges in doors and casement windows. By using a 1/2-in. diameter hinge-mortising bit and a standard round-cornered hinge, I achieve a consistently clean fit that would be difficult and slow to get by hand.

A piece of 3/8-in. plywood forms the base of the jig. After carefully measuring the size of the hinge and the router baseplate, I nail 1x1 fences to the base to guide the router. As the router is passed inside the bounds of the fences, the bit will cut the hinge shape into the plywood base. Once the mortise is cut out of the base, I lower the bit to adjust the depth of cut in the door.

A 1x2 edge guide nailed and glued to the base aligns the jig on the edge of the work. To keep the jig steady while using the router, I tack 6d nails through the plywood base into the edge of the door or window jamb.


Steve Larson, Santa Cruz, CA 

From Fine Homebuilding 16, pp. 12


posted in: Project Gallery, windows, doors

Comments (2)

omf159 omf159 writes: I usually clamp the jig to the door woih two compression clamps.
Posted: 2:20 pm on February 7th

omf159 omf159 writes: I usually clamp the jig to the door woih two compression clamps.
Posted: 2:20 pm on February 7th

You must be logged in to post comments. Click here to login.