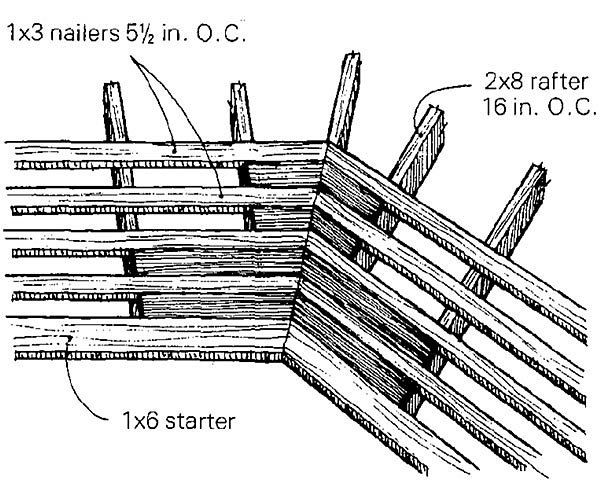
Successful valley flashing is one of the fine points of making a wood-shingle roof weathertight. I favor the old-fashioned method of nailing shingles into 1×3 horizontal stripping; fixing shingles to a solid sheathing such as plywood (even with a layer of felt paper between) doesn’t allow air to circulate around shingles. Because most of the shingles I use have 5-1/2 in. to the weather, my 1x3s are also spaced 5-1/2 in., except in the valleys, where I butt strips together to create a solid base for the flashing that follows.
I use 20-in. wide copper roll flashing, which I cut to 4-ft. lengths on a shear. I bend the copper on a brake as shown. The middle folds first and then the outside crimps. The 1-in. fold in the center acts as a kind of levee to keep water driven in a storm from sloshing up under shingles on the opposite side; the 1/2-in. crimps are back-up protection in case some water does make it up underneath — the water can’t jump the crimps so it runs back down the valley toward the gutter.
Placing and securing the flashing is another fine point. I overlap 4-ft. sheets about 6 in. to 8 in. for weathertightness. I fasten the sheets by snugging the heads of large-headed roofing nails tight enough against the outside of the crimp to unpinch the fold. This keeps the valley sound and waterproof. I put a nail at every point that the copper passes over a rafter. Be sure when putting the lowest course of shingles in the valley not to destroy the copper’s integrity by punching through it with a shingle nail. Careful work forms a very functional and lasting valley.
When placing the first course of shingles around the valley, I vary the amount of exposed copper from 3-1/2 in. at the upper end to 5 in. at the lower end, a 1-1/2-in. taper from top to bottom on each side of the center fold. This wider exposure at the bottom allows ice and leaves to slip out much more easily.
—William C. Barthelmess, Woodbury, CT
Edited and illustrated by Charles Miller
From Fine Homebuilding #1
Fine Homebuilding Recommended Products
Fine Homebuilding receives a commission for items purchased through links on this site, including Amazon Associates and other affiliate advertising programs.

Ladder Stand Off

Shingle Ripper

Flashing Boot Repair


View Comments
As usual the drawing referred to is missing so I can only imagine what the 1/2" crimps are. Still, some good points.
roofing nails are galvanized steel and copper will react with it and corrode enough to create a hole in the flashing, even under the shingles. I use copper coated roofing nails, and in a pinch annual ring brass "boat" nails. As far as "punching through" the copper, I put down Ice and Water Shield first in all valleys, eaves, gable ends, and anywhere flashing is needed. There are other, newer, self sealing materials that I have yet to use.
Thanks, would enjoy being on your team for one of these builds, I'm sure I'd learn a lot.
Copper flashing is a good sign that you take the job seriously and are looking for a durable roof. Finding the copper fittings can be a challenge, though. Look up a chart on galvanic reaction to know which metals are compatible.
If you were already proficient at using wood shingles and flashing valleys this article may be helpful. I'm not and could have used more illustrations.