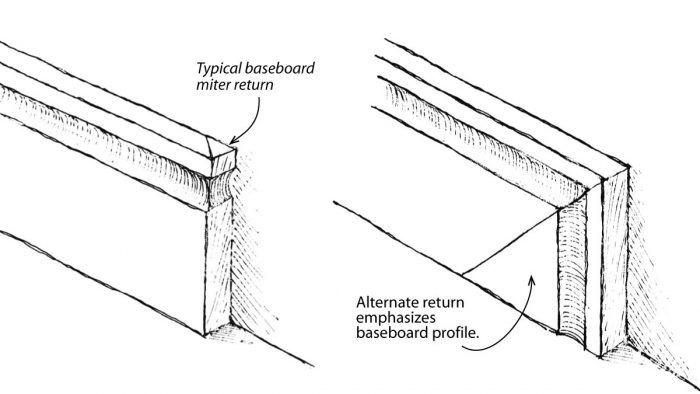
The drawing shows my method for ending a run of baseboard at locations such as open stairwells, landings or uncased corners. Instead of using the typical vertical miter detail, which takes the baseboard profile into the wall, I turn it downward into the floor. Both methods hide the end grain, but I think mine does a better job of showing off the pattern of the base.
—Bob Brereton, Minneapolis, MN
Edited and Illustrated by Charles Miller
From Fine Homebuilding #121


View Comments
That looks terrible, to put it nicely. If you showed up on my job pulling that crap, you'd be out on your ear.
I like the way Brereton's method looks, as well as the standard return, but my personal preference would be for the Brereton style. As it seems to be a matter of individual taste, it can be left up to a homeowner's choice. I assume the large diagonal in the schematic would be invisible after a little putty, sanding, and pain? Maybe that is what looks terrible to 2moreweeks.
I've used this return for a lot of my painted trim ever since I saw this tip in FHB 10+ years ago. A couple of things I've learned:
1. It's almost impossible to make it look good with stained wood trim. The miter has to be absolutely perfect.
2. As Carolcan notes above, the miter needs to be sanded flat and then it disappers when you paint the trim.
3. It looks the best with the molding profile shown in the drawing (mostly flat with a routed edge). The curvier the profile, the harder it is to get the line to disappear.
4. I glue the returns on with CA glue and put a piece of fiber tape across the back to reinforce the joint.
5. I leave the returns a little long so they aren't as fragile, then trim them off flush to the bottom of the molding.