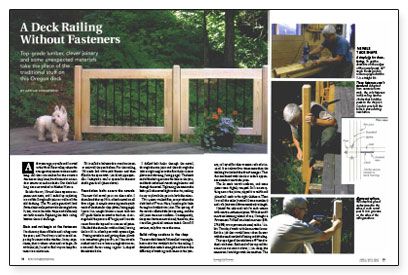
A Deck Railing Without Fasteners
Top-grade lumber, clever joinery and some unexpected materials take the place of the traditional stuff on this Oregon deck.

A few years ago, my wife and I moved to the Hood River valley, where the average rainy season is nine months long. All that rain makes for the sweetest cherries on the planet, but it’s murder on outdoor structures such as decks. Our deck had long since succumbed to Mother Nature.
Besides the rot, I found three separate carpenter-ant nests, and I ended up replacing most of the Douglas-fir joists as well as all the old decking. The 70s-style guardrail had Swiss-chalet scalloped newels that angled out. It, too, was in horrible shape and definitely not built to code. Replacing the deck railing became the real challenge.
Stain and rot begin at the fasteners
I’ve done my share of decks and railings over the years, and I’ve always tried to avoid exposing fasteners to the weather. In my experience, that is where stains and rot begin. So with this job, I tried to find ways to keep fasteners to a minimum.
I’d installed a balustrade around an interior stairwell the year before. For that railing, I’d made 2×6 white-oak frames and then filled in the space with 1/2-in. black pipe spindles. I adapted a similar system for the new deck’s guardrail.
Foundation bolts secure the newels
The new 4×4 newel posts are clear cedar. I chamfered the top 36 in. of each newel on all four edges. A simple router jig made quick work of the chamfers. I put a 1-in. straight bit into a router with two 45° guide blocks screwed to the base. A carriage held the post at a 45° angle, and I ran the router from the top end to a measured point. I finished the chamfers with a chisel, leaving the last 14 in. of each post with square edges.
Putting newels in and getting them plumb can sometimes give you fits, so I borrowed a method mat I use to brace strong backs to concrete-wall forms using regular L-shaped foundation bolts.
I drilled bolt holes through the newel, through the rim joist and then through the joist at right angles to the first holes. The hook end of the bolts goes into the hole in the joist, and the threaded end runs through the rim and through the newel. Tightening the nuts on the bolts pulls the newel tight to the rim, making it easy to plumb the posts in both directions.
This system worked fine, except where the deck had a 45° turn. Here, I used regular bolts through a doubled rim joist. The spacing of the newels reflected the joist spacing, and the old joists were not uniform. Consequently, the spaces between newels and, therefore, the size of the guardrail sections varied. Out of 15 sections, only four were the same.
Build railing sections in the shop
The new deck boards I’d installed were tight-knot cedar but wouldn’t do for the railing. I doubted that cedar’s strength and knew the difficulty of working with knots in the joinery, so I opted for clear western red cedar instead. It cost about four times more than the decking but lacked the disadvantages. That fact combined with the clear cedar’s appearance made it worth the price.
For more photos, drawings, and details, click the View PDF button below:
Fine Homebuilding Recommended Products
Fine Homebuilding receives a commission for items purchased through links on this site, including Amazon Associates and other affiliate advertising programs.

FastenMaster Screw Bolt Fastening System

Jigsaw

Standard Marking Chalk


