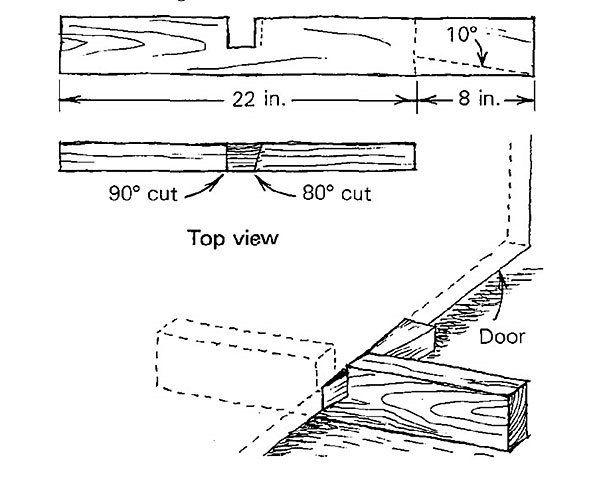
An Irish craftsman, with whom I had the pleasure of working, showed me how to make a simple door buck quickly. In fact, it’s so easy to make that it could be considered disposable, but it’s small enough that you might want to hang on to it.
Take a 30-in. 2×4 and make a 10° taper cut along the first 8 in. of the face, as shown in the drawing. Then make a crosscut at the 8-in. mark so that you have an 8-in. wedge with a 10° taper. Turn the 2×4 on edge and set your saw at a depth of 2 in. Make a 90° crosscut near the center of the board, then move over 2 in. and make another crosscut at 80°. Then make several passes with the saw between the two cuts, knock out the pieces and clean up the slot with a chisel.
Slide a door into the slot in the 2×4 and drive in the wedge with a few taps. To keep the door from rocking, locate the buck toward one end of the door, or use one at each end.
—Tim Hoisington
Edited and illustrated by Charles Miller
From Fine Homebuilding
Fine Homebuilding Recommended Products
Fine Homebuilding receives a commission for items purchased through links on this site, including Amazon Associates and other affiliate advertising programs.

Handy Heat Gun

8067 All-Weather Flashing Tape

Reliable Crimp Connectors


View Comments
Even simpler- cut a longitudinal wedge off one end of a 24" 2x4- the buck will work fine w/ one side of the foot tapered. Use a square to align one side of the wedge at 90 degrees and mark the angle on the other side. Then make a 90 degree line 2" from the short point of the angled line and cut & chisel the spoil as described above.
I made a set of these 30 years ago and they are still in use...
For those of us less experienced, please explain what a "door buck" is and precisely how it is used.
I 2nd bhami's emotion. Not everyone is in the same field/like experience. Communication is getting the point/information across so ALL understand. Using an explanation for a novice is the best approach in all of these fine contributions.