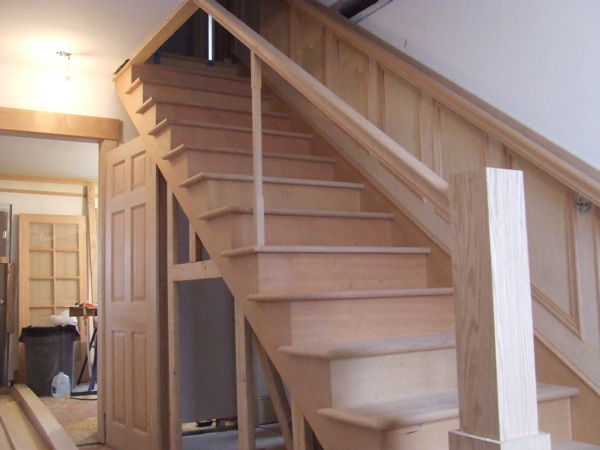
this is the first time I’ve been able to mill everything for a job myself. A while back I got a Woodmaster molder and have been waiting to do a job completely in house. As it happened it was also the 1st start to finish stair job since seeing Jed Dixon at the JLC show in Seattle. I’d make a couple of small changes on the next one, but I won’t be going back to cutting carriages for this type of stair. It was easier to do than I thought and after the first one I think its faster than the old way.
Here’s some pics.


Replies
Very Nice stuff!!
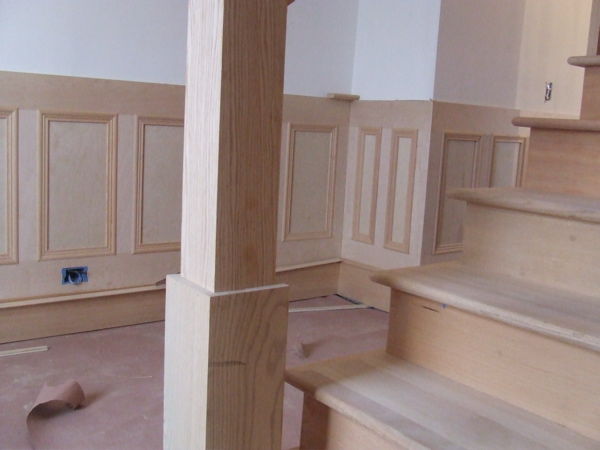
Looks real good! What species is the newel post? It looks different than the treads.
Did you do the wainscot as well?
Spheramid Enterprises Architectural Woodworks
"Success is not spontaneous combustion, you have to set yourself on Fire"
Thanks, both the treads & newel post are red oak. the returns were made with a domino & pocket screws. Yes I made the wainscoting, the shoe, cap & applied moldings were made on the Woodmaster.
Ok, wasn't sure, the grain threw me off.
Excellent stuff there.Spheramid Enterprises Architectural Woodworks
"Success is not spontaneous combustion, you have to set yourself on Fire"
Terrific! Someone who knows how stairs were once built. Every time I mention housed stairs I get a blank look from the newer guys. This is how they always came on the job when I started.
John
Ok, dumb question. Maybe it is a regional thing. Is there an advantage to doing stringers the way you did them? We put in stair horses at the framing stage with temp treads, then add skirt boards and finish treads at trim stage nailed and glued to stair horses (3-4 depending on width of stairs).
edited to add: By the way, beatiful work. Not knocking the method, just curious.
Thanks,
John
J.R. Lazaro Builders, Inc.
Indianapolis, In.
Edited 2/17/2008 8:36 pm ET by JLazaro317
Hi John,
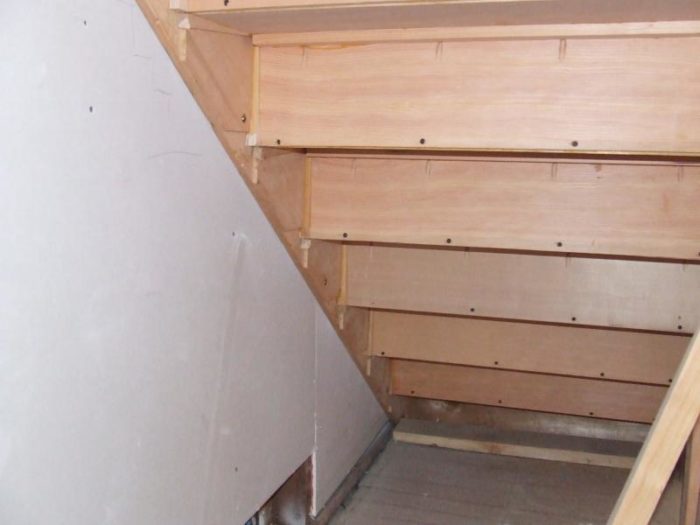
Not a dumb question, up until that one thats the way I've always done them. In my humble opinion there are several advantages to making them this way. I like the wall skirt fit much better than a butt fit of carriages. There are no visible fasteners, Once the jigs are made it is faster to make and no gaps with seasonal movements. The down side is you have to lay it out exactly right.Keith
Very nice work, just curious did you cut your wedges with a bevel and matching bevel on the stringer?
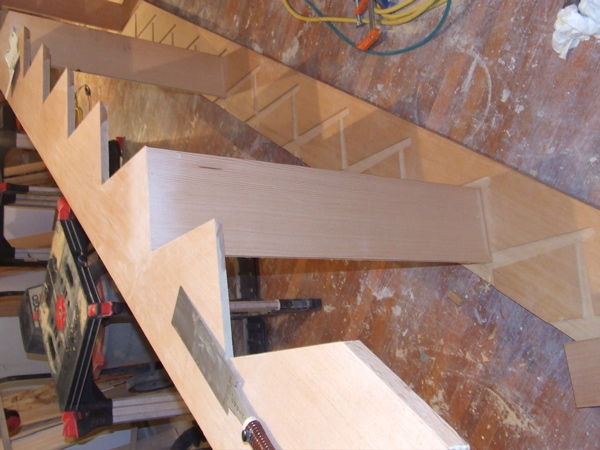
For my 1st attempt I followed Andy Engel's new book, it worked out well. Cut the wedges first, place it against your thread and trace to make a template. A couple of changes I made i'd like to pass along. For the template you don't have to make a thick template just go to a machine/sharpening shop and they will cut down a bit to whatever length you like. Also do ALL of your pocket holes before assembly.
Nice work.I never built a finished set like your out of hardwood but I worked with templates and built hundreds of closed stringers for our rough frames. I agree, they are easy. I had templates built for every common size and eventually built a template to make templates! That made the job much faster when I needed to build a custom size. My record time for routing, assembling and installing a closed set of stairs ( 14 risers to the basement) was one hour and 15 minutes. That did not include carrying the stock to my sawhorses but it did include the time the helpers assisted me in setting the stringers. I am curious as to how you are going to terminate the balusters into the ceiling. I'm curious about the style of balusters and what it all will look like in the finish. Carry on with this excellent thread! Bob's next test date: 12/10/07
Jim,
Do you have any pictures? I've been thinking of doing stairs this way for about a year, but haven't done it yet. I'm tooled up enough.
Can you elaborate on the templates? Our tread dimension is nearly always the same, I mean 99% of the time, only the rises change.
Muchos thanks
tim
Tim,You need just the single template for any straight run stair. The only other time you would need a different template is if you were doing curved stairs and then the only difference would be that it would have to be flexible to match the curve.Keith
I doubt that I would have any quality pictures of a housed rough stringer. We stopped routing them before I bought a digital so I'd have to find and old picture and I don't have many. I do remember having a nice bonfire with all the templates though....In the end, I was using a 1.5 hp PC router. I'd route plywood templates out of 3/4 subfloor stock. I think the current advantech stuff would be good and flat and slippery one one side. Most carpenters carried 8' long templates. I used 4 or 5' templates. I liked them light and fast. I think I had to move mine two times. The other guys only had to make one move. If you route your stringers, you can use 2 x 10's. The plow should be 1/2" deep but in practice, it rarely got all the way there. The wood is typically too wet and it was slow routing. If I was still routing today, I'd probably stop at Home Depot and pick me up a couple of dry 2 x 10's. Bob's next test date: 12/10/07
Jim,Amazing speed- takes me a hour just to make sure I've got everything laid-out right. I've attached a couple of pics of the balusters from another job- same design. Not my favorite but craftsman is real big out here, in both cases they will be painted.
mathewson: Very nice execution of stairwork! There is nothing like a housed stairway. What impresses me is to take an 8 foot straight edge and run down the nosings at the housed side and notice how accurate they are. I have never been able to build a non housed stair near as accurate.
Sure...they are beasts to move in at times...and if this is too much for a haul in....at least the housed stairway can be pre-cut as a kit and assembled on site.
Keep up the good work and post lots more.
Stan
Thanks Stan, I've admired your work for sometime now. I've been wanting to build a curved staircase for sometime now but have been reluctant to jump in and then not be able to deliver. How did your 1st on go?Keith
Keith: The first one went well....except I had installed the newel post on the bottom step. It would not go through the front door.......little embarassing but it was a good wake up call years ago!
Stan
PLEASE don't let my DW see your pic's. :) I'll be in BIGGG trouble if you do.Seriously, I am in awe.
Just finished wall rail . Floor guys did treads and risers , butchered them
Matthew....you gotta remember, I was routing rough stringers: not finished hardwood stringers. And....the first ones that I routed back in the 70's probably took me four hours. Bob's next test date: 12/10/07
Nice job on the housed and wedged stairs , looks clean . I build stairs in Ca and do alot of craftsman style designs . I like this one , the client found it in a magazine .
Here is another easy to build "craftsman" newell post .
Joe,Nice work! having a little trouble with the size of the pics. Keep posting.Keith
Joe,I've resized your pics. Very good work. I notice you don't use shoes on the rail. Are you using a pitch block jig & hollow mortiser? I've done them once by hand with a drill & chisels, that was a lot of work.
Im not sure which stair you are refering to . On both stairs I plowed out the bottom of the hand rail (a fillet groove) to accept the top of the baluster . I make the fillet groove 1/4" -1/2 deep . As I install the bal I put fillet (stock milled precisely to fit in groove and be flush with bottom of rail) in between the bal . Im careful to pick a good color and grain match . The white oak bal are fastened with a double sided lag (dowel screw)to the landing nosing for a seamless joint . I will mortise the metal bal to the tread or landing nosing for a nice clean look or I will use a shoe .
Spacing on the balluster looks a tad wide, otherwise, very nice work. Thanks for sharing the pics.
Very nice work - don't forget the follow up pics when the finish has been applied.
Doug
What part of west Seattle? I'm across the water in Port Orchard. Who is the builder?
Very nice stairs. I can't wait to see how these finish. Can you get some wider angle shots?
Tim
Tim,There is no builder, I got out of doing new construction in the 90's. It seemed everybody was using mdf .I did a couple of jobs and decided mdf was not for me. A homeowner bought the house as an investment and decided to redo the interior. It is one of those smaller houses probably built in the 1930's. The original stairs were narrow hence the reason that the balusters will die out into the ceiling, Homeowners design. It's been a fun job- I'll finish in a couple of days. At least I'd better I have another stair job to start on Thursday-yikes.
Wow! Super nice - panels and all.
Forrest