Assembly of RTA cabs from Scherr’s
We almost have recovered from the big freightline boo-boo that caused part of our kitchen to route through California, and needed pallets were delayed a week.
Furthermore, on the first delivery, the van contained a huge 28,000 lb. log skidder tire that broke loose and smashed two of our crates. Luckily, we only lost a couple parts, and we can wait for replacement.
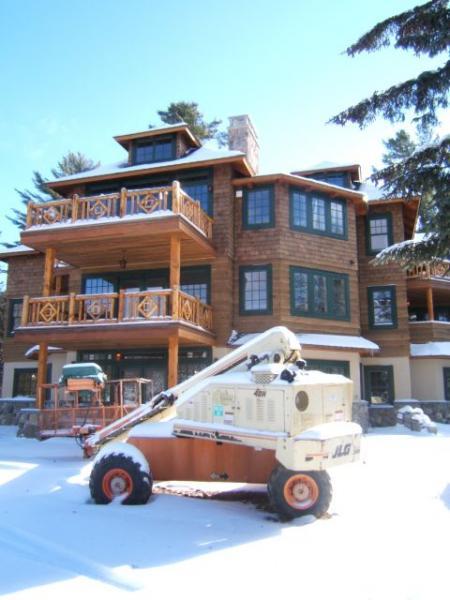
First, here is the jobsite. The pic is taken outside, and we are in a ground level unit to the far right. The stupid skylift is broken down.
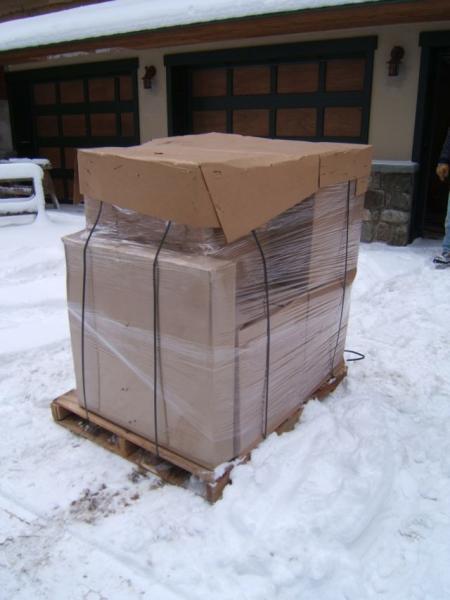
The shipment for this kitchen
comes in four skids packaged thus, two large skidded crates, and two long cardboard-wrapped and stretchwrapped packages of the long trim lineals and toekick stock.
The delivery van has a powered lift gate, and the driver gives good service by rolling all the skids inside with his pallet jack. The large crates get decapitated right on the trailer, and by hand, all the painted parts are carried inside and stored.
With the crates emptied of parts and all safely put away, we get out our boxcutter knives and unstrap the skids, shaking out and taking all the packages into the area where we will assemble things.
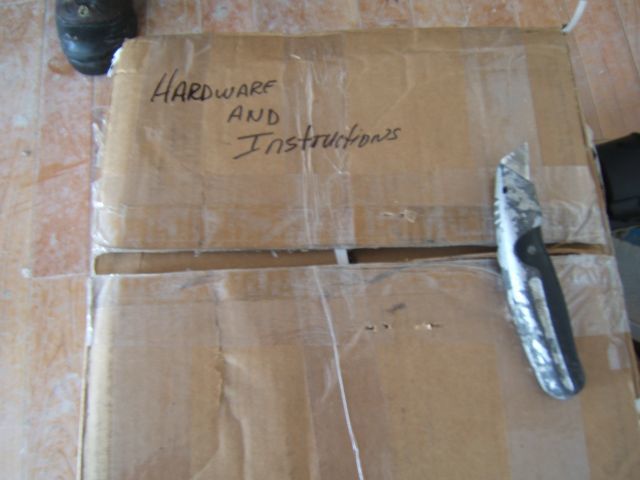
In breaking down the pallets, we are looking for this carton, without which we are lost.


Replies
The hardware-and-instructions box contains a lot of paperwork, but we dig out the plans and set them atop one of our sawhorses.
View Image
Then we find and lay out on a sawhorse top, the principal fasteners we'll use for carcase assembly. Here you see the minifix stud and its cam fixer, a confirmat screw, and a preglued dowel. Each comes in labeled bags, and there are good instructions for doing assembly with the minifix dowel and cam, plus a little tool. We just cinch up the cams with the impact guns. We load up our pouches with dowels and screws, and we're ready to go.
View Image
Pretty much what you'll need for assembly is shown here. Deadblow mallet, impact driver with a few different bits going into a mag holder, and a water bottle with tip. This GlueBot bottle from FastCap works great. We use it to pump water into dowel holes, and a spray bottle to spray the dowel ends after we have plugged them into prewetted holes.
View Image
We're going to be down on our knees a lot, so we put on some knee protection.
View Image
Edited 2/2/2007 4:50 pm ET by Gene_Davis
Is wetting the dowels part of the manufacturers instructions?
"When asked if you can do something, tell'em "Why certainly I can", then get busy and find a way to do it." T. Roosevelt
Yes, they are pre-glued dowels. The glue is activated by wetting them and it works pretty well, although the bulk of the work is done by the Confirmant screws.
Billy
Preglued dowels we've used have either a green or blue coating, sorta like a dull paint.
We use the wetting method I'm showing here, but I have used a small pail, about a third full with water, and loaded it with enough dowels for the next couple cabs or so. You wouldn't want to soak the whole jobsized batch.
Nice thread.
"When asked if you can do something, tell'em "Why certainly I can", then get busy and find a way to do it." T. Roosevelt
Gene, this is a great thread! Thanks for taking all the effort to photo and post it. There was an article in FHB a few years ago on this, but with all the pictures this is more useful.
Each cabinet carcase consists of a flatpack, carboard wrapped, strapped up inside with stretch, and a 1/4" thick back. We put all the backs together, label facing out, so they are easy to retrieve.
Lay a flatpack on the floor, zip open the tape fastening with your knife, and open it up. Take the parts out. There are two of us doing the assembly work, working on either sides of a sawhorse. Sawhorse legs make a nice lean-up-against tool.
View Image
In the pic above, a flatpack is in the rear, and the contents of another are in the fore.
Identifying the carcase sides, they are placed back to back on a piece of flatpack cardboard on the floor, R side at the bottom, L side at the top. We do this routine for each carcase assembly job.
View Image
Look at all the larger holes in the pic above. The rows at tops and bottoms make up the joinery for the top and bottom of the cab, and the three-hole array is for the stretcher. This is a base cab getting done.
Top parts are labeled "T" and bottoms are labeled "F" meaning "floor," stretcher parts are labeled "STR", while any adjustable shelves that are in the pack are labeled "S." If there are shelves, we put them aside in a pile, together. They get installed when cabs are up.
A cab carcase is going together here that will have a drawer at its top, two hinged doors below, and two pullout trays on full extension slides.
Any carcase getting slides gets its slides screwed on before anything else is done. The top slides go on thus.
View Image
In the pic above, my pard is holding a thing in place that will be discussed below.
If you are doing this for the first time, you're gonna go, "Omigod, the slides are prepped with so many holes, which holes get the screws?"
That's a good question. Scherr's precision-drills the carcase sides for the slides, three holes per, but leaves it up to you to figure the rest out.
Here's part of the answer. The front of the slide, positioned and ready for screw insertion, is a strong 1/8" from the carcase front edge. If it is for a top drawer or bottom drawer, the slide bottom (we are using Blum Tandems with integral Blumotion closing dampers) will be in the closest proximity to the stretcher board or cab floor as it can get. You can figure it out from there.
That thing Jack was placing in the above pic is a spacer block. We call them "billy blocks." Made of injection-molded plastic, they space the slides away from the carcase sides on the hinge sides of basecabs that get pullout drawers. Here is one close up.
View Image
Billy blocks screw to the sides using the double row of 5mm holes, then the slides screw to the blocks. Jack will install one pair at the lowest point possible, then another pair up about in the middle. Count rows carefully so the blocks are all in alignment.
Slides and blocks screw to carcase sides with Blum pozidrive "system screws." Go easy on them with your driver . . . they are soft and can do head stripout easily, a real bummer if you either haven't fully seated the screw or if you got a part positioned wrong and have to re-do things. Choose your bit carefully. Pozidrives can use phillips bits, which is what we use. Pozidrive bits are available from folks like Woodworkers Hardware, a great source for all things cab.
View Image
In the above pic, Jack is showing us how the billy blocks come in a bag with the screws needed for fixing them to cab sides in the bag. It is a good thing. The 5mm system screws used for both slide fixing and block attaching are slightly different, the block screws being longer. Easy to get confused. Don't.
With all the hardware attached, the other cab parts all get doweled. We lean them up against a horse leg, dowel holes up, shoot each hole half full of H2O with the water-laden GlueBot, then insert dowels. They may or may not need a tap. These dowels are so shrunken from the subzero cold they've experienced on their way here, they go in by hand.
Flip over the doweled parts and dowel the other ends.
Use a spray bottle to spray water on dowel ends, or GlueBot water into the dowel holes on the R cab side, and place your T, STR, and F parts. Lookee here.
View Image
One going together in the foreground, another in the back. We're doing time trials.
Find the right back for the cab and insert it, next.
View Image
Place the L side onto the assembly, tap it home so the dowels are all sunk and the parts reasonably flush fit, then start driving confirmat screws to bind everything up. In another post, I'll show how the minifix studs and cams go in. They are used when you have a finished side cab, one you would not want to see screw heads on.
Here is a shot of screw driving, beginning. The cab is flipped over to do the other side.
View Image
More to follow.
Edited 2/2/2007 4:53 pm ET by Gene_Davis
Edited 2/2/2007 4:55 pm ET by Gene_Davis
You must have a great pair of knees, Gene! I'd be for puttin' together an assembly table with a couple of horses and ply.
Never seen a preglued dowel before...wonders never cease!
Looking forward to this thread...thanks for posting it.PJ
Everything will be okay in the end. If it's not okay, it's not the end.
That all looks a little familiar. I put together our Scherr's cabs a year and change ago. The dowels then were blue, and we had to microwave them before using to get them to fit in the holes.
I'd vote for waiting to install the slides until after the carcase is done. Then you don't have them sliding out when you're trying to flip the box over. But hey, different strokes.
We had a couple of goofs, also. Three cabs off width wise from drawings. Leon was good, though and got us replacements in 8-9 days.
If the opportunity is there, I'd encourage you to be 'good' and recycle all that paper and cardboard packing material. I took a couple carloads of cardboard and a dozen or so 30-gal bags of shredded paper to our local dropoff.
I'd definitely use them again. They're a great value.
AD&E Sawhelper good
By the way, remember this pic? It is the building in which we are doing this kitchen. See the top floor with the dormers?
View Image
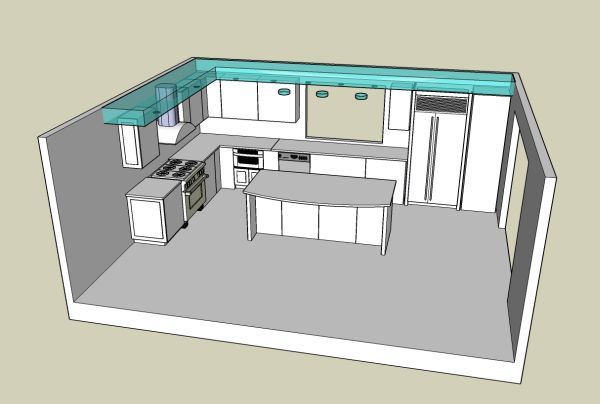
Here is the kitchen that goes inside that space on the top floor. No room for any uppers, but plenty of storage anyway, and a lot of counter space.
View Image
If you buy kitchen packages, whadda think this one goes for? Just the cabs . . . no countertops, appliances, lighting, flooring, tile work, etc. All select cherry, stained real dark, blah, blah, blah.
It's not that it is that expensive. If you are doing high end work, you've seen them much bigger and fancier. But to be prepared for negotiating with the new owner, we took prices from multiple sources, precise same specs, dimensions, etc. The numbers surprised us.
Hey Gene-
First off, thanks for sharing. I was never aware anyone else did flat-pack cabinets other than Ikea (I believe you mentioned earlier the quality on these is better, right?).
Anyway, do you think a DIY'er with a little experience can handle these cabs? And if so is the price difference from pre-built cabs worth the extra labor in assembling?
BTW: I've built large pieces of furniture using similar cam and dowel (non-glued) systems (including the quite large corner office desk I'm using now) before.
Scherr's sells plenty of cab packages to DIYers, I'm sure.
Go to their website and check out the gallery section and you'll see a whole lot of photos their customers have submitted.
Yes, they are quite cost effective, as compared to factory-builts, even factoring in the labor to assemble. Two of us can assemble a big kitchen in way less than a day.
One huge factor in cost effectiveness is that you are not bound to any modular size rules when it comes to cab width, or wallcab height. This kitchen you see in this thread has cab widths in it like 24-1/8", 14-3/4", and other odd sizes. With freedom to size to need, it makes for clean runs without the need for fillers, other than at wall ends, and you want them there, anyway.
Gene,
Thanks for posting this thread. I had lost track of it for a while, but I relocated it.
A little off topic, but what CAD program did you use to draw the 3D rendering of the kitchen in the dormer?
When I saw that along with the photo, it really clicked for me. I thought that would be a great sales tool for showing customers how the kitchen (or any other project) will look.
Thanks in advance and keep the pics. coming
I use Sketchup. Google has it, and offers it for free as a download. I use the $495 Pro 6 version, but the free one will do everything you see in the pic.
It is not only a great tool for presenting proposals to clients, but for making working drawings for building, for ordering materials, etc.
There is a learning curve to climb, as there is for any software, but it is worth the work, if you need a tool like it.
Updates Gene?"This is a process, not an event."--Sphere
Okay, I found it...so what are the RTA numbers on the proposed kitchen? Also, what are you doing for doors? Outside of the gates the trucks were unloadin',
The weather was hot, a-nearly 90 degrees.
The man standin' next to me, his head was exploding,
Well, I was prayin' the pieces wouldn't fall on me.
Check yer private mail. Right now, the proposed "penthouse" kitchen's status is on hold, waiting for legal machinations to settle, so we can deal with the owner directly.
Edited 3/11/2007 10:20 am ET by Gene_Davis
Here is an update, to show views of two of the finished Scherr's RTA kitchens in this condo project.
This pic shows the first one done. Everything is dark and woody inside these places, with a mix of roughsawn cedar ceilings, cherry flooring, doug fir kitchen faces, stone, and tile. In my opinion, the owner ruined the design here, opting to have me mirror the L-shaped island after it had been first built to the original plan. He thought he was "opening" a view, as there is a window to the R, but he in fact whacked nice clear access to the tall cab over against the wall. Furthermore, with the L reversed, one basecab door under the island needed its hinge preps reversed, so now it looks like swiss cheese. He didn't want to pay for a new door.
View Image
Here's a view of the second one completed. This one has a faux beamed ceiling treatment, all in doug fir. The owner wanted a big $6K built-in fridge, but the soffit height precluded that, as it is packed with HVAC ducting.
View Image
I never put shelving in a basecab, and specify full extension rollouts, instead. The Blum TandemPlus slides have the soft-close feature. The ultra-wide cab filler to the R of the cab door is needed, so that the door swing can clear the fridge front and allow the rollout to come forward.
View Image
This last pic shows two details of interest. Note that the wallcab doors have no light rail visible under when closed. I spec the doors to overshoot the cab bottom by 1-1/4", cab sides at the ends of runs do the same, and a 1-1/8" light rail fixes to the carcase bottoms out at the front, behind the doors.
The other detail regards the built-in Monogram microwave. Note the stile/rail surround. These microwaves need breathing room, having intakes and vents at their sides and top, which precludes building them in with zero clearance. Everything is frameless, but we bring our trim, fillers, and accents out to either flush or proud of flush, and maintain 3mm margins everywhere. The Blum "Inserta" hinges permit nice 3-way adjustments for dialing everything in, and they have clip-on closing dampers to prohibit door slam.
View Image
One last pic. It's fuzzy, and I need to be using a tripod for these inside shots, or get a better camera.
Recall the first pic in the last post, the one for which I describe the mirror-reversing of the L-shaped island. This shot is taken from about the same place, with the camera rotated R about 40 degrees. You can see the window on the far R.
The space did not allow much room at all for wallcabs, so I used what there was and did tall shallow storage cabs instead. The pic shows the one I stuffed into the recess adjacent the window. The cab was made deeper than a wallcab . . . both this one and the other one are 14-1/2" depth . . . and a recess was made for the GE Monogram microwave, there being no other place to put this very necessary appliance.
Note the arrangement of stiles and rails in this cab group, everything done around the size of the MW opening.
View Image
I gave the owner the ordering spec for the MW and its JX827SS louvered trim surround kit, all in stainless, but he chose to skip the surround and just paste the MW into the hole. Doesn't make me look good, seeing that drywall under the unit. Makes it look like Mr. Cabinet screwed up.
Gene,
I have installed Ikea KD. cabinets
From what I can see you are getting a much higher quality product. One question .. do the cabinets from your suplier come with hanging bars for the uppers and do the lower units have plastic setting legs?
If you recieve the setting legs do you actually use them? One other item , I grew to hate the packaging, we filled a 5' x 7' x 3' trailer full of packaging from these style units.. talk about waste!
Even though we recycled just as much of it as wecould it was still a $ drain to deal with.
In my package I didn't get hanging bars for the uppers. I did get the adjustable plastic legs and they are great!
Billy
Stay tuned for the details on legs, back cleats, etc.
It is getting fluffy outside, and the skiing for the next week or so should be wicked good, so when we take this back up on Monday, it might be noonish or later.
The packaging doesn't cause too much of a hassle. The drawer boxes come completely assembled, and we use the cartons they ship in to stuff everything else inside. The carcase wrappings are all flat half-corrugated boxboard, and roll up nicely.
Gene,
The 32mm system has been used for years.
Why use a impact driver for the cams when a 1/4 turn with a pozi-drive is all that is needed?
Chuck Slive, work, build, ...better with wood
It's a half turn, Chuck.
Impact driver when pozi hand tool will do? Because we can. One light squeeze, and it's done. You actually need just a slight bit more torque than a hand driver can deliver (at least from my wrist.) That's why Scherr's ships a little doohickey scotchtaped to the minifix instructions, with every order. It's a little steel stamping that has ends that fix in the cam slot and give you a better moment for turning with your fingers.
32mm came into play not long after the second world war. Come to think about it, it's been around almost as long as me!
Have you been to the forums at Woodweb and True32? Lotsa good cab info there.
Gene,
A couple of months ago I put together some cabinets I ordered from Scherr's. I should have taken pictures; I'm glad you did. A couple of cabinet backs were damaged in shipment and Leon Scherr sent some new ones out right away.
When I put my cabinets together I glued the backs into the slots to strengthen the cabinets, although I'm not sure it was needed. I also glued the attachment strips behind the backs that are fastened with pocket screws. They were made of particle board but they would have been better as 1/2" plywood.
Overall the quality is very good, and they have a nice system for putting them together. The shipping charges were less than I expected.
All of the pieces had a glued-on label with a bar code and description of the part. It's clear that Leon has a highly computerized CNC operation.
Billy
Edited 2/2/2007 9:24 pm ET by Billy
Mr. Davis?
Calling Mr. Davis.
Troy Sprout
Socialism in general has a record of failure so blatant that only an intellectual could ignore or evade it."
-- Thomas Sowell
It is unfortunate, because we have received and installed over ten shipments from Scherr's and had few if any problems, but this one has been a mess.
Because of both shipping damage and Scherr's mistakes, we are missing critical parts, and cannot complete work until resupply is made, and that stuff just plain isn't here yet.
Actually, there is only a little more to show about assembly of KD cabs. Once they are together, installation is the same as with any kitchen package.
When we get back in there, I'll show a little more about backside cleats, use of leg levelers (we greatly prefer them to any other kind of toekick subassembly), and installation of doors and drawerfronts.
Right now I cannot say when that might be.
The last part of carcase assembly is back-cleat installation. Cleats are 5/8" PB, the back offset is 3/4", leaving the cleat inset 1/8", to ease over some wall variations. Pocket screws are used to fix cleats.
View Image
And driven with the impact gun. What did we do before we had these things?
View Image
With a carcase assembled, unless it is a wallcab, it gets leg levelers. We use them at the fronts of all basecabs, with the rears bearing on cleats we screw to the wall.
Scherr's doors are 13/16" thick, and stand off from cab fronts by a sixteenth. We want our toekick faces 3 inches back from finished fronts, so we put the levelers on at an offset from carcase fronts of 2-7/8". Bases screw on quickly.
View Image
And then receive the leg in the socket. These legs will crank down to 3-3/4" at tight bottom, and jack up to about 5-1/4". If we need to get tighter than 3-3/4" to the floor, we can unscrew the foot from the threaded shaft, chop both with the chopsaw, and end up with one that can work in tight situations.
View Image
This kitchen is a mess, level-wise. The building is adapted from part of an old motel, and the floor is like the Andes. We've got toekicks running from 3-1/4 to 5-1/4.
BTW, for a fairly complete discussion of leg leveler use, mostly by pros, go to this Woodweb page: http://www.woodweb.com/knowledge_base/Working_With_Leg_Levelers.html
Edited 2/9/2007 8:47 am ET by Gene_Davis