Question for all the Pros out there new and old. My brother inlaw has purchased a house package from the local lumber yard and I have been looking over the blue prints jotting some notes down to help myself along the way and it just dawned on me that I had access to pros all over to give me some advise that I may not think of since this is the first house I have built from scratch. My part time business that I run with the help from my wife is a handyman service which I just keep fixing the old houses up around town so this is a new obstackle to chaulk up on my knowledge.
So here it goes I would like to know the good, bad, and the uglies of what to expect, and the best tricks of the trade everyone can give me though each process of the project since it will be my brother inlaw who bought the kit and another brother inlaw with his uncle (both are contractors) which I don’t really listen to they are the type that say the know it all and jump in to do the work then the truth comes out how much they know.(hehe). I usually like to keep up on the BBD (bigger better deal) or better knowledge in this case so I can reach the best of the best list. Any advise to building this house is greatly appeciated!
Thanks,
Scott
Edited 5/8/2006 9:55 am ET by fab4beck


Replies
What does the kit consist of? Is it just a pile of 2 X, beams and stck of plywood? or is it trusses, box beams and plywood panels?
The kit as far as I know is all the stick lumber and ect. It isn't a prefab kit. I haven't seen the first load yet but I also know that trusses are pre made at a local truss co.
We are waitng for the foundation contractor to finish before we call for the first load.
2-car attached garage
ACQ treated bottom plate
Designed to be built on a concrete slab (wood floor plans available)
7/16" OSB roof sheathing
Wall sheathing
Quality framing lumber
Pre-built and engineered roof truss system
R-13 wall and R-19 or greater ceiling insulation (code varies by market)
The plan looks easy enough to build, especially with the "pre-built and engineered roof truss system".
Framing a stick roof will seperate the frame carpenters from the wannabes.
It would certainly be easier to frame than the attached. We framed this 11, 650 SF monster in 1992 with our 'in house" crew. I was company owner and leadman. We also did all of the interior trim, pictured is the Great Room Finished with Red Aromatic Cedar beam dressing and Western Red Cedar on the walls and ceiling. The Great Room area is 30' x 64', and the roof peaks at 32'.
Seems you have lots of interested members here on BT. The BT Super Friends await your call.
Edited 5/9/2006 7:52 pm ET by txlandlord
Boy that was a monster! I'm glad that isn't what i am building for my first house. This one will be big enough for me to build for my first just a basic ranch style.
Yeah there seems to be alot more interest than I expected! But I am glad to hear from everyone and if anyone wants to jump in this project and help out we need all the experience we can get!!
Read the Spec House from Hell thread and hope nothing like that happens to you.
(-:
Thanks for the advice, I will check that thread!
I am already GC so there isn't any reason to hire one I am more than capable to do the job I was just asking everyone for some tricks of the trade that they have learned to make things go smoother and easier while building this house. I have already learned somethings that should help build this.
I realize you're a contractor, so the thread may not really apply to you. But in looking at your post count I saw that you were relatively new, and may not have read the story. .You may get more specific help if you ask specific questions. Like talk about how you like to frame walls and such. If you REALLY want to draw attention to the thread, just tell everyone you plan to assemble the walls using drywall screws.(-:
Practice safe eating - always use condiments.
Sorry I wasn't wanting to come off like I was meaning towards you I added that to your note but meant it as general info for all. I alsodidn't want to seem like I was being smart but it seemed like I was asking a simple serious question for advise and the only ones that took it serious was a couple people.
I haven't had a chance to read your thread yet but I will here shortly thanks again.
Hey welcome and I think I like ya.The problem is that it takes a whole book to answer the sort of questionb you started off with here. Nobody has that kind of time to write for free. But come on a specific problem and pipe up. You'll get answers.Actually browse the book setion though links at toip of yopur page and you'll have a good start on the info you are l;ooking for. Tauntonms line of books BY PROS FOR PROS is pretty darn good and some of the authors peek in here occasionally.best advice I can give about the project you are getting into with a kit and in-laws, is to smile a lot and stay out of the way of whoever thinks he's the big Kahuna on the job.
Welcome to the Taunton University of Knowledge FHB Campus at Breaktime. where ... Excellence is its own reward!
I agree piffin, thats what I was thinking of doing.
I realize it was a big question and i will check in as we get started so I can get more specific on my questions, thanks
RS Means also has some applicable books
Where did you get the plans and kit? Maybe we could access the plans or atleast some pics through the internet and our knowledge base would have something more specific.
Edit: opps, sorry missed the link.
Edited 5/9/2006 6:40 pm ET by txlandlord
I just read an old article from JLC building shear walls with 2 layers of ply/osb and it uses sheet rock screws. Must have been when screws were made in the U.S.A. cuzz we all know SRS have no shear or torsional strength.
Did it use adhesiove? if so, the screws were only a temporary feature anyway
Welcome to the Taunton University of Knowledge FHB Campus at Breaktime. where ... Excellence is its own reward!
No adhesive was called for. The article,"Stiffening garage door openings" by Harris Hyman. 3/8 or 1/2 inch ply or osb. Author prefers osb due to its uniformity. Inner layer uses 1 3/8 drywall screws @ 6" o.c. Outer layer 1 3/4 screws @ 6" o.c. Screws going into the framing. Jambs a minimum of 24" wide.
Any good carpenter knows that you use DECK screws on framing; not drywall screws! Sheesh! *rolls eyes* :-)
Welcome to Breaktime, the beatings will now continue.
Stop it, Boss! You should change you screen name to Boss "Worst Case Scenario" Hog! ;-)
Not every DIY housebuilder has an experience like you did. Let's be optomistic here.
Hey, I just got through reading the Spec house from hell thread, boy that was some ordeal you went through, I don't need anything like that to happen. Of course we are building it for my brother inlaw to live in and it isn't going to be started during winter hopefully we will have it under roof by then. I will also be fighting rainy days but that shouldn't be as bad as building it during snow and ice. Well thanks for telling me to read that thread.
Scott
Here is the best trick of the trade for your project: read BossHog's thread real carefully, then go hire a competent GC.
That is right, framer is to be left up only to those trained in rocket science! It requires a B.S. degree to just pick-up a hammer let alone swing one. PhD's only need apply.
As said in other threads, having gone this far, do ALL the work yourself, anything else and you get into the aggravation of trying to hire subs on a one-time basis.
Hey Art - Did you see the machine I posted a pictures of?http://forums.taunton.com/n/mb/message.asp?webtag=tp-breaktime&msg=73406.1You're old enough you should remember machines like this.(-:
If we quit voting, will they all go away?
Yep, saw the pix, did not respond as it had already been called correctely as a tire shaver (or truer, etc).
Not to hijack this thread, but was at a brake plant in Akron all last week, interesting big dynamometers, some 12 ft diameter, for testing aircraft brakes and tires.
To get back on track, earth filled tires make good 'framing' also.
Edited 5/8/2006 7:06 pm ET by junkhound
I don't know about those earth-filled tires: IIRC, it was in Eastern Washington (near Ritzville) a few years ago that the State decided to replace a washed out road base fill across a gully with old tires. So they built the fill, a good mixture of tires and dirt, all layed in layer by layer and heavily compacted, topped and graded with rock and finished with an asphalt surface.
About a month after the project was completed and open to traffic, the new fill caught fire and the road burned! (Spontaneous combustion of tires was the verdict).
man...I dont' know what to tell ya. Seems to me your walking headfirst, eyes wide open onto the deck of the Titanic...your comments about your Brothers in law already have me worried for ya....
there are so many factors to consider...what style of house is it? what is the lot like? is the foundations true. plumb. square? is it a walkout? lookout? slab on grade? crawlspace? full basement? truss or I joist floor? one level or two? how many windows? doors? garage? a traditional cape cod or farmhouse presents different challenges than a split level or these modern cut up things...
but in "general" terms...
1. keep the site clean and organized.
2. make a header-trimmer-cripple cut list . make sure you have the window schedule and clearly mark what header goes to what window.
3. start as early in the day as possible. I find I got 3x as much done from 7-12 as I did from 1-5.
4. make sure you use up as many scraps as possible. Why cut a 22" cripple out of a new stock piece when a cut off will do. Find places to use up scraps...backers and fire blocking work well...as do interior soffits
5. always start your wall layout from left to right (when facing the front door) and back to front...that is a general "rule" of the trade
6. be sure you properly prep your window openings (window wrap, pans etc) BEFORE you set the windows or doors...for a better idea on what I mean, go to Mike Smith's "Adverse Conditions" posting...better yet...read the whole damn thing...it is a great visual toutoral of how to get things done....its here: http://forums.taunton.com/tp-breaktime/messages?msg=67972.1
7. there are more, and I'm sure you'll get some better advice than what I give ya...
8. good luck!
knowledge without experience is just information.... Mark Twain
Politicians, like diapers, need to be changed often...and for the same reason. (bumber sticker)
http://www.cobrajem.com
Thanks for your time and advise. I know it was a big question to ask but maybe as I start to go through the process I will check back in for more specific advise.
The advise you had given is what I guess I was really wanting to find out was a basics on how to go about it and a few tricks to keep it as smooth as possible. As far as my brother inlaw he really isn't as bad as I make him out to be but at times it makes me laugh to myself seeing him scatch his head.
ok here is a simple example about 3yrs ago he ask me to help him do some repairs to some windows on an older building here in town and paint them. Well first thing that got me to woundering about his knowledge was he had started caulking the windows from the inside around the glass panes (the windows were the ones that look like a tick tac toe game) 9 lite windows i believe is the term. I said what are you doing, he was like "what?" I said " repairing the older windows like this you glaze them." he said " I have never glazed "so I showed him of course it ended up I glazed all the windows and repaired the rotten wood pieces by taking the bad windows apart to make new pieces with my shopsmith (i inherited when my father past away he bought new in 1957) put the windows back together and then he decided to help paint them but it seemed to me that I did most of the work plus had the knowledge and equipment to do this right. I believe in the back of my head that I either got played or he really didn't know what I was saying.
Thanks again for the advise!!!!!!!!!!!
oh by the way it is a full basement and the kit is from Sutherlands here in MO, the kit is called Coachlight . To see what we are building goto http://sutherlands.com/houses.htm
Edited 5/9/2006 12:22 am ET by fab4beck
fab... i looked at the floorplan... where is the stairwell for the full basement ?
View ImageMike Smith Rhode Island : Design / Build / Repair / Restore
They sell a lots of these plans in Texas.
I saw a plan not long ago with a "Texas Basement". The Texas basement was a room in the Attic.
Tx
I must be in a more refined part of the state! :)
Before coming down here I had heard of that term "texas basement" but having lived here now for three years I've yet to meet anyone that has called an attic a "texas basement", here in the city we just call the attic an attic!
Doug
San Marcos more refined than Hungeford, ha....we use vintage Texaco sign for septic tank lids.
The plans I viewed were actually in Houston. first time I have seen taht expression, and thought it was creative. Would you need use dynomite in San Marcos to create a basement?
TX
I'd need dynomite to dig a post hole!
I believe the first time I heard that expression was on here and it was FastEddie down in San Antonio that used it.
I thought it to be quite clever but I've still yet to here a local say it, maybe because I dont understand Spanish!
Doug
We call them Texas basements when they are in a 6000+ house and you have a large floored attic as opposed to just wasted space above ceiling joists. Basically an unfinished bonus room without any a/c.
A good 3 car garage w/3 car carport and a 12/12 roof will have a make ya a Texas basement.
I think thats how FastEddie described the Texas Basement way back when I first heard it.
It's clever but I notice a lot of people dont have "basement" in there vocabulary!
Doug
I have a friend named Robert Kirkpatrick. He has a brother who is a custom framer. Robert's mom lives in Kingwood. Are you his brother?
no relation there.
That door into the mastrer BR swings wrong. Should be in but hinged on opposite side.
I see no doors from master BR into master bathroomThat could be an inconvenient house to be the master of.
Welcome to the Taunton University of Knowledge FHB Campus at Breaktime. where ... Excellence is its own reward!
That door into the mastrer BR swings wrong. Should be in but hinged on opposite side.I see no doors from master BR into master bathroom
Details, details. There is another thread with some attention to bidding / estimating. I think unit cost pricing would be the only way to estimate build cost for that house, because it would provide a discount for the ommison of that door and the consequent lockset, doorstop, casing and transition strip from carpet to ceramic or vinyl.
Here I scanned the part of the print that has the stairs which there are located in the Family room.
This post is not really addressed to you Charlie. More an encouragement for teh orignial poster than anything.
I think the guy asking the question has some experience as I beleive he has said "he is already a GC". In any case, I beleive he is just here to share his excitement and enthusiasim as much as anything.
Sadly, in breaktime fashion, the guns come a blazing! Sure there is a place for the "eyes wide open" and "if you don't hae some experience" and "if you don't have the time" or "realize it will take three times longer than planned" and fifty other great points, but so often it seems to me that the comments are fairly demeaning and sometimes a bit arrogant on the part of the tradesmen.
JUST MY OPINION.
If you got the skills, and you should know, go for it.
What you said there was right mostly because I have the expience as a GC on fixing up the old houses but this will be my first house I have built so I decided to hear from some other experts on the topic to expand my knowledge before I jump in to get my feet wet and not drowned!
I thank you for your rightful asumptions.
fab: You bet. I am here to cheer you on. Eyes wide open for sure. But show fear and the sharks here will circle. Sweat a drop of blood and look out! LOL!
I am sure that many here have your best interest at heart, others don't think a guy can change a light bulb without hiring a "professional". I certainly respect the notins that building a house is a big deal, dealing with subs can be tough, it will take you three times longer than planned, and your marriage could be on the line! Once all that is said and understood, you should be off to the races.
Since this is your livelihood, only half of the above probably applies to you.
I like how you think and type what you mean!
This is a big deal for me, since I believe once I put this under my belt and in my porfolio, it should help get my foot in the door on alot more job oppertunites for my own business.
I have had my handyman service for 5yrs and I enjoy doing all the small jobs such as home repairs, painting, one room remodeling and all of the other little jobs that I get called for. I consider myself a jack of all trades, but not the master of all. If its broke I can fix it, if it needs done I can do it. I have never said I CAN'T do something, but I have added sometimes that I have tried it but I'm not the greatest yet!
Oh by the way i looked at your profile and it didn't see any info, like were you are from?
Scott
no problem DoRight...the bad thing about computers is they can not detect the tone or delivery of what is written...my opening statement wasn't intended to be a bash of the poster, merely a "eyebrow raised word of caution"...kinda like the time when your 17 year old son first comes to you and tells you he just bought his first car...and you remind him of ALL the hidden "costs" of buying a car...insurance, upkeep, tires, oil...as well as the car payment...
I only wish I were able to swallow my pride and ask for help on my first frame that I did solo/with my own crew...would have saved me lots of headaches...:)knowledge without experience is just information.... Mark Twain
Politicians, like diapers, need to be changed often...and for the same reason. (bumber sticker)
http://www.cobrajem.com
Charlie
...and you remind him of ALL the hidden "costs"
Reminds me of a farmer (no I didnt mean framer!) that I worked for while in high school, he always told me that buying the car was the easy part, took me a while to realize what he meant.
Sorry didnt mean to hijack, just brought back memories!
Doug
Clearly there is a great deal of wisdom and experience on this board, including yourself! No doubt!
Well first day starting to put the house together and I would say you are right on the time frames. My brother in law (the one that bought the house package) measured and chaulk lined were he wanted the walls to be put in the basement so we can get it ready for the first load of material (I hope tomorrow but it sounds like friday that means I won't be getting started until monday then), He is doing something different than i have seen before he is using 2x6 walls in the basement instead of the laminated beams to support the floor joist thats what we were getting layed out and built and yes the first four hours after we started building the walls we kicked butt and after that things just seemed like we didn't get much further!
Scott
2x6 walls in the basement are fairly common...especially in a house of this style...do the walls have any headers in them? I would ####-u-me there would be at least 2 doorway headers down there. Most modern homes have large LVL beams to open up the basement, but with your home, I would not be suprised to have the more conventional 2x6 walls.knowledge without experience is just information.... Mark Twain
Politicians, like diapers, need to be changed often...and for the same reason. (bumber sticker)
http://www.cobrajem.com
Right now we just put the walls up, but yes there will be headers put in as he figures out were he wants to place the doors at (he needs to get a visual because this part is not in the plans just in his head). We did put in a rough in for a sliding patio door going out of the basement. When I get some time I may try to post some pics that I try to take through this project.
Scott
Hey Charlie, I just posted some pics of the first day framing!
Scott
looks good...nice looking lot by the way...knowledge without experience is just information.... Mark Twain
Politicians, like diapers, need to be changed often...and for the same reason. (bumber sticker)
http://www.cobrajem.com
Thanks, believe it or not I was considering doing this to the very same lot but didn't have the money at the time and my brother in law hopped on it once he seen it, but atleast part of my vision is coming true, that is to build a house on it.
Scott
How about a request from a lurker. Can you take a picture from the same spot every once in a while like Mike is doing on his project in addition to some of the detail pics. It will make a good record for your progress in addition to entertaining us looky loo's. Thanks and good luck.
Lefty - Lurker without an attitude or a clue
Thats my plans anyway, I was going to post pics of it as I go through the process and hope to get in about the same spot to take each pic. Hopefully about each week I will be able to post some progress for everyone that is cheering me on to see it get built, I need all the cheering, advise and support I can get to feel my way through this priject since this is my first time building a new one.
Scott
Hey Charlie I have a question for you, We were putting the sill seals and plates on today and it seems like this foundation contractor may have put the bolts in the foundation alittle off than what I think they should have been. Were are the bolts suppose to be placed at on the foundation?
These were an average of 2 in from the outer edge of the exterior side of the foundation which didn't put them in the center of the sill plate. It put them in a 1 1/2 inch from the edge of the board which was a 2 x 6 PT. then when we put the sill plate on the garage foundation it screwed us up and we had to adjust how the board layed so it would leave it flush and straight for the garage wall that conects to the house. If I ever build a house again I hope it goes smoother than this one did today, it took us 12 hours to top cap the 2x6 walls we built Last wed. and Thurs. and mark the holes out to drill and place the sill plates down this includes putting the nuts and washers on the sill plate and cutting the bolt ends flush so the miss our joists. I will be back out there tomorrow to start building the joists so I hope it goes better then.
Scott
Edited 5/22/2006 11:49 pm ET by fab4beck
sad to say, but I've come across this same deal many times myself...you should be ok with what you got.
not sure i understand what problems you had with your garage layout...but that could be due to the fact I'm dead tired and my head stopped working about 4 hours ago...I'll read it again tomorrow.
a note...a lot of times, I end up doubling up the mud sill (sill plate) with up to 3 layers of 2x6...most the time I do use 2 plates...esp if the basement is going to be 8'walls...gives just a bit more headroom and allows the bolts to be buried in the second layer of sill. Not saying you need to do this, or should...just a note to put a wrinkle in your brain to recall later.
keep pluggin...it does get easier!knowledge without experience is just information.... Mark Twain
Politicians, like diapers, need to be changed often...and for the same reason. (bumber sticker)
http://www.cobrajem.com
Yes, I'm tired too it has been a long day but I thought I would get on here and post my question to see what you had to say about this situation before going to bed. I will try to explain it the best I can about the garage. We plated the house foundation first then went to the ajoining garage which has a wall that goes along the porch but from the porch to the other side of the garage/Livng room sill plate the bolts were on the other side of the foundation towards the garage wa which put the sill closer in to the garage were the other side put it closer in to the porch and gave us about a 1 1/2 inch jog on the sill in stead of haveing a straight wall it jog in the middle of the garage, if they were placed in the center where I think they should have been there shouldn't have been a problem keeping it line up. hope I explained it better. for you to understand what had happened.
Scott
Good luck to you on this project. I have a feeling you and your co workers are not framers but are going to give it a shot. Here is my two cents
1. You are probably going to save about 10.00 per hour if you don't screw up anything
2. You will probably get hurt during the job
3.Your will probably get in to a huge argument with someone before you get finished
I agree with every bit of your advise you said getting hurt and argueing with my one brother inlaw will be the to very currect asuption
1. You are probably going to save about 10.00 per hour if you don't screw up anything
2. You will probably get hurt during the job
3.Your will probably get in to a huge argument with someone before you get finished
And if you go into it with those thoughts in mind I'm sure they will come true.
Always the eternal pessimist!
Doug
Edited 5/9/2006 5:24 pm ET by DougU
In addition to what the others have said, generally it's a good idea to check progress for level, plumb and straightness, and make adjustments so each level is being built upon a good base. This can easily double the time of your framing if everything is constantly not matching up.
Use strings as often as possible to align walls and check surfaces for being flat.
A level and square foundation is needed to quickly put a floor on. A flat and square deck is needed to ease framing. The framing needs to be right for the trusses. The spacing of joists, studs, trusses, rafters, etc. need to be on an even layout (16" on center, 24" on center) for the sheet goods to be able to break properly.
If you only remember one thing from me, it's to keep your layouts constistant!
Thanks thats good advise everything does have to be strait level and square to make everything work good and smooth!
Just got started on the support walls in the basement here are some pics I took on the begining of the second day
I will try and keep you all posted as I make it through this project
Thanks for all the advise and enjoy!
Best of luck to you fab! I'm sure you'll learn a lot and every smart-a$$ here at BT, including me, framed a house for the first time, sometime.
No one seems to have asked, but I assume that you are familiar with the basics of layout and code for the framing job? I know you said you are already a GC, but I also know that where I live anyone who can pay for a liability policy and a license is suddenly a GC. I'm not trying to belittle you, remember that the regulars here are asked a lot of questions and from, I'm sure you'll know what I mean, many different "levels" of askers!
Despite the level of "forum fun" some of us regulars enjoy, this crowd WILL HELP! with your questions.
Joe
"Doubt is not a pleasant condition, but certainty is absurd." Voltaire
Yes, I am familiar with the codes and regs. This is a kit house so to speak everything is figured out for you except the support walls we were putting up in the basement in those pics. Everything else from the foundation up is all drawn out and figured out in a set of plans. Oh by the way were I am from that is all it takes here is money for the licence and insurance, your right they are popin up everywere. This house I am building is for a brother in law which I am not asking for anything in return, besides I believe the knowledge this well give me is well worth the time that I will be putting in and I am adding all photos and videos to my portfolio to help expand my business as a handyman.
Scott
I haven't read all the replies, but I used to build Lindal cedar homes and they were delivered as a kit.
First thing is to properly stack the lumber.... and if they send the trim package as well (like Lindal seemed to love doing) you need a place to store doors, windows etc. till you need them. A MAJOR PITA when you have the whole house sitting on the ground in a zillion pieces.
Then there's the fact that stuff is always missing, beams are sized too short etc. etc.
Then, as you seem to be ready to to, you got guys who are professional-in-their-own-minds only cutting into the lumber and using up stuff that goes somewheres else.....pretty soon you have a serious cluster f---ck and have to order more lumber (YOU get to pay for)
My advice would be for you to take a complete inventory of the kit upon delivery (before signing off on it) and if everythings ok take complete charge of the project and let everybody know it ....or walk.
Blind allegiance FOR ANY REASON is the greatest ignorance we can bestow upon ourselves.
Scott, sorry for being so late to post--we're ballz-to-the-wall framing new homes right now!
Lemme know if you've got any specific questions about particular details, especially once the walls start going up. From the plan you showed earlier it looks to be a simple house, not sure if the roof is hip or gable, but in any case trusses will probably make it easier for a novice.
As I understand it, you're a handyman, same as I was when I started out on my own, although I came from a framing background. I can tell you, learning production framing (or production anything) will give you the mindset to know when to cut a corner and when to spend time getting it perfect.
Good luck, bro, and talk to us before you goof it up LOL!
BTW, if you like call me at (251) 533-8657 and ask personally...I can't promise I'll answer but I'll try my best.Jason Pharez Construction
Framing Contractor
Same here Jason, I have been putting 12 hour days back to back since I started this project this includes the full time job at the factory. Of course today I had to stop early I got a sinus headache that turned in to a migrain that made my eyes hurt and couldn't think straight so I told my brother in law I had to leave at about 5:30 that put me at about 9 hours today.
I will tell you though, I knew this would be a challenge for me and I'm loving it except trying to deal with my other brother in law and his uncle, earlier we was doing great we all pull together and worked good as a team the uncle was getting the joists slidding them over to me I was in the basement on a ladder setting them on the one support wall my other brother in law was nailing them in place. We had a third of that basement done by lunch after lunch my other brother in law had to leave to goto work so his uncle and my brother in law were left doing it, when we got to the center section it didn't go as smooth we started placing them and after about 6 joist we noticed that they weren't coming out straight, that was about 2pm, at 2:30 the uncle left and there we were my brother in law and I went back through figured out what had happened and straightened it out and thats were I had to leave. I have to go back to work tomorrow but they are suppose to go back in the morning again, so I wounder what I will have to straighten out Fri. I guess what I'm boiling down to is it a seems like there is half way knows what is suppose be done (me) another that as common sense to notice and figure out somethings wrong (my brother in law that bought the house package) then we have two other that have there brains in there back sides. Well I think thats were some of my head ache came from today also, bu thanks for listening and being there when I need advise. I'll try to keep this posted as I go through my adventure.
Scott
fab, I think many of us feel for you. Thinking for four people is a big job!!
Yep I realize it and I know I can handle it I have already had some expience supervising, I was a night superviser for my workcenter when I was in the Navy. I am just going to have to get my brain back in to the supervisor mode after not needing it for about 13 yrs. except for the 2 kids I have which I think I must still have it because when my wife trys to get on them for doing wrong its like she wasn't there, then when I speak up everything stops and all eyes are on me, my wife hates that (hehe). Well I guess when we meet up tomorrow afternoon to work I will have to step up and tell them how its going to have to be built and it isn't going to work any other way so that we have less screw ups and everything should line up ALOT better by staying on the same pattern we started with instead of go off on another route that will end up having to redo later.
Scott
Dispite everything sounds like you are having a ball! Good going!
Yes I am enjoying it even with the double checking stuff and 90 degree sun turning me in to a lobster (first burn this summer). Wow what a rush, always have enjoyed a new challenge too. Boy it is a challenge when I haven't really done anything like this before.
Scott
So far it sems to be going ok as we go though the inventory list that was with the kit plus we have scratched our heads a few times trying to figure out what goes to what and were somethings are suppose to go.
As you read through the posts that I have made you will have noticed that I have another brother in law and his uncle helping us build this. The uncle says he has built houses before but it seems that he is talking to me about what were are suppose to be doing at different times when this is my first build and it seems I have more of a grasp on whats going on then either of them. You would think if he has built homes before he would be able to jump in and now what he was doing and would be correcting some of my errors, right. NO after he has left my brother in law that bought the house have been tweaking and straightening some of his screw ups, there isn't alot of them but he has screwed up just as much as I have ( I at least admit it and have kick myself a few times for doing some of them. Well thats enough jabbering for now I'll keep everyone posted and as questions come up I'll post them as well. Thanks guys for being there with all the avise.
Scott
That's why you need a chain of command when building a house. I always did the lay out for example.....I cut the plates marked them out..chalked the floor and placed them where they went. The other guys could load the studs and nail them together etc. This you should do. More than one guy laying out and you begin to have problems......same with rafters, etc.Take charge. I know you are in a sticky situation, but it will only get worse with uncle as time goes on ...
Blind allegiance FOR ANY REASON is the greatest ignorance we can bestow upon ourselves.
Yes I have been thinking about that and I'm probably going to bring some things up tomorrow afternoon when we all are going to meet there, we all have something going on in the morning so I stepped up and said we'll take tomorrow morning off to get what we have to do done and meet back out thereafter lunch to work on building the house. When we meet back there I'll probably speak up and get things straightened out so it will help having any more problems to redo later. All the time we keep redoing these screw ups they are going to prolong getting these house done. I realize that there are going to be screw ups since this is most of ours first house we built but the screw ups that have been happening have lead back to the same place. So that is what I am going to bring up is how we started figuring our spacings from left to right has to be figured the same way all the way though to the rafters so it all comes out lining up and straighter than it has been. So I hope I can get it though there heads because my brother in law that bought the house package has tried to explain what has happened on the screw ups when I wasn't there but it seems it hasn't quite sunk in yet. Well we will see what happens.
Scott
P.S. I figured a way that speeded measuring my 16" O.C., I made some jigs out of some scrap wood I had here at home I took a 2 x 4 cut it at 14 1/2" then took a 1 x 4 cut it at 16" put them together in a T shape to create a fast easy way to get my spacing the same each time I did this with the 15 1/4" O.C. and the 24" O.C. I'm sure that some one makes a jig like this but I had the scraps lying around and dreamed that up one day and made them. If you want I will try to take some pics of them to show you all what I did.
Edited 5/26/2006 2:22 am ET by fab4beck
Edited 5/26/2006 2:24 am ET by fab4beck
I figured a way that speeded measuring my 16" O.C., I made some jigs out of some scrap wood I had here at home I took a 2 x 4 cut it at 14 1/2" then took a 1 x 4 cut it at 16"Some words of advice, I wouldn't use this device unless you don'twant your sheathing to break on a rafter/stud/joist. You will havea cummalative error, cause the actual distance between studs spaced16"oc is actually 14 7/16". But that's just me. I would ONLY usea tape measure period
Believe it or not after we used these blocks to build the basement wall I double checked the 16" O.C. with a tape measure and they each ended up with in an 1/8 either direction of being on the money.
Scott
for short distances it will work,but when you get a long one that is when a problem will arise. I'm just speaking from experience, and you can do itthe way you want, that is what this forum is for is to expressideas and to take it or leave it
Ok, I will keep that in mind and double check it as I go. Thanks
Scott
I agree. Throw in the thickness of your pencil and less than perfect placement of the jig each time and you can be off an inche in no time.
Now six or eight foot long jig might keep you our of trouble but then it becomes unruly.
Two Cents.
Umm, it sounds like you invented framing square.
blue
LOL!
Nope, not a framing square just a stud spacer. I guess I will just have to take pictures to show you guys these things.
Scott
would you like a lesson on using a tape to lay out with?
Blind allegiance FOR ANY REASON is the greatest ignorance we can bestow upon ourselves.
Edited 5/27/2006 7:26 am ET by jjwalters
No don't need a lesson reading a tape measure but the reason for the back and forth of the 16's is the most of the boards have a twist to them.
Scott
I did just think of a specific question.
There is a double window in the diningroom, when I start framing the walls in, how are those framed in?
The way I have in mind on framing the windows is just making a doorway rough opening first then frame in the bottom section to meet the window rough opening. If I do that wouldn't that puts 4 - 2x4's in the middle of those windows, does that sound right?
Also were the stairs go to the basement they have on the drawing that the pantry is built with a sloped bottom to give the stairway the proper head room it shows having a double 2 x 12 on top of the floor level to create this head room, how does this tie in to the wall?
Scott
Your double window should be framed same as a doorway, Over 5 ft for a width I use two jack studs on each side of the window. Then measure down from your header and make yourself a window sill at the right height.
As for your sloped ceiling/floor in your pantry 2x12's I can't understand why they are sitting on top of the floor. Is the pantry floor at an entirely different height? If so build your 2x12 box then build your walls on top of the box.
But if the floor height is constant the sloped 2x12's sit on top of your basement walls same floor plain.
Hope this helps frame on manI only golf on days that end with a "Y".
In the drawing the windows are 2 single windows put side by side to make it a double. If I would make it like you said it doesn't seem like I would have a nailing surface for the inside flanges, or would I?
The pantry (closet) floor is the only thing sloped for the head clearence height on the stairway. The drawing has a side cut away like view showing the stair riser and tread measurements plus the head clearence view which look like they are 2 x 12 at the top of the floor and they also show the floor joist at the bottom which look like they are the same sizes. you almost have to see the drawings to understand what I am trying to say I guess. I would almost guess that they were doubled up like that to help strenghten that section to the load of that wall over the stairs.
Scott
Sounds like a mulled window to me, most of the time they come assembled together as a single unit. Look at your window and door schedule to verify, if you have one that is.
I attached a picture of a house with the mulled windows I think you are describing.
Edit: I think the floor in the pantry has been raised to give you the headroom for the stairs below. Just layout your pantry walls the same side to side and sister your floor joists to the studs for your 16" OC spacing. The last joist has been tilted to give you more headroom and a flat floor in the pantry.
I only golf on days that end with a "Y".
Edited 5/26/2006 8:29 pm ET by Stilletto
I will have to see about the windows I think the inventory list just has the same size windows on it.
The pantry floor according to the drawing is not going to be flat it will have a slope in it to allow for the head room, but I just wasn't sure how all of it went in to the wall and I think you answered my question. I was thinking that it had to go together like that but still not positive on how it will join in to the garage wall just yet.
Scott
If you have a digital camera take a picture of this stairwell on your print and post it here. Maybe someone or myself can help you out. I frame houses for a living and know what it's like to look at the print, scratching your head cooking in the sun.I only golf on days that end with a "Y".
LOL Stilletto, it's getting to be that time of year ain't it? 92 degrees here yesterday!
Fab, look on the plans where the double window goes...it should say something like "TWIN 2860" or "DOUBLE 3050". If so, then they're mulled together like Stilletto said and you just build one large opening...if in doubt frame the RO larger than it needs to be and pad it in later.
You can also look on the elevations to find out what the finished window unit looks like.
Also, like the others have said, be careful using your layout stick...the hotter it gets, the more erratic your layout will become LOL! If laying out with a tape is confusing, try this: Pull from one corner 15 1/4" and make a mark. Now drive a nail on that mark but leave the head up 1/4" or so. Hook your tape on this mark and pull even 16's.
Don't worry, by the time you finish, you'll have figured it all out ;-)Jason Pharez Construction
Framing Contractor
Not all that hot here in Michigan yet just very humid, probably pretty humid in Alabama to though. It's been a real wet spring here, so as it heats up the air starts to get real thick.
Like you said the hotter it gets the more mistakes I tend to make. Come back the next day after a real hot one and wonder what the heck I was thinkin. That sun can fry your brain. By the way glad to hear stuff has picked for you.I only golf on days that end with a "Y".
Ya it's not the heat, it's the humidity--70-80% makes 90 degrees feel like about 96.
Thanks for the goodwill--things are picking up well; maybe we can get back on track.Jason Pharez Construction
Framing Contractor
Yes I know about the 15 1/4 first then go on the 16's but as far as my jigs i don't really understand the big difference between measuring and and the jigs, the measure is already done with a jig which more accurate and consistancy. When I double checked my 16's the other day they were real close and if I were to have made that jig at 14 7/16 like was posted the other day. I would say my jig I made is keeping more accurate than if I were to measure all of them but things work different for everyone.
Today we got the stairs built, finished all of the butt end splices with our scrap, and all of the cross bridging. i believe tomorrow we are ready to lay the sub floor.
Scott
P.S. No, tape lay out isn't confusing I've layed walls out before, that is how I came up with my jig idea and the measurements so I could make it faster and easier to do. Also I felt it would make it easier for the less experienced , no names mentioned, LOL, Oh yah there is alot of 2 x 6's for stud walls around the bathroom and the drawing is hard to read how thick the walls but it isn't all of the walls. We are quite confussed about why there are 2 x 6 walls around the bathroom and there has to be more walls that are 5 1/2" than what is labeled.
Edited 5/27/2006 10:09 pm ET by fab4beck
Edited 5/27/2006 10:30 pm ET by fab4beck
2x6 walls around the bathroom are for running plumbing vents and drains and supply lines through the wall without turning the studs into worthless scrap. A 2x4 wall with a drain through it is pretty much cut to nothing.
I only golf on days that end with a "Y".
Yeah, what Stilletto said. Don't worry though, if you miss one of the 2x6 walls you can always come back and furr it out with 2x2's.
Are the plumber's stub outs already in place? If so look for the walls that have the big (3-4") DWV pipe sticking up. If the stub outs aren't in place, look on the plans for the walls that the toilet, sink, and tub/shower back up to--that's normally a 2x6 wall.Jason Pharez Construction
Framing Contractor
We haven't put the floor down or any stud walls yet we are hoping to do all the subfloor today and chaulk the wall lines out on the subfloor and then put some sealer down on the floor. We were just looking at the lumber and trying to figure out what was going were on this load he just got. So we noticed all the 2 x 6's and looked at the drawing and kinda got lost!
Scott
What's the sealer for?Joe Carola
The sealer is to protect the subfloor from the weather as we build the house, this way the subfloor doesn't get ruined during any rain we may get during the process of building.
Scott
I guess it can't hurt but it's really not needed or will ruin the subfloor if your using a good subfloor.Joe Carola
I thought it was to seal the chaulk lines in place
Welcome to the Taunton University of Knowledge FHB Campus at Breaktime. where ... Excellence is its own reward!
"I thought it was to seal the chaulk lines in place"Why even do that? If you use red chalk or some other colors they don't fade away in rain or snow. Unless your in rain city like Tim Uhler, but he even uses a chalk that doesn't fade away through rain or snow from what I've read from him.Joe Carola
Why? because this is a guy doiong this for the first time, and disorganization plus weather plus inexperience means maybe a month before all the walls are up, along with a lot of feet dragging back and forth to wear the chaulk off. I thought he miht have read about it someplace for that. This is a kit, right? kits are sold to inexperienced people along with a book about how to... The kit company might have had previous customers take a year ort so to get things covered in...Anyway - I was wrong. I certainly agree with you that if the subfloor material is worth using, it shouldn't need sealing, but then again, this is a kit...so they wouldn't necessarily be selling them Advantec
Welcome to the Taunton University of Knowledge FHB Campus at Breaktime. where ... Excellence is its own reward!
What is the price difference between CDX and Advantex?
about the same here for me. Both ran about $39.95 my last purcahse. That made it easy to select Advantec since it's the best.
Both were for T&G 3/4"I was afraid you'd be getting regular OSB which would be a waste of time if it rained once.
Welcome to the Taunton University of Knowledge FHB Campus at Breaktime. where ... Excellence is its own reward!
Do you really need T & G for subfloors? Why?
I built a home years ago and used plain CDX.
diaphraghm stability and less squeaks
Welcome to the Taunton University of Knowledge FHB Campus at Breaktime. where ... Excellence is its own reward!
Piffin,I didn't know this house was a kit because I'stopped reading this thread after the first few responses.I then raed his post about the sealer. If it will take that long after he snaps his lines to get the shoe/sole plates down then he'll have a lot more trouble then just a sealer.Joe Carola
I forgot - not all of us use that framing method for erecting walls
Welcome to the Taunton University of Knowledge FHB Campus at Breaktime. where ... Excellence is its own reward!
along with a lot of feet dragging back and forth to wear the chaulk off.
that's funny.i think i will use that one tomorow.Quit draggin your feat or we'll have to re-snap.
Why even do that? If you use red chalk or some other colors they don't fade away in rain or snow. Unless your in rain city like Tim Uhler, but he even uses a chalk that doesn't fade away through rain or snow from what I've read from him.
Joe,
We use the Blackline chalk http://www.blacklinechalk.com/products.html No matter how much rain you get, you'll still be able to see the lines. Only downside is that if you are doing a lot of snapping, and the chalk gets on your hands, they'll dry out and crack.
Red Iron Oxide is a pigment that’s used for concrete and masonry dye. It works very well for long lasting chalk lines. You can usually find it where you purchase concrete and masonry supplies.
Check out the FHB article “Concrete Mix Design.”
Sun and rain, no problem. I’ve used a lot of red iron oxide to snap lines and it’s always been there for me.
Home Depot sells a red concrete dye, in 1 lb. boxes, that sells for $4.95. Their product is called Pakmix©. I’ve never used it. I hope this information is helpful.
The sealer is used in building homes around here, several people and contractors suggested this to use plus use the water resistant chalk to mark all the walls all out before sealing, it sounded right to me because of the time between getting our walls built and we will be getting the trusses in about 3 - 4 weeks in that time that floor is going to probably get rained on plus its used on decks to protect it all year round.
Scott
Well guys I have pics that I took this morning, I think I have took pics of everything we have talked about. I took pics of different parts of the plans which I think I will be a mull window I does mention that on the inventory list. I took pics of the plans were the stairway is for the angle ceilingunder the pantry. I also took pics of the job site and my jig, which we started getting the flooring put down and haven't had any problems suprisingly. Ok well I get to the pics. I also took a pic of the double joist that the wall should be sitting on going of the stairway and the drawing of the bathroom area for the 2 x 6 walls. Enjoy and let me know how you think I'm doing. Thanks
Scott
Edited 5/28/2006 10:33 pm ET by fab4beck
pic 11...looks like you have your x bracing nailed at the bottomIve always waited until the floor was decked and the walls were upto load the joists than nail the bottom of x bracing. this allowsthe joist to flatten out. When you nail prior to loading you are locking in the individual crowns not allowing the joists tostraigten each other out. Also if they are touching were theycross that is a potential squeak. So they should be seperated a 1/4" or so. HOpe that is clear and it helps you out.
Yes, They were all put in place so they were easier to get to I never thought about them touching I will have to check on that, we straighten them out by tweaking them with a homemade board tweaker looks like about a 2 foot fork, I didn't come up with that one the HO did but it did straighten them out and looked pretty good eye balling them anyway but I wasn't nailing them in I was up top tweaking, but I will try to look to see how close they are. But you wait isn't it harder to nail in the top partrs or do you nail the top then wait to nail the bottom?
Scott
Edited 5/28/2006 11:14 pm ET by fab4beck
You always nail the tops in first and once the deck is down you nail the bottoms in or that's one of the last things you can nail in on the house. You straighten the beams out when you nail your decking down by pulling 16" centers. I put the plywood down first and when I get close to the line where the bridging goes that's when I nail them in.Joe Carola
Ok, Well oops, first timer mistake, well if I ever build one again I will try to keep that one in mind, but it does make sence and safer then I was doing it sliding a 2 x 10 walk board along to have something to kneel down on to tweak the boards.
Scott
Scott,In one of your pictures the smaller stairwell double which I thought was a double is not.It's interrupted by the bigger double. Is there a wall going underneath that later?Joe Carola
Yes in the plans for the basement it does call for a wall along the stairs but I wasn't there when the opening was framed in, but how would you have framed that in? I know it might be had to explain, (just asking for future reference). It is 2 same length boards side by side just had to tell, oops I was looking at the long ones never mind. You were talking about the short one at the end, there will be a wall length wise to the stairs and a door at the bottom.
In drawing it was alittle hard to see what they were wanting on that detail, all it had was double lines and the others did what they thought was the best way. The uncle seems to have built houses before so they went along with it and I wouldn't really had any better idea anyway if I was there.
Scott
Edited 5/29/2006 12:16 am ET by fab4beck
Edited 5/29/2006 12:19 am ET by fab4beck
If that wasn't getting a wall the short double should be a full double, not a single like the way yours is framed with the long double nailed into it and then two short pieces. Now the longer double would go into that with a double hanger.Then agin, this could be another regional thing and guys frame that way but I couldn't do that around here and pass inspection.Joe Carola
Ok so your saying there should have been 2 long doubles instead of spitting the one. If I am reading this right. Then the 2 doubles length wise get a (metal) double hanger?
Oh the one on the side there is setting on the sill plate around the garage foundation.
Scott
Edited 5/29/2006 12:39 am ET by fab4beck
Just thought of another question what trobles will occur if the sealer is used?
Scott
"Just thought of another question what trobles will occur if the sealer is used?"I don't know if there will be any because I've never used a sealer before.Joe Carola
When I was reading your post I thought maybe you experience some problems when using it.
Scott
When I framed my dads house 2 years ago we put sealer on the plywood subfloor, because I tried to squeeze my dads house in when I was waiting on trusses on two frames I had going. I came back a week and a half later and finished his house the subfloor looked new still.
After we hung and taped all the sheetrock we put alot of porcelin tile in and put it down directly to the plywood. I couldn't get a tile out in one piece I tried in 3 different rooms.
So the sealer didn't hurt one bit, I laid that tile two years ago and they are all still there in one piece.I only golf on days that end with a "Y".
I really didn't think it would, but framer was saying it might ruin the subfloor. I'm just curious of what happens or why he thinks it might. Everyone has there own ideas and experieces on different things so I'm just trying to keep everything in mind so if any problems do arise I might have an answer for the cause and effect theories.
Scott
Framer has much more experience than I do and thats a fact. I used on that house for one reason, I wasn't sure when I was coming back. My dad put it on the subfloor and it didn't affect in any way that I could see. If in doubt research it, call the company that makes the subfloor and find out what they have to say. Don't take it from me as if it was carved in stone, more like whittled in crayon.I only golf on days that end with a "Y".
I just was listening to you guys when this conversation started on the sealer I would imagine the sealer isn't going to hurt but the reason for the sealer is to protect the subfloor from the water puddling up and weaking the plywood during the time it will take to get it all under roof. I know several others here have mentioned it to protect it for the time on waitng for the trusses.
Scott
Joe - Framer - was not saying thatthe sealer would hurt the subfloor. he was saying that IF the sealer was NEEDED, that you would have a world of other problems. In other words, a subfloor that NEEDS sealer to survive for a few weeks of weather is a subfloor that is not worth using, like cheaper OSB. it will fail on its own soon or later.Another thing that can show up where sealer is a needed thing - It suggests to a pro framer that you will be working so slow that the weather has time to destroy other parts of the house, for instance the pile of studs has more time to warp...
Welcome to the Taunton University of Knowledge FHB Campus at Breaktime. where ... Excellence is its own reward!
You guys are too hard on the osb users.
I just drove by a hillbilly house that has had the osb on the roof for five years now. He managed to shingle the back side a couple years ago, but he's still not done sheathing the front. The stuff looks gray but I think it has swelled up uniformly. I wish I had my camera.
blue
Ok I was just had my mind on the subfloor not the 2 x 4's and ect. As far as right now they are stacked up under a tree with tarps on them with boards under them, thats how they took them off the truck and we put the tarps on them. After we put them up I realize theres nothing to protect themuntil the roof goes up.
Scott
Oh by the way guys, the uncle and me bumped heads today but I backed down and told him I was sorry. We both weren't understanding what what each other was trying to explain and I slipped and told him to shut up. After we cooled down alittle but we started listening to each other better and I think things were working out for the best. Between the sun fring our brains and stuck on our own way of thinking I snapped. In someways I think I was wrong for snapping but other ways I don't.
Scott
Hey, I like the joist spacing jig!
Thanks, I thought those would help make things alittle easier and I painted them for visibility and not to mistake them for scrap to throw away, lol. They seem to have worked great, we layed the half the subfloor the other day the joist lined up good just a couple places had to be tweaked. We will be laying the other half tomorrow.
Would like to try the jig idea?
Scott
We were wounder about that but also thought might be for structual strenght because the one of the bathroom walls sets about middle way in the house. I haven't got out there yet so I haven't took those pics yet of the drawings.
Scott
Hey guys, I have a situation that I might need some advise on, we finished laying the subfloor down today in between rain showers. We are noticing a few spots in the (I'm guess they would be called) rim joists were they are leaning out ward with a bow setting them about 3/4 of an inch outward which seems to me that once we start putting the walls and sheathing up it will make everything look wavy. Is there a simple solution for this, please say yes?
Scott
"We are noticing a few spots in the (I'm guess they would be called) rim joists were they are leaning out ward with a bow setting them about 3/4 of an inch outward which seems to me that once we start putting the walls and sheathing up it will make everything look wavy. Is there a simple solution for this, please say yes?"That usually happens where the joists run parallel with the rim/box. 3/4" is a lot, but that's why I don't nail the decking down on the outside until you snap the lines for your walls.That's how I do it anyway. Once my walls are snapped I nail my shoe/sole plate down into the plywood first and then slide my box in or out until it's flush with the outside of the shoe and then I nail the shoe through the decking and into the box.If the box is out 3/4" where the it runs perpendicular to the joists where they are nailed and the box is flush with the sills then you have big problems because your sills must be crooked.Where is this bowed?Joe Carola
Edited 6/1/2006 5:01 am ET by Framer
It is leaned out and bow at the top edge of the rim joist where the subfloor sets on it but the bottom where it sets on the sill plate it looks to be straight.
Scott
Lean it back in and make it plumb with the straight mudsill. Trim off he excess deck plywood.
five minutes tops.
blue
It is leaned out and bow at the top edge of the rim joist where the subfloor sets on it but the bottom where it sets on the sill plate it looks to be straight.Scott,I guess it's where the box runs parallel with the joists. So that's an easy fix. If it's glued and nailed just pull the nails out and snap your lines for your wall and use a small 2x block the size of your wall wether it's a 2x4 or 2x6 wall and use that as a guide holding it on your snapped line and nail your box to that. Or string a line on the outside of the box and nail it to the line.Your lucky it's not the other way.Joe Carola
Thanks, you and blueeyeddevil had about the same idea just hope it is as easy as it sounds, lol.
Wait just went back and read your reply again, there is acouple places that showed up one is at the end that is parelle but it bows in we can probably push it outward and nail but the other one is along the back side where the joist ends are nailed to it. We noticed it bowed out but it looked worse after putting the staight plywood edge next to it.
Scott
Edited 6/1/2006 1:21 pm ET by fab4beck
is along the back side where the joist ends are nailed to it
Oops! That's a harder one to fix.
Get in there and start sawzallin' to provide some relief space. Next time, when it looks bad by eye, fix it before you add more layers.
blue
yeah thats what figured!!!! But I was wishing real hard for a simplier solution.
It's raining today so we haven't done anything to it today.
Scott
Edited 6/1/2006 3:03 pm ET by fab4beck
fix it before you add more layers
Lol! Yeah thats always the best way
"the other one is along the back side where the joist ends are nailed to it. We noticed it bowed out but it looked worse after putting the staight plywood edge next to it."You can take the box off where it's out and snap a line from one end to the next on top of the decking at the end of the joists and that line will show you where your out and where you have to cut the beams. Next run your circular saw first through the line and then finish the cut with the sawzall. Do that on all of them and then nail the box back on.Or you can snap the same line across the decking where the ends of the joists are which is the inside of the box and then run your circular saw through the line deep enough to score the box at each bowed joist. Make cuts at each end of the box where you want to take it off and before you pull the box all the way off just scribe both sides of each joist onto the box.That saw blade is the depth you set your saw at and can just shave off the back of the box at each joist by taking the saw and going side to side with it. Once your done just pop the box back on.I've done it that way and it's faster than using the sawzall for me because I'm comfortable with my saw. If your not just use the sawzall and be safe.Joe Carola
I'll try doing these ideas and see how I do, hopefully I can get this staighter than it is or I think I will look really crappy. I know I have to do something, it ain't looking good the way it is.
Scott
fab, those rim joists outta be solid as rocks, with the pisssss naile dout of them. Toed into teh sill and three 16 d into each joist. How the heck did they move a fraction of an inch?
No real explaination just think we screwed up and didn't pay attention to the rim joist when we were nailing it together.
Scott
Well didn't get out there today until late about 4pm.
I was planning to cont. on with the walls that were built by my other brother in law and his uncle. When got to checking somethings out so I could cont. on the same track as they did, I came across some mistakes that I couldn't figure out what they were thinking when they were building the walls so I called the uncle at home and talk to him to see if he had planned on doing something different because I was getting my 16 OC on the inside of the walls but not the outside were I had thought they should have been. While I was on the phone with him and did a few measurements for him he said he had made a mistake and should have measured it from the outside.
There was also a spot were there is a 2 foot overhanging floor in the dining room that the ext. wall cont. about 3 foot as an int. wall and they had left the 3 foot off, he said he thought there was but he had ask my other brother in law if there was and he told him no, he didn't double check the plans to make sure, he took his word for it. My thoughts were that it should have cont. in as the int. wall so it could be connected to by the ext. wall to cont. along the back of the house.
I had a feeling I should have been there this morning but I had some other things that I had to do. I enclude a pic of the area I am talking about so you can see what I was thinking. Its the top right corner part of the plans is where there is a 2' bump out in the dining room that has a 5' wall with 2' ext. and 3' int. and cont. along the back of the house with the ext. wall.
Scott
Well we have most of the ext. walls put in place today, the uncle has been putting the walls up with out putting the RO for the windows and doors because my brother in law has been thinking of moving some of the windows doors alittle bit, so he has been just putting the stud walls up with out the openings because the placement of the windows and doors keep changing, this way we can get the walls up while my brother in law finally decides were he wants what.
It sounds fine to me because my brother in law has changed a few things in his mind and then you talk to him the next day and changed again, I think its kinda funny, when I would have went with the plans and made it simple except for one end of the house there isn't any windows and I may have added a couple windows there but the rest I would have keep it the same, he is making it alittle more difficult then it should be. But its his house and this is a good time to change a few things while it is being built instead of afterwards.
Scott
Well guys it's looking good so far! I had a chance to ask the uncle how long it's been since he built a house today he told me about 4 yrs. I guess it's just like learning how to swim you never forget you just have to think and refresh yourself some, but it seems he either isn't familiar with reading simple drawings or he is use to more detailed drawings because he is making alot of little mistakes that me as a first timer has caught, but all in all it's still turning out pretty good I think. All of the ext. walls are up and half of the int. walls are up. I have been gradually measuring out the windows and door placements as I can because they haven't put any in except for the front door so we could get in and out better with the boards. My brother in law the HO is finding out now after they been putting the int. walls together with the doorways framed before they stand them up that I was right. it's easier to do all of that on the floor than doing it after the wall is up. I brought that up once I seen the first few walls put up when I wasn't there. I haven't really been out there a whole lot the past couple of days I had a few small jobs that I needed to take care of and I probably am not going to make it back out there until thursday.
Well that my up date for now, I'll check back in later maybe I remeber to take my camera out the next time to get some pics.
Scott
Hey everyone,
Just got back in from working on the house and got some updates for the progress pics.
Uggh... am I missing it or are you leaving the cripples out for a reason. They may be there and I just can't see them.I only golf on days that end with a "Y".
I didn't see cripples either--he does know he needs them? (I guess you can use hangers and not use cripples.) I can't imagine trying to put the walls up without the door/window r.o.'s. (Workers must be thin to get through between studs!)
Reason I said something is we can't have split cripples around here.
The cripple has to go from the header to the bottom plate.
Hope for his sake the cripples are there, or he can put in split jacks.
If not he will have to use them header hangers.Can't you hear the violin playing your song.
Are you talking about cripples or jack studs.http://www.pbs.org/hometime/glossary/frame.htmCripple Stud
A shortened stud used to fill around an opening, usually under a window opening or over a door opening. Also called a crippleJack Stud
Shorter studs that support the ends of a header, which in turn supports the load of the studs above the opening. Also called trimmers.
When I replied to his question about cripples, I was thinking jacks, but also called them cripples. Jacks are what seem to be missing as far as I can tell.
I was talking about the jack studs, I call them by either name.
So good catch don't want to confuse anybody. Can't you hear the violin playing your song.
Here is how they are built. We went off of what the drawing is show for a typical window and door framing for the exterior walls and the interior walls. I scanned these real quick for you so sorry if they aren't real good.
Scott
It's a lousy drawing but it does show the required jacks under the headers, which are hard to see in your photos. If the jacks are not there, it's a major screw-up. Simpson does have a piece of hardware that is designed to take the place of jacks, up to certain limits
Welcome to the Taunton University of Knowledge FHB Campus at Breaktime. where ... Excellence is its own reward!
The drawing looks just like what the framing does you just can't see all the framing in the pics, sorry. I just took some quick snap shots because I wasn't feeling to good that day I had a bad headache that i believe the sun and heat gave me and I wanted to give everyone an update.
Scott
hope you feel better. Force yourself to drink lots of water. Water is your friend
Welcome to the Taunton University of Knowledge FHB Campus at Breaktime. where ... Excellence is its own reward!
Yeah, I do ALOT any more. I have had heat stress before and that wasn't fun!
Scott
As Stilletto mentioned, some inspectors will not pass split jacks. The drawing detail you scanned shows a window detail with a split jack stud (rough sill intersects the jack). As with Stilletto's area here we must have a solid jack from header to bottom plate. If you haven't asked your inspector you may wish to do so.
Yeah my first thought was to do it that way but ended up double checking the drawings and figured that if they had showed the split jack method than thats how they figured for the lumber in the package. The package had pre figured amount of lumber so I was playing it safe on what they had supplied. I'm just trying help him keep everything with in his budget.
Scott
The picture you posted of the window framing detail is a generic detail sheet that has been around for years, my dad wiped my a** with that when I was a baby. As far as figuring the material list off of that detail page, I think that most of your 2x4's for the windows are 8 footers anyway so you won't come up short by making 1 board go from the header to the bottom plate as opposed to making 2 seperate boards.
Keep working on it, though, but try to get everyone on the same page and organized better. You have added 2 days of labor (at your pace) by leaving all your headers out. Think ahead man, there is a natural order of doing things that will make the job flow....
I'm on the same page as you but these guys I'm working with seem like they try to do things right but they seem to end up taking one step forward then two steps back on this whole project so far. I'm not trying to knock these guys any, they all are working hard, but I'm like you there is a certain order to do things and we need to down shift a gear and look at what we are doing by keeping it square, level, plumb, ect. the couple mins. it may take to double check stuff could save us a couple hours re doing things later. I'm sorry I frustrated sometimes thinking of all the mistakes I have found that could have been caught if they would have took a min. to double check a measurement, the drawing and /or ask questions before doing it. Well i think I have relieved enough steam on you and everyone else, I"m sorry about that. Thanks for the good words.
Scott
Don't worry about it too much Scott, every framer here who has ever ran a crew has gone thru the same thing. Sometimes even us pros leave a job and someone else decides tot ry to run things and when you come back it looks like a big brain fart. It takes lots of repetion to develope a good system of getting things done. No house is as easy in reality as it is on paper. Just keep going and doing as much as you can and it'll eventually get done.
I'm starting an 8000' footer tomorrow wanna race ?
JK
I understand what your saying but I'm not really running a crew this is just a few family members helping build this house. It seems for one of the least experienced ones on this crew, I sure can figure out what to do on the problems we are having come up were everyone else seems to throw the hands up, but when problems come up I just don't give up on anything and set back look at things and figure a way to staighten it out. For example Sat. when we were putting the trusses up it was going great until we got to the kitchen dining room area and the trusses didn't seat were they were suppose to they were 2 foot off from the rest of the peaks, first thought everyone had was the trusses were wrong they all left but I sat down looking at the drawing and the house and figured out they weren't wrong, the wall we had in the dining room was wrong it needed to come down about a foot and a header needed to be put in to support the trusses. We all misses that on the drawing because there wasn't any real detail on how that should be built, once my brother in law came back I told him sit down you aren't going to believe this so I told what I figured out and he was ready to take his chain saw and cut that dining room bump out off but I calmed him down and said it can be done fairly easy we just have to put a header in and lower the wall to clear the trusses.
I have a pic of the drawing in this area I will add to help you see what I am talking about.
Scott
Edited 6/28/2006 10:46 am by fab4beck
I missed one like that on the last house I framed, I caught it before we were setting trusses. I was laying out the plates and looked over and realized I ran out of plate but had 6 more mono trusses to find a place for.
Your drawing at least shows a line where a header needs to go, my drawing had nothing. So I had to go get a beam across town that night so we could set trusses in the morning.Can't you hear the violin playing your song.
I am glad to hear I'm not the only one that makes mistakes like this, but I noticed the header in the drawing and wasn't sure why a header would be sitting there until we had the trusses sitting up there and then I got to thinking about it and it dawned on me what we needed to do. I think you bet me on that though it was staring me in the face on the drawing and yours wasn't. I'm sure I'll have plenty more mistakes before its all said and done!
ScottScott Beckett's Handyman Service
Jack of all trades
"Can't never did anything but can did"
That small mistake you made reminds me of another house we built recently, the GC changed the plate height over the front door with the truss company it was supposed to be 2' taller and I noticed it when I was hooking the first truss up to the crane.
I had to scramble and cut the old wall out and reframe another wall while the crane operator was charging me $75 an hour to watch it all happen.
When we finished setting trusses I said that his bill was an hour short, he said I didn't charge you to watch, it was worth it to see you cut that wall out with a chainsaw!
Can't you hear the violin playing your song.
The redneck saw zall, LOL
I wouldn't have charged you either, thats worth the admission for the show you put on. hehe. I can't laugh to hard, my brother in law was about to get his chain saw and chop that section off until I calmed him down.
ScottScott Beckett's Handyman Service
Jack of all trades
"Can't never did anything but can did"
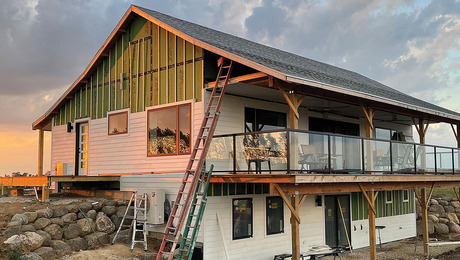
Here are some new pics taken today of the house I'm building.
If you look close at the back left side you can see where we had to change the wall to adjust for the trusses.
Scott Beckett's Handyman Service
Jack of all trades
"Can't never did anything but can did"
Edited 6/29/2006 9:44 pm by fab4beck
I see the reason now, the roofline is continued down to the lower plate height.
That seems like a long span for a couple of 2x12's to carry trusses and sistered rafters. Might want to put a string to the bottom of the beam and make sure it's not sagging in the middle.
Not sure of your location either, I have to deal with snow loads.
Looks good, keep on truckin. And that is a clean job site, really well kept up.Can't you hear the violin playing your song.
I didn't see any bracing on those trusses either. If there isn't any get some on there until you sheet that thing.
2x4's running diagonally from the outside wall towards the peak of the house on the top chord.
Up towards the peak, back down towards the plate with another 2x, then back up until you reach the other end of the house.
Those look like they cost some money, with the scissor trusses and all. I'd hate to see them fall and someone possibly get hurt or worse.Can't you hear the violin playing your song.
Well we do have some bracing on it but they are not the way you explained. We did it where we could get to it by walking the walls and reaching up into the rafters, down each side and through the middle. The header is what they called out for in the drawing so thats how we built it.
Oh I'm am south of you, in Hannibal, MO you know Mark Twain land. I looked at your profile and it says your in MI.
Scott Scott Beckett's Handyman Service
Jack of all trades
"Can't never did anything but can did"
I didn't read your profile until after I posted that to you.
In my area we probably have a pair of 11-7/8 LVL's in that case.
The more bracing the better in my opinion, one good wind is all it takes. I couldn't tell if you had any braces on.
I'm not trying to sit back here and tell you how you should do your job either. So don't take it as that.
Can't you hear the violin playing your song.
I wasn't trying to say you were I'm glad everyone here is giving there opionion and I try to post pics and describe what I'm doing the best I can. I am not real up to par on my framing though, I can fix up a house but never have framed one until now.
ScottScott Beckett's Handyman Service
Jack of all trades
"Can't never did anything but can did"
Nice looking job Fab4beck. I'll bet you are thrilled to get to this stage.
You still have a long way to go, so keep your petal to the metal.
blue
Hey blue, I seen those trusses going up and stood back when we got that far, and my blood was pumping, I was ready to jump in and finish this baby, LOL.
ScottScott Beckett's Handyman Service
Jack of all trades
"Can't never did anything but can did"
Hey All,
Haven't been out at the house for a week, I took a well needed vacation. I will be heading out there in the morning. I guess they got all the roof sheathing on and half the felt paper. I guess its there way of saying I'm doing the shingles, LOL.
Just thought I would check in and see everyong since it's been awhile. Hope to talk to you all tomorrow.
Scott Scott Beckett's Handyman Service
Jack of all trades
"Can't never did anything but can did"
Hey guys,
It's been a long time since I been back and sorry about that!
I have been soooooo busy, I feel like I am running around with my head cut off, HAHA! Well here is an update to the House building. Take a look!Scott Beckett's Handyman Service
Jack of all trades
"Can't never did anything but can did"
You got all Indians and no Chiefs dude! That's no way to frame a house. Be the chief bro.... be the chief. I tell my guys all the time.... this ain't a democracy.
Keep at it... you all are plugging along just fine. Framing's the balls, ain't it?View Image
You nailed that right on the head man!!!!!!!!! It seems that I have took control to a point they all keep coming to me now for the answers to there problems they come across in this build, I really don't understand how this came about except for me always finding the mistakes and coming up with the solutions for them.
Oh by the way building this house is a rush man, I'm loving it even with the mistakes we are making its a rush to see something come to life that you have built with your own hands and mind! I get like this every time I do a remodel for someone too, the change that occurs from start to finish is a rush at the finish and sit in amazement of what I can accomplish when I use my imagination and create from different things I here my customers say they are wanting to see done, then see and hearing them praise my work to me and others. It's unbelievable
Scott
Scott Beckett's Handyman Service
Jack of all trades
"Can't never did anything but can did"
Edited 6/29/2006 12:32 am by fab4beck
That's a typical mistake by novice framers. I made that same mistake thirty years ago.
You've got about five thousand more mistakes to make to catch up.
blue
Oh I now your right on that!!!! I am making the mistakes right with them and I bet by the time I'm done, I'll see your five thousand and raise it a thousand more, LOL
ScottScott Beckett's Handyman Service
Jack of all trades
"Can't never did anything but can did"
THey were building walls without window and door openings? Never heard anyone do that, and has to bee a lot of work knocking out studs and then adding back cripples etal. UGLY!
Believe me I wasn't any part of that! I had to be else where when they started doing the framing other wise I would have stressed to them it was easier to put them in on the floor. but they did do it on the interior walls just not the exterior walls.
Scott
Ok I will try to do that maybe tomorrow because everything is out there at the site.
Scott
There are books. Larry Haun's books seem quite competent, but your local library will have lots. Getting that kind of comprehensive overview is likely to be more important than what an online forum can offer. Then come back with your specific questions.
Bill, never framed more than a shed, so I sure can't help.
I have a framing book I had bought and explains stuff real good but sometimes I like to explore all knowledge before and during the process of doing new things. Thanks for the info though.
Scott