
I am a general handyman in Baltimore and I don’t always know what tasks a client will have for me when I show up. Even when I get a list ahead of time, there are always those”while you’re here” items. So I like to bring everything I think I’ll need to a job.
That’s fine for all of you guys with E-series vans, or big pick ups, but I’m working out of a minivan. It started as a necessity, because that’s what I owned, but I’ve come to realize that it’s as close to ideal as I can get for my many different, sometimes competing, needs. It’s the right size for most of what I do, it fits my gear (now that I’ve added a few things) and I still have room for the morning grade-school carpool. If I need extra space I can pull out the bench seat in a snap. As a bonus, I think the minivan flies under the radar of those with prying eyes because it looks like a thousand other family minivans.
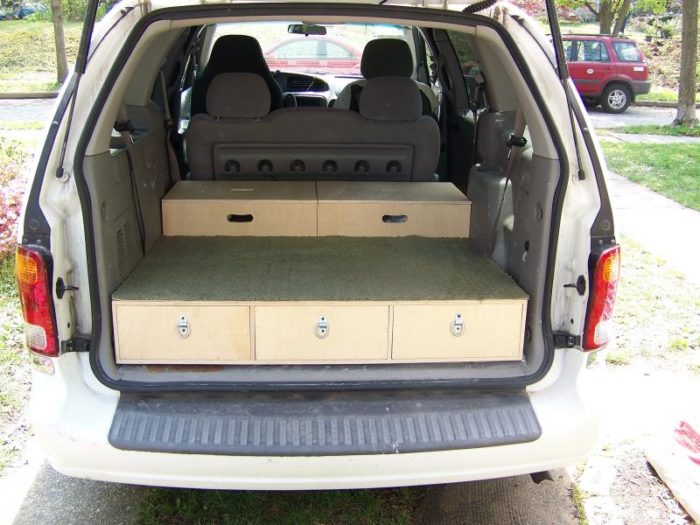
My original setup had most of my tools in buckets with those nylon pocketed sleeves and a tool bag with the items I most commonly used. That got old after a while because the buckets were hard to reach and some tools got buried. I also saw the space above the buckets as wasted because it’s hard to stack things on top of overflowing buckets.
I looked in the forums here and on other sites to see what other storage options folks have come up with. There were some for vans, and some for pickups, but I didn’t see anything for minivans other than on factory sites.
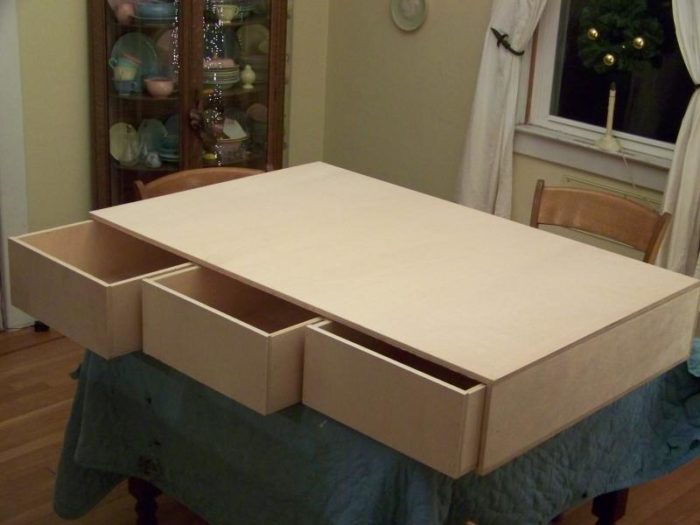
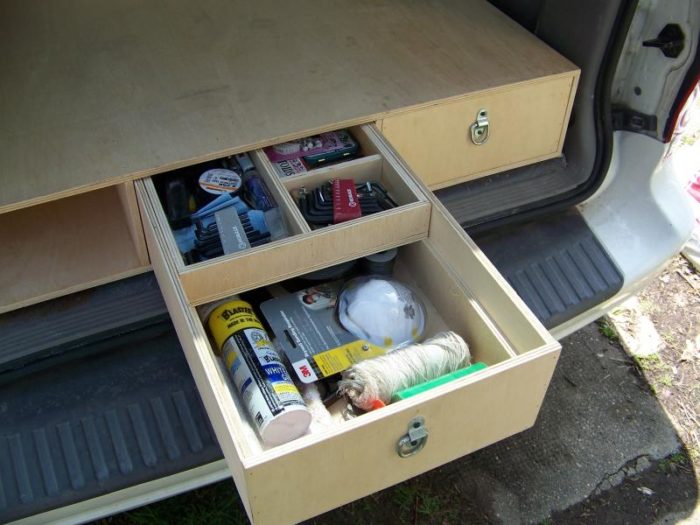
So over winter break this past year I finally broke down and built the drawers and boxes shown here. Everything is 1/2-inch birch ply. I figured 3/4 was overkill and I wanted to save a little weight. No fancy joinery; just glue and 16-gauge brads. The drawer boxes are waxed on all sides for easy sliding, even with about 45 pounds of gear in each. I added simple D-ring pulls and drilled the back of the case for air vents to make opening and closing easier. The sliding trays rest on strips of 1/2 inch ply tacked to the inside of the drawers.
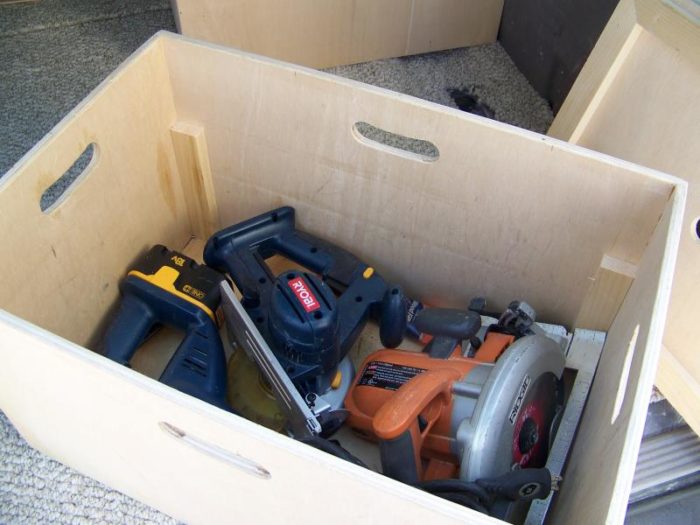
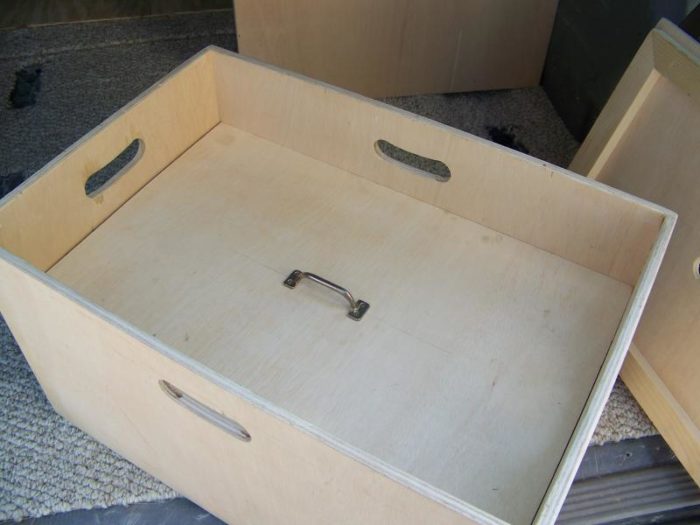
The “cargo boxes” are the same construction with cutout handles on four sides. They have drop-in shelves that rest on 3/4-by-3/4 blocks. The boxes hold larger and loose tools like my circ saw, recip saw, drain auger and some 12-inch clamps. Tools with multiple accessories, like a corded drill with hole saws and wire wheels, stay in their factory cases and slot in on the side. I also keep all of my chargers and spare batteries in the case that my cordless drill came in. (I used a Dremel to remove all of the interior gussets and dividers to get more space.)
I left all of the plywood unfinished as sort of an experiment to see what kind of “patina” would develop, though I added a scrap of very nice carpet to the top deck of the drawers to keep things from sliding around.
Over this spring break I organized the loose items I carry with me into clear plastic bins, and I finally got the bright idea to hang my step ladder from the small built-in clothes hooks with bungees.
It all takes about 30 minutes to empty out and everything totaled up weighs about 425 pounds. I get about 14 mpg loaded, vs 20 on a recent tool-less family trip.
I’d love to know what you guys think about this setup. Any suggestions? Anything you would have done differently?
Thanks,
Rich Dowd


Replies
I like it
Simple and effective.
I like what you've done with your Minivan!
I'm a DIY who uses his 2003 Kia Sedona as his "work truck". I like the way you've set up your tools fot nead and easy transport, but my question for you is:
"How do you transport materials with a Minivan?"
This is what I do, and I can't see how you could do the same with your setup
Sheet Goods:
With my vehical, the rear door opening is exactly 4' wide... about 6" off the floor! That means any sheet good cannot simply be placed on the floor and shoved in. When this happens, I need to bring along a bucket or two. This allows the sheet good to rest on the folded down middle seats in the front, and on the buckets in the rear.
Long goods (Lumber/pipe):
There is a path directly down the center of my vehical where I can place about a dozen 2x4x8' boards. The will wedge between the seats, but I have to stack them carefully otherwise they will not allow me to shift into drive! Along the passenger side, between the seats and the door, there is a narrow area where I can get in thin but long pieces, such as 10' lengths of threaded rod or conduit.
For transporting longer pieces, I have a bed extender. It looks like a goal post attached to a 4' tube coming out my hitch point. It's not really used to carry weight - it's used to keep loads from shifting side to side and keep stuff from tilting back out. With this I can easily transport 16' long boards (10' of the span rests on the floor of the minivan), I've even used it to transport 20' long pieces... very very carefully!
I think in the future I'd like to build a "roof rack" that would mount to the front tow hook points and the rear trailer hitch, keeing a load securly suspended overhead - or possibly a side carry system that would allow me to carry the long boards beside the passenger side.
I like it. Of course, I'm biased since my van looks like this:
Van pics
Sir,
I really like the drawers you built. How much shorter are the trays in the drawers than the drawers themselves.
I would like to build something like it if you don't mind me copying you.
Thanks,
Jim
I wondered why I never got any replies here. Now 8-1/2 years later I'm updating my billing info and I see that I didn't check the "send me e-mail notifications" box when I posted. I'm sure nobody was waiting around to hear back from me, but as long as I'm here . . .
For xxPaulCPxx
The Kia Sedona is pretty similar to this Windstar. (I've since moved to a Town & Country.) I have the opposite problem for sheet goods. Both the Windstar and the T&C are 48+ inches wide at the floor and the sides taper in starting at about 16 inches from the floor. The most I'll carry in sheet goods is maybe half a dozen sheets. My work is small scale honey-do stuff. If I need more material and it won't fit on the roof, usually the job is not a good fit for me anyway. If I think it is I'll rent the home center truck for an hour.
I do something similar with long dimensional lumber and trim: straight down the middle. I have (had) a column-mounted shifter so the material rests against a cubby below the radio. I like the idea about the hitch-mounted extender. Does that mean you have to drive with the tailgate open? Or does your rear window roll down?
I like how DonCanDo stores his ladder underneath. I wonder what's in those giant drawers. They look heavy.
Jimamoses
The sliding trays are about half the depth of the drawers, front-to-back, and about half the height. If I did them over I'd use 1/4-inch material for the runners, and maybe 3/8 for the trays. it would save a little interior space. I definitely recommend doing them, though. They help keep small bits and bobs from getting lost in the chaos.
The outside dimension of the case is 48x32x7.5. The two cargo boxes are 24x16x14 tall, so they fit side-by-side ahead of the drawer unit and keep (kept) cased tools from sliding forward.
About a year after originally posting this I built a second set of drawers for holding smaller items and materials. Again 48 wide and 32 deep, but 6.5 tall with 4 drawers across. When this set sits on top of the original case, the total height matches the cargo boxes to make a 48x48 platform.
The problem with having a large flat area is that nature hates a void and I tend to fill the space with tools and bins. So now that I don't have to carry kids to and from school, I have plans drawn for more drawers to fit in the center of the van that will open to the sides and a large lidded box to hold all of the tools that are in hard cases. These drawers will hold all of the tools, supplies and materials I've accumulated that currently live on top of the cases and boxes.
If you (or anybody really) decides to build something like this, I would make a pitch for the idea that simple can sometimes be better. Don't overthink it. I know plenty of folks use heavy-duty drawer glides, rabbeted and dadoed joinery, and all kinds of hardware, and kudos to them for sure. I know half of the point is to use your skills and build something to be proud of. These are just wood on wood. I waxed the sides of the drawers and the insides of the carcass when I built it and once again a few years later. They still slide fine with no binding. There's no sign of wear, no little bits of sawdust to indicate that they are wearing down. My skills and tools have improved since I built these, but the new sets will be made the same way because they work.
Stay tuned. I promise it won't be 8 more years before I'm back.
Thanks for sharing its nice to be here. I would like to see more of your drawers until your next post.
It's sad that it took a pandemic for me to have enough time to finish the storage in the Big Blue Whale. The center casework is in. I still need to figure out what drawer holds what crap, er, material. All of the cased tools (nailers, corded drill, etc.) are in a lidded box. The wide T-shaped lidded box holds long items (level, vacuum wand, cleaning brush) and scrap lumber and trim. Here's what it looks like, and an honest pic of what it looks like when I add my daily tool bag, parts bins, and step ladder.
It looks great! I have never seen anything like that before
That's a great job. And very neat finish.