Hi guys,
The rough in for my hansgrohe tub filler finally arrived. I need to mount this rough in into a slab so the tub filler can fit on top of it and the tiled floor.
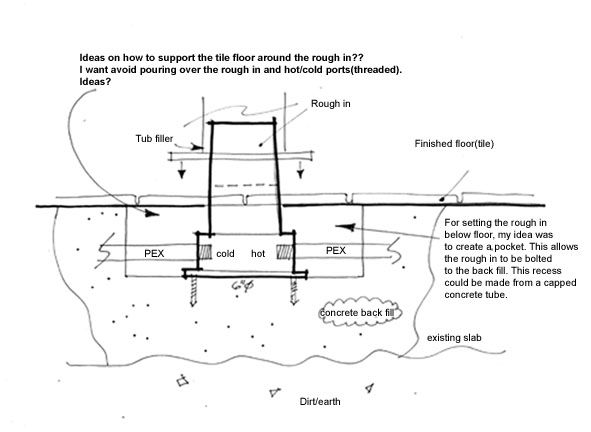
My problem is, how to set this rough in w/o pouring backfil concrete over it. The hot/cold lines enter in near the bottom of the rough in and are threaded. I dont like the idea of concrete over connections especially threaded connections. I plan to use PEX. If I dont reinforce with concrete back fill the tile around the tub filler flange is not supported.
A couple of ideas are: Backfill a recessed pocket to bolt the rough in to. Then bolt a steel plate higher up to floor surface to support the tile. I could level out seams with thinset etc.
Just dont know if this is a bad idea or good idea. Or am I over complicating this?
A suggestion over at a JohnBridge suggested making a 2×4 box with 3/4 plywood covered in hardi backer then tile over it(small area) then caulk this tile if I had to get access.
Anyone mount a hansgrohe rough in for a tub filler on slab, how do you do it.
Attached is a detailed view of the setup.
BTW. The idea of mounting on a box dosent appease the wife, its gotta look like the pics in the fancy home magazines…which I think it should too! View Image
Thanks for the input..Chris


Replies
Bump
I'm not sure what part you're trying to install, and why it needs to be in the slab. Can you post a link to the website so we can see what it is?
In 2006 I installed 54 Grohe deck mount tub fillers, 12 of those were slab, with the rest being stone tile, mainly marble.
None were mounted from the floor though.
All of the ones were mounted below a substrate usually made of steel stud framing, with denseshield, durock, or hardi backer covering it. Over that was thinset then the slab or tile surface.
Deck mounted faucets are designed to "sandwich" the substrate & sometimes the substrate & finished surface.
From the looks of your pic you don't have a "deck" mount but more of a pedestal style--- I think.
If the spout rough-in is designed to mount down to something like a shower valve is designed to mount to the back, then I would do as follows.
I would use a zinc coated steel plate about 12 gauge--- nothing lighter than 16g though. Drill a hole in each corner & use some cap screws with nuts to create a stud post to help tie it to the concrete.
Cover steel plate with 10mil pvc wrap tape set plate at subgrade.
Two choices of mounting---- self tapping tech screws, drill & use a stove bolt type set up, which would be my choice.
I would cover the whole valve & the pex connections with self adhesive foam tape. This will allow the concrete to hold the valve firmly while letting some room for expansion, & contraction. While keeping the concrete from corroding the valve assembly.
What's the model # of the HansGrohe---- I'm not familiar with the drawing you posted.
“The Hand of providence has been so conspicuous in all this, that he must be worse than an infidel that lacks faith, and more than wicked, that has not gratitude enough to acknowledge his obligations.” —George Washington
Guys,
First thanks for the reply and input. It is a freestanding filler(comes right out of the floor). Here is the tub filler link http://www.hansgrohe-usa.com/products/singleprod.php?prod_num=10456&pass_group=Bath&page=prodthumbs.php
you can click on the rough in .PDF to get an idea of the situation I am in. The rough in gets mounted below slab. The plaster guard gets trimed 3/8 above finished floor so I have room to work with below slab. The tub filler gets mounted to the top of the rough in. In my first post I didnt illustrate this correctly. I still need to mount the rough in below the finished floor. The rough in has threaded connections too so a pocket unde the floor is the way to go.
Hope this helps..chris
OK thanks for the link.
My recommendations still stands on how to mount it.
You need a good substrate to mount it to.
“The Hand of providence has been so conspicuous in all this, that he must be worse than an infidel that lacks faith, and more than wicked, that has not gratitude enough to acknowledge his obligations.” —George Washington
Plumbbill, thanks for the input. It is a deck/floor mount filler. I think I follow you, here goes...I like the idea of steel vs wood(other forum suggestion). Not sure where I can get a 12" square plate(zinc/or galv/ coating). I think Henrys coated over plate, steel 2x4 and bolts would be enough protection in addition to 10mil palstic. I am concerned since the rough in has opposing cold/hot ports the PEX wont be that flexible for running PEX back to the wall. So a small 2x4 steel box will be atleast 12" square. I will still need to have a steel plate for a lid so the floor tile substraight will be solid. I am not sure of wrapping the valve in foam tape, are you suggesting to pout right into this rough in box?
Another question, same project: I am using PEX off the copper starting approx. 6" off the sole plate in the wall - run the PEX down through the sole plate into the chipped out concrete hole and into this 2x4 steel box. Quickcrete poured over this run. Should I slip Armour Flex foam sleeve over the PEX? I was told PEX can handle concrete as is. Is this a good idea or overkill?
thanks again...Chris
I said steel, for the simple reason is it won't rot.
12 x12 was just a number that would give a wide base with plenty of surface area.
An electrical J box cover would work quite well, they come in pretty much any square size you can think of. I have seen 10 x10 & 12 x12 at the box stores.
Page 6 of Grohe's directions shows the valve being poured in the slab ( I'm not a big fan of pouring valves in concrete) so that's why I suggested the foam tape.
If you plan on running the supply lines in a chase, then I would install brass nipples & 90's to make the lines parallel.
We run all pex water lines in a sleeve of some sort when installed in a slab ( except for radiant heat) rubitex is a bit bulky in tight areas, they do have red & blue vinyl socks that will achieve the same result minus the R factor of course.
“The Hand of providence has been so conspicuous in all this, that he must be worse than an infidel that lacks faith, and more than wicked, that has not gratitude enough to acknowledge his obligations.” —George Washington