*
Discussion Forum
Discussion Forum
Up Next
Video Shorts
Featured Story

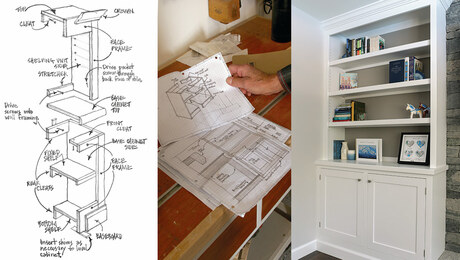
A standardized approach, quick-to-install hardware, and a simplified design make building custom casework cost-effective.
Featured Video
Video: Build a Fireplace, Brick by BrickHighlights
"I have learned so much thanks to the searchable articles on the FHB website. I can confidently say that I expect to be a life-long subscriber." - M.K.


Replies
*
Okay ?
*
Joseph FuscoView Image
*Yes you do and you probably will continue to have trouble unless to ask and tell more.Gabe
*
It's been a long time and I've forgotten just how to go about scribing these T&G boards to fit to the wall.It had been so long I didn't spell scribing correctly on my question posting.
Using 1"x*" cedar. Git me started and I'll be ok.
*Installing 1"x8" cedar boards. Have to scribe a 20'run (divided up in 3 lengths) to an existing beam. Can you describe for me the layout procedure. At one time I'm sure I knew how to do this but I'm not getting it right and can't see where I'm making my mistake. Thanks
*
HD - are you starting at the beam?...or have you already installed everything up to the beam and need to finish? - jb
*
Have installed to the beam and need to finish.
*
I would install as many full peices as I could , then take one more full peice and tack it onto the last peice I installed flush with the leading edge . Then set your scribe [compass ] to the width of a full peice and scribe away . hope this makes sense . Chuck
*I can't say it any clearer than Chuck...well said. - jb
*HD, I could do it for you, but I'll be damned if I could try to describe it on the keyboard....Try this: Pop you a line 1" away from your beam measured off from each end of the beam. Tack your first run of T&G ( groove side toward the beam ) on this line so it sits about the one inch off the beam. Find your widest gap from the beam to the T&G. Set your scribe to that width ( plus a little ). Run your scribe down the length of the beam making a corresponding mark on your T&G. Take down your T&G and cut along that scribe line undercutting as you go. ( The scribe line will be the long point of your undercut so to speak. ) That will be your first run of T&G. Be sure to check your 1" chalked line against the back wall you're working toward so you end up square with your last run. You made need to adjust your chalked line to correspond to your back wall.Wheww...If that makes sense, you owe me money.Good luck......Ed. Williams
*Ed - isn't it amazing how difficult it can be to EXPLAIN something? I think many of us are in the trades becaue we are more "visual", or "spatial" in the firt place. I know I have always had trouble with extracting information from words on a page, but spatial stuff seems kind of easy. Glad we're not all the same. You did explain that clearly though. - jb
*
Thanks Ed..
Unfortunately I got the starter up w/out much trouble. This is the last board. I vary from 4&3/8"
To 3&7/8"on the gap to fill.I spent wlmost two hours trying to figure this out again this morning. I'm close but something still escapes me. Thanks for the help.
Guy Tiffany
*Thanks to all who answered and gave me aid. I do believe I've got it figured out, with your help and the answers to my other question(sdame theme).Thanks again all!!!
*
*
Guy, Not bad...just a half inch off on a 20' run is pretty good. You can cut your last run to fit by just laying it out on the floor and popping a line from 4 3/8" down to 3 7/8" along the length of the T&G. I'm sure you know that you have to cut the bottom of the groove off to nail up your last run. There is no good way around it unless you are covering the gap with crown mould or something. Talk to you again.
Ed. Williams