FHB Logo Facebook LinkedIn Email Pinterest Twitter X Instagram Tiktok YouTube Plus Icon Close Icon Navigation Search Icon Navigation Search Icon Arrow Down Icon Video Guide Icon Article Guide Icon Modal Close Icon Guide Search Icon Skip to content
Subscribe
Log In
  • How-To
  • Design
  • Tools & Materials
  • Restoration
  • Videos
  • Blogs
  • Forum
  • Magazine
  • Members
  • FHB House
  • Podcast
Log In

Discussion Forum

Discussion Forum

Sheetrock fix – where to cut?

PeteBradley | Posted in Construction Techniques on November 5, 2009 01:36am

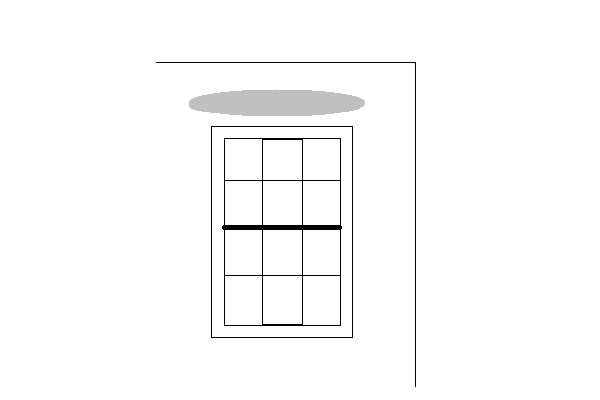
Not a rocker, and didn’t stay at a Holiday Inn last night, so I could use some advice on how to replace a section of rock in a way that will show the least and last. It’s only one and it’s for me so extra time is ok. The window has a corner about a foot to the right of it. The gray oval is the part that has to be replaced. It’s slightly wider than the window framing on the right, and maybe 8″ wider on the left.

So where to cut? Seems like the bottom so most falls under the window casing is a no-brainer but what about the rest? Put a rectangle around it, go all the way to the ceiling and wall (two inside corners, but two less butts, etc.

Reply
  • X
  • facebook
  • linkedin
  • pinterest
  • email
  • add to favorites Log in or Sign up to save your favorite articles

Replies

  1. Mike_Mills | Nov 05, 2009 01:39am | #1

    Find the studs.  Where are they in this picture?

    1. PeteBradley | Nov 05, 2009 03:41am | #6

      Location of studs (ignore the short one at the top, drawing error).

      1. DonCanDo | Nov 05, 2009 04:54am | #9

        Unless the studs happen to land where you can easily use them (and it appears that they don't), ignore them and patch where you need.  Here's what I would do:

        Cut out the damaged portion a little smaller than it needs to be.  Feel around  behind to drywall to determine how much more needs to be removed.  Now is also a good time to decide if you can use a stud, but it's usually not worth the trouble to cut the drywall so it half-laps the stud.

        Once you know how big the patch needs to be, cut a basically rectangular patch.  Trace it onto the wall so the patch will be a perfect fit.  Do not make it a snug fit, 1/8" all around is good.

        Use backers (1X2 pine works good) to span the hole and secure it by screwing through the drywall.  If you removed all of the damage, you will have no problem securing it this way.  Behind the header, if there is one, you might need shims if the header wasn't packed out.  The new piece gets secured to the backers and the shims.  Doing is this way assures that the new piece of drywall is "in plane".

        Use a utility knife to trim the edges of the old and new drywall making a small notch or "V".  Fill this notch and the 1/8" gap with a setting compound.  Durabond would be best, but EasySand also works.  You can even use a water putty like Durhams.

        Once the setting compound is dry (not just set, but also dry), make sure that old and new are in plane and prime the patch and wait for the primer to dry. 

        Now, find some drywall crack repair tape.  There's some self-adhesive stuff out there, but the stuff I use has an adhesive that needs to be wet first.  I've never found it online.  I pick it up at my local paint store so you may have to hunt around for it.  It's very thin since it doesn't require compound underneath it.  It's not as strong a regular paper tape, but it doesn't need to be for this kind of repair.  Also, there's no need to overlap the tape at the corners

        Finally spackle over the tape.  2 light coats should be plenty.

  2. calvin | Nov 05, 2009 01:40am | #2

    Pete, what you patch you need to paint.

    So, I would stay short of the ceiling so I wouldn't have to tape the corner.  Depending on the size and real shape I might just cut out the bogus part-fit the non sq. patch and either let the paper of the wallbd be my tape or use paper tape.

    edit.  I might use wood scraps as backer and something to screw to along with the header/studs if present.

    You just want the patch to register properly with the existing wallbd.

    A Great Place for Information, Comraderie, and a Sucker Punch.

    Remodeling Contractor just outside the Glass City.

    http://www.quittintime.com/


    Edited 11/4/2009 5:42 pm ET by calvin

  3. Shep | Nov 05, 2009 01:51am | #3

    I'd cut the old rock far enough to get rid of the damage, without worrying too much about where the studs are, and from the top of the window to the ceiling. Then use some scraps of pine or ply as backer for the joint between old and new rock.

    If you don't want to have to repaint the ceiling, you could cut the rock 2-3" down from the ceiling, and have another flat joint to tape.

    Then patch  in new rock, tape and mud it with EZSand 45 so I can recoat quickly, topcoat and feather out the repair with same (as needed, 2-3 coats), and let someone else paint.

    What happened to require the repair?

    1. Snort | Nov 05, 2009 02:14am | #4

      That should all be header. If the house isn't new, and has done it's settling, you can cut your patch piece (big enough to cover any crumbly edges), hold it over the hole, scribe it, then do your wall cutting.http://www.tvwsolar.com

      We'll have a kid

      Or maybe we'll rent one

      He's got to be straight

      We don't want a bent one

      He'll drink his baby brew

      From a big brass cup

      Someday he may be president

      If things loosen up

      1. DonCanDo | Nov 05, 2009 03:00am | #5

        Yes, cut the patch first and then cut the the wall to match the patch.

        I have cut many a hole in preparation for a repair and taking the extra trouble to make sure it's a perfect rectangle, measuring the hole and then cutting the patch to that size.  One day it dawned on me that I was doing it backwards.

        It's so much easier to cut the patch first.

        1. Snort | Nov 05, 2009 03:46am | #7

          I spend way more time fixin' than I do doin'<G>http://www.tvwsolar.com

          We'll have a kid

          Or maybe we'll rent one

          He's got to be straight

          We don't want a bent one

          He'll drink his baby brew

          From a big brass cup

          Someday he may be president

          If things loosen up

        2. PeteBradley | Nov 05, 2009 04:33am | #8

          Any suggestions on keeping the wall looking flat with all those short butt joints?

          1. calvin | Nov 05, 2009 05:48am | #10

            To keep the patch looking flat, feather out the taping job well past the patch.A Great Place for Information, Comraderie, and a Sucker Punch.

            Remodeling Contractor just outside the Glass City.

            http://www.quittintime.com/


          2. Hudson Valley Carpenter | Nov 05, 2009 11:18am | #11

            FWIW, there are special screws available which have fewer but wider threads.  They are used to fasten one layer of drywall to another.  In this case they would serve to hold a drywall bridge to the back of the patch piece.  I'm not sure what their official name is now.  When I was doing commercial drywall we called them "rock to rock" screws.

          3. drozer | Nov 06, 2009 12:05am | #14

            i learned drywall from my friend's father- he subbed out the rocking, but did all the taping with his brother.on all of the butts, he would peel the paper from both sides of the joint. i kid you not. this creates a space for the tape to sit in- replacing the thickness of the paper on the drywall with the thickness of the tape.i don't do this on butt joints, but i do do it on patches.also, make sure you put the paper tape with the right face down. that line down the center of the tape (for folding it) forms a ridge on one side of the tape, and an indentation on the other. always bed the ridge into the mud.

          4. DonCanDo | Nov 06, 2009 12:59am | #15

            Good tips.  I have on occassion peeled the paper back like you said to make a flatter butt joint.  When I do that, I like to use a primer on the exposed gypsum to help adhere everything together before taping and mudding.

        3. BradG | Nov 05, 2009 08:53pm | #13

          "cut the patch first"

          I've fixed a lot of holes and hadn't ever thought of this - thank you.

          (can't believe how sheetrock holds such a world of obvious, simple solutions)

  4. AitchKay | Nov 05, 2009 04:04pm | #12

    Backing up a bit, are you SURE that the GWB needs to be replaced? That's an odd place for a doorknob or a fist to go through the wall...

    Cracks in that location are common, although not so much with the kind of framing you show -- are you sure that there is no header?

    Header shrinkage/settling is the most common cause of cracking there. But replacing the GWB is rarely necessary.

    Usually it's just a mud job. Setting compound is stronger than drying compound, use that.

    But how about a photo so that we can do a reality check?

    And Hudson Valley Carpenter is talking about laminating screws, which are handy to have around.

    AitchKay

Log in or create an account to post a comment.

Sign up Log in

Become a member and get full access to FineHomebuilding.com

Video Shorts

Categories

  • Business
  • Code Questions
  • Construction Techniques
  • Energy, Heating & Insulation
  • General Discussion
  • Help/Work Wanted
  • Photo Gallery
  • Reader Classified
  • Tools for Home Building

Discussion Forum

Recent Posts and Replies

  • |
  • |
  • |
  • |
  • |
  • |
View More Create Post

Up Next

Video Shorts

Featured Story

Rescuing Old Hardware

Whether it’s already in your house or picked up at a flea market, vintage hardware almost always needs help.

Featured Video

Video: Build a Fireplace, Brick by Brick

Watch mason Mike Mehaffey construct a traditional-style fireplace that burns well and meets current building codes.

Related Stories

  • Mortar for Old Masonry
  • Grout-Free Shower Panels
  • Prep Faster With Peel-and-Stick
  • One-System Wonder

Highlights

Fine Homebuilding All Access
Fine Homebuilding Podcast
Tool Tech
Plus, get an extra 20% off with code GIFT20

"I have learned so much thanks to the searchable articles on the FHB website. I can confidently say that I expect to be a life-long subscriber." - M.K.

Get home building tips, offers, and expert advice in your inbox

Signing you up...

This site is protected by reCAPTCHA and the Google Privacy Policy and Terms of Service apply.
See all newsletters
See all newsletters

Fine Homebuilding Magazine

  • Issue 332 - July 2025
    • Custom Built-ins With Job-Site Tools
    • Fight House Fires Through Design
    • Making the Move to Multifamily
  • Issue 331 - June 2025
    • A More Resilient Roof
    • Tool Test: You Need a Drywall Sander
    • Ducted vs. Ductless Heat Pumps
  • Issue 330 - April/May 2025
    • Deck Details for Durability
    • FAQs on HPWHs
    • 10 Tips for a Long-Lasting Paint Job
  • Issue 329 - Feb/Mar 2025
    • Smart Foundation for a Small Addition
    • A Kominka Comes West
    • Making Small Kitchens Work
  • Issue 328 - Dec/Jan 2024
    • How a Pro Replaces Columns
    • Passive House 3.0
    • Tool Test: Compact Line Lasers

Fine Home Building

Newsletter Sign-up

  • Fine Homebuilding

    Home building tips, offers, and expert advice in your inbox.

  • Green Building Advisor

    Building science and energy efficiency advice, plus special offers, in your inbox.

  • Old House Journal

    Repair, renovation, and restoration tips, plus special offers, in your inbox.

Signing you up...

This site is protected by reCAPTCHA and the Google Privacy Policy and Terms of Service apply.
See all newsletters

Follow

  • Fine Homebuilding

    Dig into cutting-edge approaches and decades of proven solutions with total access to our experts and tradespeople.

    Start Free Trial Now
    • Facebook
    • Instagram
    • X
    • LinkedIn
  • GBA Prime

    Get instant access to the latest developments in green building, research, and reports from the field.

    Start Free Trial Now
    • Facebook
    • YouTube
  • Old House Journal

    Learn how to restore, repair, update, and decorate your home.

    Subscribe Now
    • Facebook
    • Instagram
    • X

Membership & Magazine

  • Online Archive
  • Start Free Trial
  • Magazine Subscription
  • Magazine Renewal
  • Gift a Subscription
  • Customer Support
  • Privacy Preferences
  • About
  • Contact
  • Advertise
  • Careers
  • Terms of Use
  • Site Map
  • Do not sell or share my information
  • Privacy Policy
  • Accessibility
  • California Privacy Rights

© 2025 Active Interest Media. All rights reserved.

Fine Homebuilding receives a commission for items purchased through links on this site, including Amazon Associates and other affiliate advertising programs.

  • Home Group
  • Antique Trader
  • Arts & Crafts Homes
  • Bank Note Reporter
  • Cabin Life
  • Cuisine at Home
  • Fine Gardening
  • Fine Woodworking
  • Green Building Advisor
  • Garden Gate
  • Horticulture
  • Keep Craft Alive
  • Log Home Living
  • Military Trader/Vehicles
  • Numismatic News
  • Numismaster
  • Old Cars Weekly
  • Old House Journal
  • Period Homes
  • Popular Woodworking
  • Script
  • ShopNotes
  • Sports Collectors Digest
  • Threads
  • Timber Home Living
  • Traditional Building
  • Woodsmith
  • World Coin News
  • Writer's Digest
Active Interest Media logo
X
X
This is a dialog window which overlays the main content of the page. The modal window is a 'site map' of the most critical areas of the site. Pressing the Escape (ESC) button will close the modal and bring you back to where you were on the page.

Main Menu

  • How-To
  • Design
  • Tools & Materials
  • Video
  • Blogs
  • Forum
  • Project Guides
  • Reader Projects
  • Magazine
  • Members
  • FHB House

Podcasts

  • FHB Podcast
  • ProTalk

Webinars

  • Upcoming and On-Demand

Podcasts

  • FHB Podcast
  • ProTalk

Webinars

  • Upcoming and On-Demand

Popular Topics

  • Kitchens
  • Business
  • Bedrooms
  • Roofs
  • Architecture and Design
  • Green Building
  • Decks
  • Framing
  • Safety
  • Remodeling
  • Bathrooms
  • Windows
  • Tilework
  • Ceilings
  • HVAC

Magazine

  • Current Issue
  • Past Issues
  • Magazine Index
  • Subscribe
  • Online Archive
  • Author Guidelines

All Access

  • Member Home
  • Start Free Trial
  • Gift Membership

Online Learning

  • Courses
  • Project Guides
  • Reader Projects
  • Podcast

More

  • FHB Ambassadors
  • FHB House
  • Customer Support

Account

  • Log In
  • Join

Newsletter

Get home building tips, offers, and expert advice in your inbox

Signing you up...

This site is protected by reCAPTCHA and the Google Privacy Policy and Terms of Service apply.
See all newsletters
See all newsletters

Follow

  • X
  • YouTube
  • instagram
  • facebook
  • pinterest
  • Tiktok

Join All Access

Become a member and get instant access to thousands of videos, how-tos, tool reviews, and design features.

Start Your Free Trial

Subscribe

FHB Magazine

Start your subscription today and save up to 70%

Subscribe

Enjoy unlimited access to Fine Homebuilding. Join Now

Already a member? Log in

We hope you’ve enjoyed your free articles. To keep reading, become a member today.

Get complete site access to expert advice, how-to videos, Code Check, and more, plus the print magazine.

Start your FREE trial

Already a member? Log in

Privacy Policy Update

We use cookies, pixels, script and other tracking technologies to analyze and improve our service, to improve and personalize content, and for advertising to you. We also share information about your use of our site with third-party social media, advertising and analytics partners. You can view our Privacy Policy here and our Terms of Use here.

Cookies

Analytics

These cookies help us track site metrics to improve our sites and provide a better user experience.

Advertising/Social Media

These cookies are used to serve advertisements aligned with your interests.

Essential

These cookies are required to provide basic functions like page navigation and access to secure areas of the website.

Delete My Data

Delete all cookies and associated data