FHB Logo Facebook LinkedIn Email Pinterest Twitter Instagram Plus Icon Close Icon Navigation Search Icon Navigation Search Icon Arrow Down Icon Video Guide Icon Article Guide Icon Modal Close Icon Guide Search Icon Skip to content
Subscribe
Log In
  • How-To
  • Design
  • Tools & Materials
  • Videos
  • Blogs
  • Forum
  • Magazine
  • Members
  • FHB House
  • Podcast
Log In

Discussion Forum

Discussion Forum

Shingle flashing(?) detail question

MikeHennessy | Posted in Construction Techniques on June 2, 2009 03:16am

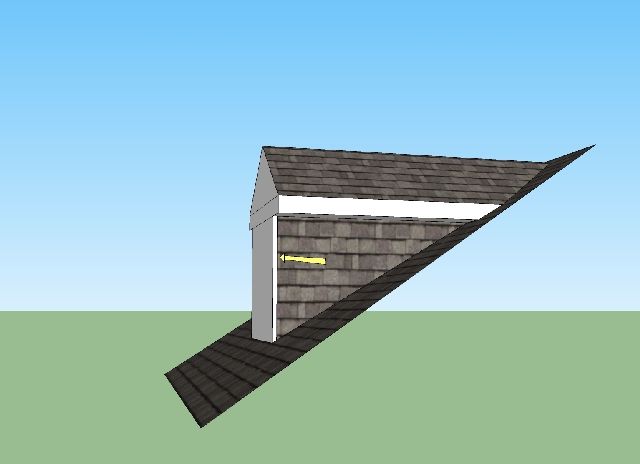
I’m starting to rebuild a dormer that has been butchered on several occasions in the past, so I’m not sure what the original detail was. What’s the best way to detail this intersection where the vertical shingles on the dormer wall meet the trim at the front plane of the dormer (See yellow arrow)? Should there be a corner board installed over the shingles to keep water out from behind the front plane? Flash & caulk? Something else?

View Image

[I see the pic pie is back again today – bummer. ]

Mike Hennessy
Pittsburgh, PA
Everything fits, until you put glue on it.

Reply

Replies

  1. MikeSmith | Jun 02, 2009 07:18pm | #1

    if you are using corner boards ( say  5/4 x 4.... or 5/4 x 6 )...  you wrap the  corner with Grace, maybe a 10"  or !2" strip....

    traditionaly this would have been a double  15 lb felt or a 30 lb felt corner, nowadays  corners are  an I&W detail


    there is no caulk... and the shingles merely butt to the corner board, the Grace  keeps the joint waterproof

    corner boards DO NOT  lap on top of shingles... that is a vinyl siding detail


    also.... where the shingles meet the roof, there should be a 3/4" space so the rain will drip and not wick back up, we use black coil stock for the step flashings in this

    Mike Hussein Smith Rhode Island : Design / Build / Repair / Restore
    1. MikeHennessy | Jun 02, 2009 07:27pm | #2

      Thanks, Mike. Yes, there is trim on the front, but presently none on the sides. I'll either add some or just run the front trim a bit wide and use I&W around the corner behind it, flashed at the bottom. I'm planning on using Azek for the trim, so I won't need to worry about water there.

      There is a flashed gap between the side shingles and the roof -- I'm just sketchup challenged, so I didn't draw it. ;-)Mike HennessyPittsburgh, PAEverything fits, until you put glue on it.

      1. User avater
        Sphere | Jun 03, 2009 12:50am | #4

        What Mike said.

        As an aside, AZEK makes a premade corner in 5/4 thickness and 3.5" on each face in case ya want to avoid a joint. Might not scale out on a house corner, but about perfect for a dormer.Spheramid Enterprises Architectural Woodworks

        Repairs, Remodeling, Restorations

        "If Brains was lard, you couldn't grease much of a pan"Jed Clampitt

        View Image

        1. MikeHennessy | Jun 03, 2009 01:18am | #6

          Yeah, I actually was thinking about that corner piece, but the front trim piece is about 10" since it works as both the corner and trim for the dormer window.

          I'm now leaning towards Grant's method, but with the flashing only covering the back side of the trim board, or maybe turning the corner just a 1/4" or so for stiffness, and with some caulk behind it to seal it to the trim.

          Or maybe running a kerf on the backside of the trim where it overhangs the corner and caulking the flashing into the kerf -- that way, everything is behind the shingles. The more I think on it, the more I like that one.

          Guess I'll just get started and see how it turns out. ;-)Mike HennessyPittsburgh, PAEverything fits, until you put glue on it.

          1. User avater
            Sphere | Jun 03, 2009 01:33am | #7

            I'm gonna look and see if I can actually retrieve an old attachment of those dormers I did a yr. or so ago.

            If I go poof, come find me.

            View Image

            I don't have a "finished" pic I don't think, but I finished it out with something...LOL

            Being Hardie, I didn't flash at all, just caulked the siding to the azek, I like your kerf plan.Spheramid Enterprises Architectural Woodworks

            Repairs, Remodeling, Restorations

            "If Brains was lard, you couldn't grease much of a pan"Jed Clampitt

            View Image

          2. MikeHennessy | Jun 03, 2009 02:56pm | #10

            Nice dormers. But the siding I'd know how to do -- 1/8" gap & caulk. It's the shingles that have me scratching me head -- never did vertical shingles before. But hey, that's the way these dormers were originally built, and I've got the shingles, so that's how they're gonna get rebuilt.

            Like I said, I think I'll just start building, keeping these tips in mind, and see what comes out the other end of the process. Gonna hafta find me a break tho', if I decide to go with the flashing.

            Mike HennessyPittsburgh, PAEverything fits, until you put glue on it.

            PS: What are the things that look like gutter hangers in your pic -- was it taken pre-gutters? And thanks for dipping into your pixel allotment to post that. ;-)

            Edited 6/3/2009 7:58 am ET by MikeHennessy

          3. User avater
            Sphere | Jun 03, 2009 06:55pm | #11

            Thems are the shanks (copper) for the gutter circles to bolt to. They go under the shingles and screwd to the sheathing.

            They have holes as do the circles that allow you to slope in itty bitty increments when you bolt them together.Spheramid Enterprises Architectural Woodworks

            Repairs, Remodeling, Restorations

            "If Brains was lard, you couldn't grease much of a pan"Jed Clampitt

            View Image

    2. jimAKAblue | Jun 03, 2009 08:01am | #9

      there is no caulk...

      Does the "no caulk" advice meet the local building codes? Does it meet the manufacturer's requirements on the underlayment, siding and trim pieces?

      Wouldn't eliminating the caulk affect the air infiltration rate?

      When you say "butt" to the corner board; does that mean tight, or do you leave a gap?

      Are gaps required for expansion and contraction?

      Lots of questions....I guess I probably should read up on these products.

      1. MikeSmith | Jun 03, 2009 08:03pm | #12

        jim,  his  question was  about "shingles"  butting  a corner  board

        there  is  no  caulk  in  that  case

        if  it  is  clapboards  butting  a corner board then  there  should  be  a  small  gap (  about  1/8"  or  an  8d nail )  to  allow  caulk

        my  sequence  then  would  be  grace /  corner  board ( backprimed/primed )

        apply  corner  boards (  backprimed/primed )

        caulk

        finish  paintMike Hussein Smith Rhode Island : Design / Build / Repair / Restore

        1. jimAKAblue | Jun 05, 2009 03:14pm | #13

          Good observation Mike. I gotta learn to read better.

  2. seeyou | Jun 02, 2009 11:55pm | #3

    Mike -


    Here's what I've done in that situation on occasion:

    I install a "Z" shaped flashing (I've exagerated the clearances for clarity) before installing the side wall material.

    View Image

    http://www.quittintime.com/      View Image        

    1. MikeHennessy | Jun 03, 2009 01:11am | #5

      Thanks, Grant. But doesn't that leave the flashing exposed on the side of the trim -- or do you cover it with the corner piece?Mike HennessyPittsburgh, PAEverything fits, until you put glue on it.

      1. seeyou | Jun 03, 2009 01:52am | #8

        But doesn't that leave the flashing exposed on the side of the trim

        Yes. Yes it does. I can't do a hemmed edge less than 1/2", so I would make that piece so the hem is flush with the front of the corner board. It hides better when painted being flush with the front rather than creating another shadow line down the side of the board.

        I've typically used copper so about half the time it doesn't get painted. Not that big of a deal  - it ties in with the other copper flashing on the dormer. Painted, it's not there unless you're looking for it.

        If there is a side corner board and not just the front board as you have pictured, I'd just show a 1/2".http://www.quittintime.com/      View Image        

Log in or create an account to post a comment.

Sign up Log in

Become a member and get full access to FineHomebuilding.com

Video Shorts

Categories

  • Business
  • Code Questions
  • Construction Techniques
  • Energy, Heating & Insulation
  • General Discussion
  • Help/Work Wanted
  • Photo Gallery
  • Reader Classified
  • Tools for Home Building

Discussion Forum

Recent Posts and Replies

  • |
  • |
  • |
  • |
  • |
  • |
View More Create Post

Up Next

Video Shorts

Featured Story

Fine Homebuilding – April/May 2023, Issue #314

Find online articles on options for countertops, wood-boring bits, ductless heat pumps, tighter miters, fences, and much more.

Featured Video

How to Install Cable Rail Around Wood-Post Corners

Use these tips to keep cables tight and straight for a professional-looking deck-railing job.

Related Stories

  • Podcast 549: Energy Upgrades, Chimney Inspections, and Questions About a Home You Might Buy
  • Podcast 549: Members-only Aftershow—Patios vs. Decks
  • Podcast 548: PRO TALK With Design/Build Operations Manager Jessica Bishop-Smyser
  • Strategies for Venting a Roof Valley

Highlights

Fine Homebuilding All Access
Fine Homebuilding Podcast
Tool Tech
Plus, get an extra 20% off with code GIFT20

"I have learned so much thanks to the searchable articles on the FHB website. I can confidently say that I expect to be a life-long subscriber." - M.K.

Get home building tips, offers, and expert advice in your inbox

Signing you up...

This site is protected by reCAPTCHA and the Google Privacy Policy and Terms of Service apply.
See all newsletters
See all newsletters

BOOKS, DVDs, & MERCH

Shop the Store
  • Pretty Good House
    Buy Now
  • 2022 Fine Homebuilding Archive
    Buy Now
  • Code Check Building 4th Edition
    Buy Now
  • 2023 Tool Guide
    Buy Now
  • Shop the Store

Fine Homebuilding Magazine

  • Issue 314 - April/May 2023
    • 7 Options for Countertops
    • Tool Test: Wood-Boring Bits
    • Critical Details for Ductless Heat Pumps
  • Issue 313 - Feb/March 2023
    • Practical System for a Seismic Retrofit
    • Fine Homebuilding Issue #313 Online Highlights
    • Practical System for a Seismic Retrofit
  • Issue 312 - Dec 2022/Jan 2023
    • Tool Test: Cordless Tablesaws
    • Gray-Water System for a Sustainable Home
    • Insulate a Cape Roof to Avoid Ice Dams
  • Issue 311 - November 2022
    • 7 Steps to a Perfect Exterior Paint Job
    • Options for Smarter Home-Energy Tracking
    • The Fine Homebuilding Interview: James Metoyer
  • Issue 310 - October 2022
    • Choosing a Tile-Leveling System
    • Choosing Between HRVs and ERVs
    • Custom Built-in Cabinets Made Easy

Fine Homebuilding

Follow

  • twitter
  • facebook
  • instagram
  • pinterest

Newsletter

Get home building tips, offers, and expert advice in your inbox

Signing you up...

This site is protected by reCAPTCHA and the Google Privacy Policy and Terms of Service apply.
See all newsletters
See all newsletters

Membership & Magazine

  • Online Archive
  • Start Free Trial
  • Magazine Subscription
  • Magazine Renewal
  • Gift a Subscription
  • Customer Support
  • Privacy Preferences

Taunton Network

  • Green Building Advisor
  • Fine Woodworking
  • Fine Gardening
  • Threads
  • About
  • Contact
  • Advertise
  • Careers
  • Copyright
  • Terms of Use
  • Site Map
  • Do not sell or share my information
  • Privacy Policy
  • Accessibility
  • California Privacy Rights

© 2023 The Taunton Press, Inc. All rights reserved.

X
X
This is a dialog window which overlays the main content of the page. The modal window is a 'site map' of the most critical areas of the site. Pressing the Escape (ESC) button will close the modal and bring you back to where you were on the page.

Main Menu

  • How-To
  • Design
  • Tools & Materials
  • Video
  • Blogs
  • Forum
  • Reader Projects
  • Magazine
  • Members
  • FHB House

Podcasts

  • FHB Podcast
  • ProTalk

Webinars

  • Upcoming and On-Demand

Podcasts

  • FHB Podcast
  • ProTalk

Webinars

  • Upcoming and On-Demand

Popular Topics

  • Kitchens
  • Business
  • Bedrooms
  • Roofs
  • Architecture and Design
  • Green Building
  • Decks
  • Framing
  • Safety
  • Remodeling
  • Bathrooms
  • Windows
  • Tilework
  • Ceilings
  • HVAC

Magazine

  • Current Issue
  • Past Issues
  • Magazine Index
  • Subscribe
  • Online Archive
  • Author Guidelines

All Access

  • Member Home
  • Start Free Trial
  • Gift Membership

Shop the Store

  • Books
  • DVDs
  • Taunton Workshops

More

  • FHB Ambassadors
  • Reader Projects
  • Podcast
  • FHB House
  • Customer Support

Account

  • Log In
  • Join

Newsletter

Get home building tips, offers, and expert advice in your inbox

Signing you up...

This site is protected by reCAPTCHA and the Google Privacy Policy and Terms of Service apply.
See all newsletters
See all newsletters

Follow

  • twitter
  • facebook
  • instagram
  • pinterest

Join All Access

Become a member and get instant access to thousands of videos, how-tos, tool reviews, and design features.

Start Your Free Trial

Subscribe

FHB Magazine

Start your subscription today and save up to 70%

Subscribe

We hope you’ve enjoyed your free articles. To keep reading, become a member today.

Get complete site access to expert advice, how-to videos, Code Check, and more, plus the print magazine.

Start your FREE trial

Already a member? Log in