I’ve been meaning to post some photos of a very satisfying basement project I just completed. It has lots of interesting elements that could provide grist for a few mills out there, and I learned a lot doing it, too.
I wish I had more pix of the earlier stages of the job, but my trusty Canon A1 35mm got a bad case of the hiccups early on, and Ryan’s fixed aperture 50mm Vivitar didn’t have a wide enough lens to capture much inside that small space. So until I got the digital, I don’t have too many shots that are decent.
The house is a four-year-old spec house GC’d by one partner in a two-man shoestring development operation. After he and his family had been living in it for three-and-a-half years, he sold it to my clients, an American couple from New Jersey who wanted a property up here to use as a summer cottage/ski chalet. The next house down the road belongs to one of my regular clients, also from the U.S., so they got together with their new neighbors and ‘talked house’ for a while. The new neighbors mentioned they wanted to finish the basement, so I got a call the next day and dropped by to see what was up.
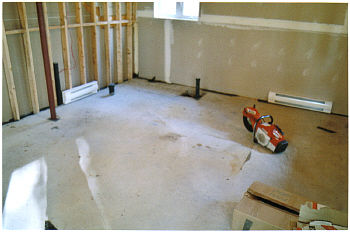
The basic requirements were fairly simple: The clients wanted a full bathroom, one bedroom with a new closet, and a large, open family room. They also wanted the utility room partially finished. The existing condition of the basement was bare slab floor and gyprock over foamed-in studding against the exterior walls. Only the partition walls around the utility room had been rocked. The rest were bare studs. What gyprock there was had been taped and mudded once, but it was a pretty brutal job.
My first design called for the bathroom to be surrounded by a half-height wall with fixed, milk-glass windows above, so as to preverve as much as possible light entering that corner of the basement through what would become the bathroom window. This was to be coupled with a cast-iron, high-back, clawfooted tub and 1″ hex mosaic on the floor with 3×6 wall tile laid brick fashion up to 5′. There were objections to this based on family considerations (the HO’s MIL was elderly and didn’t handle bathtubs very well, and Mrs. HO had had one too many Victorian-style bathrooms to want another. So we started over.
The final design called for a 7×9 bathroom with the entry door set into a short wall that cut off the corner of the box at 45 degrees. This helped reduce the visual impact on the large space. Instead of a tub, there would be a large tiled shower, about 3×5. And to prevent this box-within-a-box from creating a claustrophobic atmosphere inside the bathroom, the shower surround would be built of Thin-Line (3″) glass block. Only the walls of the shower would be tiled, and with 4×4’s instead of 3×6’s.
I did get to keep the mosaic floor tile.
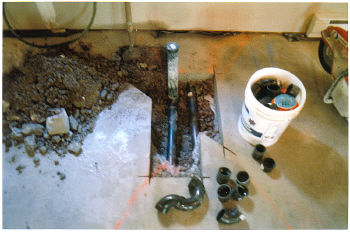
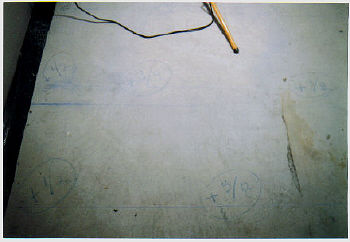
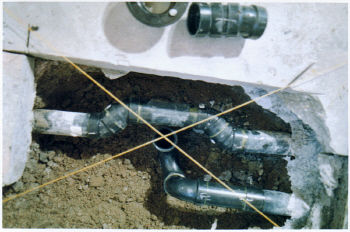
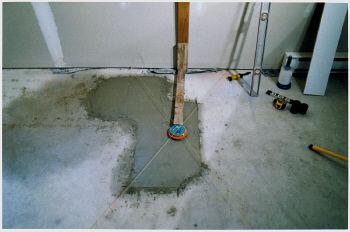
Moving the existing floor drain for the pre-planned bathtub to where it had to be for the shower was the first step. After that, I shot the floor heights with a laser level on a 2’x2′ grid to get an idea of how much we’d have to shim or rip the sleepers. We wound up using 2×3’s on edge, Tap-conned and PL Premiumed to the floor as sleepers. From the floor grid photo, you don’t get a complete picture of the height differences. There was over an inch and a half diff from highest to lowest point–and this wasn’t a slope; it was humps and valleys all over the place. Laying the sleepers dead level took two of us three days.
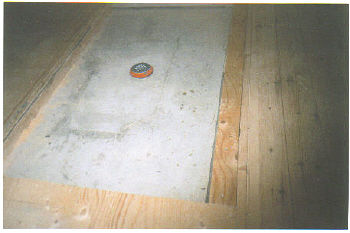
The finish flooring was 2×6 T&G red pine roof decking. This has the advantage of not needing a plywood subfloor–a big advantage considering the price of ply last fall (and still!). It nails in place very nicely with a framing nailer. In the bathroom area we did lay a subfloor of two layers of ply, screwed and PL’ed, to carry the tile. And under the toilet and all partition walls extra sleepers were laid into provide solid support down to the concrete.
Here’s a few pics of the early stages.
Dinosaur
‘Y-a-tu de la justice dans ce maudit monde?
Edited 9/1/2004 8:41 pm ET by Dinosaur


Replies
Once the floor was laid, the next step was framing the partition walls. Unfortunately, that's the point where I was out of working cameras for a week, so no pix available. But it was pretty straightforward stuff, except for joining the existing framing...which was, ahem, shall we say, not quite plumb....
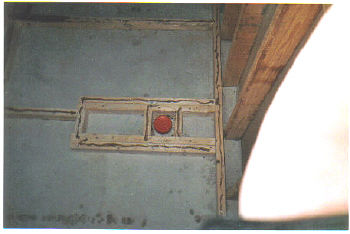
The plumbing and electric were also pretty straightforward, although we did run into a few nasty surprises in the existing wiring (see photos). The box with the blue arrow pointing to a nicked wire had had the wire looped in front of it, and the rock hangers squeezed it between the gyprock and the box. Then the rotozip caught it. In the other photo, the sparky stapled down this heater supply wire so hard he broke the insulation and shorted out one phase to the ground wire. It ran like that for 4 years till I found it when I was trying to figure out why that heater kept blowing thermostats all to heck.... Suffice it to say it's just luck this house hadn't burned down before this.
For the new plumbing I installed all type L copper and hooked it to the existing pex on a home run back to the utility room. I have gone over to 100% ball valves for cut offs now; they are so much easier for the HO to deal with the extra couple of bucks is well worth it, plus they improve the flow in a half-inch system substantially. All waste lines were ABS except for the toilet seal where I used a lead/ABS fitting to mate the existing waste line to the new floor height. ABS doesn't flare like lead when you need it to....
Dinosaur
'Y-a-tu de la justice dans ce maudit monde?
Edited 9/1/2004 8:42 pm ET by Dinosaur
The gyprocking was a bit of a horror story, both due to off-kilter existing framing (we had to build a false 2x6 stud wall set into the 2x4 supporting wall to hang the rock on; it was 2" off plumb at one end and 3" off layout at the other, warped like a potato chip) and the lousy hanging and taping job done by the original contractor. By the time I was ready to lay on paint, some of the joints were well over 2' wide just to get some semblance of flatness on the wall....
Dinosaur
'Y-a-tu de la justice dans ce maudit monde?
Edited 9/1/2004 8:42 pm ET by Dinosaur
The bathroom and its glass-block shower were the heavy hitters in this job. The tiling went well; I found the new laser level I'd bought to shoot the floor a real help for laying in the beige band on the wall that the HO had asked for. And the Daltile 1" hex mosaic tile was beautiful, although a real PITA to work without mosaicist's tape (not available locally, and I was under the gun at that point and couldn't wait for a special order to come in). I built the shower pan directly on the slab, leaving the shower a 3" step down from the rest of the bathroom. This, and the large size of the shower, enabled me to hang the shower door swinging in, which is an interesting touch also.
Dinosaur
'Y-a-tu de la justice dans ce maudit monde?
Edited 9/1/2004 8:43 pm ET by Dinosaur
Great stuff.
But I was all fired up for pics of the glassblock shower wall. :o)be dead on or that quarter inch is going to haunt you
They're comin'.... I'm posting this in pieces as you're sittin' there reading....Dinosaur
'Y-a-tu de la justice dans ce maudit monde?
Then finally I was ready for the glass block. What was designed as a way to avoid giving the bathroom a coffin-like feeling (3x5 shower inside a 7x9 bathroom) wound up as the showpiece. I'd never laid glass block before, and I found Pittsburgh-Corning's tech support extremely helpful in getting tech bulletins, parts, materials, and methods all sorted out, since my local supplier really knew nothing about the stuff other than the catalog numbers. One thing I did on my own initiative was to strike the joints very deeply, then wire brush them when the mortar dried. Then when the whole wall was finished, I used a silver-coloured sanded floor grout to fill the joints. The grout has a much smoother texture than the mortar, and the average viewing distance of that wall would be between 18 and 24 inches, so that mattered a lot. The pics I took back to show the supplier convinced them to learn the product, build a floor display, and push it more. There have been quite a few more installations locally since I did this one last fall. I love being a trend-setter, LOL....
Glass block is considered structural in some code jurisdictions, but not all. But it still needs to be strong enough so that the panel won't fall apart if someone leans on it, regardless of what the local authorities think of it. This is accomplished with the use of panel anchors screwed to the framing and then laid in the mortar joints every two rows, horizontally and vertically, and with ladder-type mini-rebars laid in every second course. The foam strips you see in the photos are called expansion bands; they absorb the expansion of the glass block so it won't deform the structural framing to which it is attached. The cedar 1¼x6 running up the left hand side of the block wall is both finish trim and structural framing. It serves as the door jamb as well.
Glass block mortar is very fat, so it's easy to handle and sticks well. But the blocks I used here are the Thinline series, only 3 inches thick. After about 4 or 5 courses, the wall wants to sag out of plumb because the mortar is still wet. I solved that by bracing with 2x and doing the shower wall in two lifts, letting the first 5 courses dry overnight before laying on the top 5.
Dinosaur
'Y-a-tu de la justice dans ce maudit monde?
Edited 9/1/2004 8:43 pm ET by Dinosaur
I had to get the bathroom finished and on-line before I closed down for the winter to take on my regular winter job, so a few things got done out of order. It worked out pretty well; in the spring I came in and finished the joints in the rest of the basement and got the paint on in a couple of weeks, then started on the floor finishing. Goldhiller and IMERC gave me some good advice on that score, and I was able to rent a new-type floor sander, a 14x20 random orbit job, that made sanding this red-pine floor a lot less nerve-wracking than it would have been with drum sanders and disc edgers. Once sanded, the floor got one coat of MINWAX stain prep, then two coats of transparent stain. Finally I put on 4 coats of supposedly quick-drying (it wasn't!) oil-based polyurethane with a lambswool pad. By the time it was done, the flash from the camera was boucing off the floor and shining highlights on the walls.
Dinosaur
'Y-a-tu de la justice dans ce maudit monde?
Edited 9/1/2004 8:44 pm ET by Dinosaur
The ceiling had been an item of discussion back in the design phase; I do not like to put gyprock ceilings in basement spaces, simply because of all the utilities that need to run above it. But Mrs. HO didn't like that idea because she was afraid of winding up with an 'office look'. Her husband managed to find a 2x2 Armstrong tile pattern called Tin Ware which resembles a tin ceiling and which passed her critical eye. The laser level makes installing this a snap. We had it up in one day, and I hooked up the pot lights the following day, including the custom installation of the hard-wired smoke alarm, for which no mounting hardware was available.
Dinosaur
'Y-a-tu de la justice dans ce maudit monde?
Edited 9/1/2004 8:44 pm ET by Dinosaur
After the rooms were done, all I had left to do was build a storage unit for the closet in the bedroom, a ski rack for the HO's winter toys, and a cupboard door for the plumbing clean out.
Whoof....
I really wanted to get this all posted before RhodeFest so's you could all pat me on the back in person, but I think it took almost as long to write it up and organize the pix as to build it, LOL!
And I never did get a photo of that cupboard door over the plumbing cleanout....Dinosaur
'Y-a-tu de la justice dans ce maudit monde?
I'm glad I was more patient than Rez...
It was worth it....
Nice work Dino...
Life is not a journey to the grave with the intention of arriving safely in a pretty and well preserved body, but rather to skid in broadside, thoroughly used up, totally worn out, and loudly proclaiming.... WOW!!! What a Ride!
Thank you, bro. I missed an appointment this morning to get that finished last night, LOL...but now I feel like the job is done....
Dinosaur
'Y-a-tu de la justice dans ce maudit monde?
"pat pat".be dead on or that quarter inch is going to haunt you
Merci MerciDinosaur
'Y-a-tu de la justice dans ce maudit monde?
Nice stuff! I really like the glass block work. We did a few bathroom window with glass block a few months ago but nothing like that. Trim looks great too. DanT
Thanks, Dan. I'd been wanting to work with glass block for the longest time, but never could find an appropriate application or budget. This time it clicked. It won't be the last one, I hope.
Dinosaur
'Y-a-tu de la justice dans ce maudit monde?
Sorry, everybody--I don't know what happened to the font in the posts at the beginning of this thread. It was okay yesterday, but today it looks like one of Larry's screamers....
I composed most of it before going on line and then pasted it in; maybe that has something to do with it. I'm going to go back and try to edit and change font size and see if that works....
Dinosaur
'Y-a-tu de la justice dans ce maudit monde?
I was wonder the same thing....
Yur tag is about an 18 and mine is at 11.... It was a 6
Life is not a journey to the grave with the intention of arriving safely in a pretty and well preserved body, but rather to skid in broadside, thoroughly used up, totally worn out, and loudly proclaiming.... WOW!!! What a Ride!
Yeah, it was pretty scary looking at that.
Font sizes have been screwy for a few days, but I thought it was my browser or something.
The edits on the original messages seems to have taken. Dinosaur
'Y-a-tu de la justice dans ce maudit monde?
Nice work Dino! Sounds like you are quite the all-around guy - carpentry, plumbing, etectrical...
Was the wood trim style and wood floor selected to be similar to the rest of the house? Matt
In a way, yes...but done the way the original construction should have been done.
This house was a live-in spec house built by one partner in a two-man shoestring development outfit. I know the former owner pretty well; he's a good guy but not a builder himself--works at the same mountain I do in the winter, but he's there year round in the sales department. He GC'd the house on his coffee breaks and lunch hours using a variety of low-bid semi-local talent. His former partner has disappeared--hauled off by the fuzz for whacking his wife around one time too many--and shortly thereafter the two of them sold the rest of the unbuilt lots to one of my clients.
In that the house was never intended to be his permanent home, a lot of things got done for max visual and minimum cost: The 'rustic pine floors' in the upstairs were laid from reject 1x6 white pine T&G on 1/2" OSB subfloor; lots of busted T's or G's and a lot of major (1/4"-3/8") checks in the wood, with the heart laid up or down randomly and lots of cupping or bowing not sanded flat. Then about three coats of Gem Coat to make it shine for sales appeal.... In fact, once the new owners had taken posession of the place and gotten a good look at it in the 'cold clear light of morning', they expressed very serious reservations about laying another pine floor in the basement--because they were afraid it would degenerate to what they had on the second floor. I had to guarantee it wouldn't and show them a 10-year-old floor I'd done out of 2x6 red pine before they were convinced.
The original base and other mouldings were all selected from stock cuts of 5/16" finger-jointed pine, cheap paint-grade bungalow stuff, and a single coat of stain was wiped on and off and that was it. No plinth blocks, only a 3/8" shoe in some places and not in others, and no crown, cove or any other moulding at the ceiling joint. No tabling on the windows, just a piece of flat-moulded 15-degree casing set upside down. In short, a fast and cheap job of moulding, barely sufficient to hide the edges of the 'rock.
There was no way I was going to tack crapola like that into this basement; it would have effectively downgraded the rest of the HO's investment radically all to save less than $500 in materials. So I drew up the moulding plan and presented it and it was accepted carte blanche. It's really a pleasure to work with clients that trust your judgement. There is enough stress in this business without worrying about whether the HO will like it when it's all done. (Of course, we always worry anyway...but that's human nautre, LOL!)Dinosaur
'Y-a-tu de la justice dans ce maudit monde?
Great plan - build a beautiful basement so now the HO has to call you back to upgrade the rest of the house to match - LOL!
Thanks for taking the time to share in such detail. The shower block wall is especially inspiring as I think about what to do with my funky master shower.
Thanks--although it wasn't really planned that way. I just couldn't see putting crappy woodwork on top of a good job. Kind of like baking a Tarte Tatin from home-made pastry and fresh picked apples, and then topping it with CoolWhip. Eeeeee-yuck! Fortunately, the HO saw it that way, too....
Glass block is a nice alternative to tiled stud walls for a custom shower. It may even be price-competitive if you factor in the cost of framing, cement backer, and tile against the cost of the block.
If you have budget concerns, one thing to avoid is having the block turn a corner. Corner blocks cost over 4 times what standard blocks do, and the way the blocks are designed, you can't make a 90-degree corner without them--the edges of each standard block are finished for good mortar grip, not for looks, so you can't butt the end of one to the side of another as you can with brick or concrete block.
Pittsburgh Corning has some extraordinary tech support available. Check their website at http://www.pittsburghcorning.com/index.asp. Lots of ideas there.Dinosaur
'Y-a-tu de la justice dans ce maudit monde?
Thanks for the advice and link. Makes sense about the higner cost of the corners, but, dang, that corner you did looks sooo good!
Which ever way you go, have fun with it. Post some pics here to show us how it came out.
Dinosaur
'Y-a-tu de la justice dans ce maudit monde?
looks great. what did that run per square foot?
Surprisingly little, actually. I haven't calculated it exactly, because I don't charge that way, but it was about 20-25% under the cost for new construction of that general type in this area.Dinosaur
'Y-a-tu de la justice dans ce maudit monde?
When we got to the woodwork, I had to rent a paint shop to pre-stain all the doors and moulding parts. Early spring weather was too flaky to chance doing it outside, and there was too much to do inside the basement. I had also changed all the existing luan hollow-core doors for 4-panel knotty pine doors, and these had been temporarily hung the previous fall. One had warped and was sent back, and the rest got stained with 1 coat of stain prep and two coats of transparent stain, then hand-rubbed with steel wool, as did every inch of moulding. Once the wood was all installed, I put a coat of teak oil on it, which does not require buffing. The HO will re-oil the woodwork several times for the first year, then annually.
My moulding plan called for a backer band to support the L-track that would hold up the suspended ceiling; I custom moulded this out of 1x4 white pine on a Delta router/shaper, as I did the 1x6 baseboard and the window tabling. The shoe and casings I bought from stock patterns at my local suppliers. The bathroom was the only place where a crown was needed, to join the glass block to the wood ceiling, but instead of using standard crown and trying to get it to sit well against the glass block (to which I could not nail, obviously), I made a built-up cornice out of backer band and 15/16" stock cove moulding. The cove was big enough to enable me to nail it to the ceiling without hitting the glass block wall.
I also fabricated the plinth blocks for this job, and found a stamped oval appliqué to decorate them with. This Victorian rosette detail was my own last minute inspiration, and it turned out to be the one that impressed the HO's 14-year-old daughter the most. She didn't even notice the shower; but she loved those rosettes....
Dinosaur
'Y-a-tu de la justice dans ce maudit monde?
Edited 9/1/2004 8:44 pm ET by Dinosaur
The last thing to be installed was the tile on the flush entry at the ground-level exit door. This is a 6'-wide slider, and it's mounted in a concrete wall, so raising it to match the interior level of the new floor wasn't a practicable option. But in addition to that, a tiled entry 'foyer' inside an exterior door is a good idea when you have bare wood floors in the rest of the space. It is a place to take off shoes and put on slippers, and it's easy to maintain and practically indestructible. I had wanted to use gauged slate, but we settled on a rustic tile that matched what they had upstairs. I set the 12x12s with 4x4s to keep it from looking like a bleached-out checkerboard.
Dinosaur
'Y-a-tu de la justice dans ce maudit monde?
Edited 9/1/2004 8:45 pm ET by Dinosaur
Congrats on a great job! I especially like the built up trim you substituted for crown. I do have a couple of questions as I am new to much of this.
First, when I had my solid wood floor installed, plastic was laid down, and the sleepers are laid in a sort of tar mastic. I see neither plastic nor anything remotely black and gooey. Which is the best practice?
Second, definitions for a rookie: "mosaicist's tape", "PL premiumed"
Thanks for the play-by-play, the pictures tell the story of a craftsman at work.
Thanks for the kind words. It was a long job, but very satisfying and the HO was the kind all contractors dream about having....
On the floor question: we laid the sleepers directly on the concrete floor slab for several reasons, most important of which is that this house is built on a base of rock and sand fill over bedrock (excellent drainage conditions), and has no history of ground water in the basement. Also it is on the second highest part of the mountain where it's sited, so there is an extremely small chance of surface flooding. A good rule to follow when waterproofing is that in general, you can't really stop water, all you can do is re-direct it somewhere it won't bother you. Thus, if you lay a waterproof membrane below your sleepers and water does manage to get into the underfloor area, say, from a blown dishwasher on the storey above, that water will stay there until it evaporates...which can take quite a while in a sub-floor space where there's no air flow. On the other hand, untreated, unsealed concrete is relatively permeable (compared to plastic sheeting) and will let free water weep out downwards over the course of several days or a week. So we chose to go directly on the slab. The only part of the basement that required special treatment was the 'trench' created when the slab was poured around the supporting wall, whose sole plate sat 3" below slab surface on a separate foorting, and which was lined with a heavy membrane. That trench could have become a swimming pool, so it was filled with concrete up to slab level before we closed the floor and walls over it.
Sleepers were ripped from 2x3s and then screwed and glued to the slab with PL Premium construction adhesive and 5/32" TapCon concrete screws on 24" centers through pre-drilled counterbores. Any shimming necessary to fill dips was done with scrap asphalt roof shingles.
Mosaicist's tape is a pressure-sensitive film a tile-setter can lay sticky-side up on a work table while assembling a tile mosaic face down on it. It's a lot easier to adjust the position of itty-bitty pieces of tile on this than after they're on the floor or wall and they're all full of thinset and gooey. The tape or film is then cut into manageable sized sheets and each sheet is laid as a unit into the thinset. Once the thinset is dry, the film is peeled off and voilà you're done....Dinosaur
'Y-a-tu de la justice dans ce maudit monde?