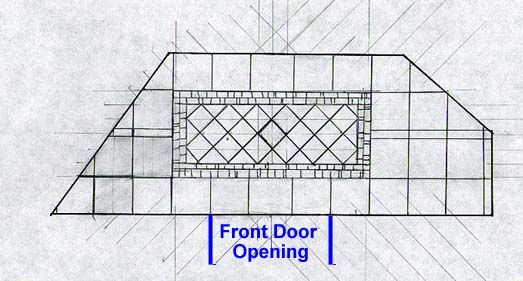
I’ve done some tiling and am not shy about starting in on the tiling on my place as I am advancing to some finish work. Most of my tiling projects have been pretty straight forward; however, at my entry way, I’m trying to “trick” things out a little. This will be the front door entry way; just ahead when entering is a partition, with two openings (the angled lines) into different living areas to the right and left.
Is my layout correct? For the field I am using 12″ x 12″ tile and for the “pattern” area I am using 6″ X 6″ tile with a mosaic border surround. Any comments would be helpful before I buy the tile! The layout I figure is pretty exact, although I really haven’t accounted for grout widths, but it shouldn’t affect the layout too much.
Edited 2/7/2004 3:26:17 PM ET by Wiley


Replies
Wiley,
I laid a floor with almost that exact inset pattern a few years ago. I'm suspicious of tile dimensions so I often lay pieces out dry to check things out before I start setting. In your layout I would start with the diagonal 6x6 tiles first. Cut the quarters and halves you need and dry-set the 6x6 on the floor with exactly the grout joint you are going to use (buy and use spacers is my rec). Place some of the mosaic around it, also with grout joint spaces. Then you'll be able to see how your 12x12 will relate. You're showing five 12x12 tiles across the feature area, centered on the door, and the only way you'll really know if that's going to happen is to lay it out dry first. You're showing 2+ tiles across the end of the feature area, so you're safe there because you can cut that '+' rip to whatever you need.
You're showing one course of 12x12 from the door to the feature area, and one more behind it to the wall. That layout is critical. You may choose to lay the door pieces first, in which case you need to be sure that the five of them adjacent to the feature are spaced out correctly. Or, you may choose to set the feature first, in which case you need to be sure it starts one course away from the door and one course away from the wall.
It can be helpful to 'stake out' your layout after you have it dry set on the floor. For instance, you could lay down the feature pieces and then tack down 1x2 strips around them so you can put them down in exactly the same place once you have the thinset mixed. Put the sticks right against the tile. Lines drawn on the floor tend to disappear under thinset pretty quick.
Dave's advice is right on the money. You absolutely have to account for the grout joints, and the best way to do layout is to do it right on the floor.
You can fudge the grout joints a little bit to get adjoining tiles of different sizes to fit. For example, after you've layed out your 6" diagonal tile, with the mosaic around it, you want to have whole tiles in the mosaic. So if you're half a mosaic tile off, take out a half tile and close up the grout joints between the 6" tiles, or add a half tile (to make it whole) and open up the grout joints between the 6" tiles.
I know you're trying to center the feature area on the front door, but it doesn't look good to me to have a larger expanse of 12" tiles on the right side compared to the left side. I think it would look better to make the feature area longer to the right so there is about the same visual "mass" of 12" tile on each side of the room.
I definitely don't like the slivers of tile running across the middle and down the right hand end, nor the little bits of triangular tiles in various places. If you had to do this, I would visually underplay the joints by selecting a grout color that nearly matches the 12" tile color, so the joints kind of disappear and your eye catches the feature area. I think you really want your nice feature to jump out and the background to fade away, like looking at a nice oriental rug on a plain looking floor.
With the field tiles being so large, it's giving you problems. Maybe using 6 x 6 tiles, but in a different color than the center tiles would be a solution, too.
The angled walls, especially on the left, is giving me visual problems with the way the large, square tiles just look cut off. Maybe a small border all around the room, even if it was in the same color as the field tile but in a small size would make it look more finished. The way it's drawn it just looks chopped off.
Whatever you do, take your time and don't lay the tile till the layout is visually satisfying to you. When I tiled my foyer it took me six weeks of layout and tile setting, working nights and Saturdays, to do the job. But all the fussing payed off. If your layout doesn't look right to you, take a break, and try a fresh approach another day until you hit it right. Enjoy!
I have to agree with Dave and Wayne. I would dry fit my tile w/ spacers and center the pattern in the whole area rather than on the front door.
Good Luck, Dave
Gentlemen, thanks for taking the time and lengthy input. I hadn't really given too much thought about centering the "feature" over the whole tile area, but yeah, extending that thing one more 12" distance to the right would give the whole area more of an even feel to the area in general. Actually, opening the front, a visitor will see the same thing, but when walking throughout the house coming in from left or right side living areas, the tile area will seem more balanced with the feature area lengthened.
What I had kind of planned was building or tiling the feature area first so that it is centered, and then building or tiling out from there. What may not be apparent since I didn't really account for it in the drawing is that the 12" rows "top" and "bottom" will be less than 12"...I will plan to trim these 12" tile and run that trim all the way to the outside, left and right, parameters. Also, I was going to tile for the right and left edges of the feature inwards to the center; I imagine the center 12" tile will be either greater than 12" (in which case I will cut down a 12" X 18" tile) or I suppose less than 12".
Specifically: Davemeiland, I like the idea of "dry" setting first; this I will usually do to some extent, but maybe will take more time at it than I originally planned. I also like your idea about using 1x2 strips to tack down and make some reference edges and yeah, I agree that snap lines and other reference marks tend to disappear once using thinset. If it is a pretty straight forward application i.e. no feature, fairly square application, I tend to use a string line and actually just eye that critical first row where everything else is going to come off However, here I think that feature in my drawing has got to come out square, so will need to focus on that.
Wayne, I hear you about some of your comments; some of the little pieces I think will disappear on the left side and maybe even the right too once I take into account the grout lines widths--of course a dry set will indicate this right away. Regarding your comment about the left side and dizzying issue on the angle; there will be wood flooring butting up against that angle on the left and right. I thought I would use a piece of wood to border the tile there, but maybe I should use a tile border? My only concern is that I would then be getting real close to encroaching on the feature in the middle of the tile area on this left side.
Anyway, thanks for the help all three of you. I also did the sketching so I can do a dang take off on how much tile I need. I plan to the use daltile's "Continental Slate" which I'm not sure will be a special order or not. I was going to go with a black field, incorporate the red and green colors of theirs in the feature, and then use their "deco" mosaic-type border (4" in width if I remember correctly). I hope this won't take six weeks! ;-) And will try to put up a couple pics when done.
Thanks again for the help...
It would be nice to see pictures when it's done.
There's an alternative to tacking wood strips. Draw the pattern on the floor with pencil or marker. Lay a strip of masking tape so that one edge of the tape is on the line. The tape should be on the outside of the line, that is, outside the area to be mudded first. Spread the mud right up to the tape and overlap the tape. Then pull the tape up. It will leave a clean, straight, visible straight edge to the mud so you still can precisely place the tile but without gaps or overspread mud.
Well, it didn't take me eight months to do the tiling, but as Wayne had suggested, here's a follow-up of what I ended up doing for the tile (original layout is above in attachment). I took the suggestion of the bordering the surround as part of the layout. This went down this past spring, and my tiler for my bathrooms was cool enough to have his laborer grout and seal this area while he was on site during the summer.
Anyway, just thought I would attach a finished pic of the entry area and appreciate the help here; your suggestions do make a difference! ;-) Since the wood flooring just went in a few weeks ago, the entryway really kind of jumps out as it is contrasted with the earthtone of the oak wood.
Very nice...
Life is not a journey to the grave with the intention of arriving safely in a pretty and well preserved body, but rather to skid in broadside, thoroughly used up, totally worn out, and loudly proclaiming
WOW!!! What a Ride!
Wiley, hope you dont mind if I chime in here but what did you use for those thresholds there? I'm considering doing the same kind of thing but havent figured out thresholds to taper the height difference down to the adjoining floor.
Ps - very nice work.
Tools, actually the transition point between the tile and wood floor is "flush." Knowing that the wood flooring material was going to be 3/4" thick, I thinset and nailed 1/4" Hardiback board down before spreading about 1/8" thick worth of thinset, then laying 1/4." tile. With the thinset, backer board, more thinset, and then tile, it was almost precisely 3/4" in height. If it was a skosh above, my flooring guy was able to slightly shim the wood to make flush like he did on two granite thresholds I put in the guest bath and pantry.
In the picture you see, I tried to leave a grout width gap (1/4" I think) between the wood and tile. I then went back and taped both sides of material (wood and tile) and caulked in between with of all things, some concrete caulk. This off-white of the concrete caulk seems like just the right color to merge the color of the wood and tile together.
Downstairs, where my tiler actually mudded the whole floor of the masterbath before tiling, my flooring guy just used a reducer to make the 1/4" height different between wood and tile. Looks nice BTW.
Wiley, my apologies then. Awesome that you got it flush. I am going to have an issue on my project because when I remove the section of hardwood floor to put tile down (the previous owner tiled on top of the entrance hardwood) it will likely be a bit higher than the remaining hardwood floor it butts up against.
Thanks for the info.
L
Thanks for the picture. It's nice to hear, and see, how a job turned out. Rarely do we find out. Enjoy the new floors.