Update on balloon frame barn 94837.1
Hi all:
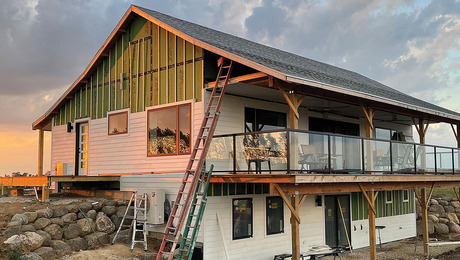
Last September I initiated a spirited discussion (94837.1 ) on a balloon framed barn I wanted to build for myself. Well, the barn is complete and I just wanted to offer an update to everyone. My concern about rafter thrust at the time seems almost silly now–after building the structure as I had originally intended, but with the 16″ center rafters required by the building department, the results are VERY solid. These rafters are going nowhere, nor is the rest of the building.
I’ve posted a series of pictures on my business website, including close-ups of the balloon framing, for those who want to check it out:
Thanks to all those who posted (including those who told me I was making a mistake!) because I really appreciate the forum to bounce ideas back and forth. When I get a little more money I’ll finish off the inside of this barn and move my shop tools there. If anyone wants further details on the project just let me know.
John


Replies
John, That is one of the nicest solo efforts I've seen.
Nice work. View Image
Peaceful,
easy feelin'.
Rez:
Golly, thanks. :-)
In fairness, I did sub out the foundation and some of the electric.
J.
John, gorgeous barn, great web site, I think we're country neighbors, tewksbury here. Nice work, Rich
R:
Wow, we sure are country neighbors. In the summer I ride my bike through Tewksbury on a loop through Califon, Annandale, past Round Valley and back home.
You have your own business, or do you work for someone else?
J.
john.... nice job.. i liked your photo essay tooMike Smith Rhode Island : Design / Build / Repair / Restore
My own, DBA Summit Construction, do much the same as what I see on your website. Moved locally about 4 years ago and no longer have a shop, so I'm limited to what I can produce myself. On longer, bigger jobs I'll set up shop onsite. Hopefully I'll see you around, maybe at Huston Supply.
R;
I think I've seen your ads or truck around because the name sounds familiar. I'll occasionally go to Huston, but more often I use Fox Lumber in Clinton. I'll stay away from Somerville lumber unless forced to be there because they are jerks. One of my biggest irritations about our area is the lack of variety and choice in lumberyards. Other areas of the country seem to have better quality and a much bigger selection--especially in mouldings and speciality items. On numerous jobs I've been unable to get what I need locally, forcing me to go over the internet or to change my design. It can be really frustrating.
J.
I agree, Fox Lumber has probably the best selection of materials in our area, and I don't like Somerville Lumber either. I've been told that their salespeople get a percentage of the sale, so it doesn't make for very good pricing upfront. I've dealt with Huston for 20 years, always good service. Great sales guys, real pro's. I've got a barn that needs vertical T&G replaced, but I want to find 7/8 stock, and not the scant 3/4 stock that is common, as it doesn't have sheathing. Any Ideas ?
R:
LOL! I just posted a reply to another poster about this (see previous message).
I did actually use what was supposed to be 7/8" material from a sawmill in Frenchtown who I wouldn't use again. However, when I ran out of enough material to build my sliding door and big double doors, I went to Fox and found that they had rough cut, ship lap siding which is 7/8", not 3/4! They don't have enough for a whole building, though. I cleaned them out of most of what they had left, but they have a few shorter boards left if you want to see for yourself. Talk to Pete Meck at Fox--he has been invaluable to me over the years taking the time to find more unusual items.
I also know of a sawmill in Hillsborough and in Hopatcong which might be able to help.
J.
Very Nice!!
Really a great build - had to add it to my list!
Forrest
Sweeeeeet barn John. Good job!
I like your website. Other than the fact that there is no "back" button on the gallery it is very nice. Easy to navigate and good photos. Who dod the work on it?
Eric
[email protected]
Eric:
Thanks. I do my own website. Before I started my business I worked in the computer industry. Actually, the website is due for an overhaul, but I've been too busy building things to get to it!
J.
Great job on the photo essay.And of course on the barn too.Most new construction I see bothers me,because for little or sometimes no extra cost you can get something with true character,like your barn.
The curved deck blew me away too.Is the railing solid wood?Looked a little too shiny.
One of these days I hope to work for a company that does stuff like that.
I:
No, the curved railing on that deck is made of cedar. I laminated 2x and 1x cedar boards together with polyurethane glue, then cut the appropriate curve, then did a four step machining process on a router table with a special jig to finish them off. The balusters are also cedar. The posts, on the other hand, are 4x4 PT wrapped with Azek PVC trim, which are mitered and glued. They have stayed tight for over three years now in NJ temperature swings.
J.
Your screen name so aptly describes what the photo essay conveyed!
Two thumbs up for a very lovely project. Thanks for sharing it with us.
Walter
I lived North of you in Morris County for about 10 years. I'd say you've nailed the local design flavor head-on with your barn. Looks like it could have been there for a couple of centurys.
Excellent work, now go get some of that $$$ in Bedminster, Basking Ridge, etc.
Cheers
The best reward for a job well done is the opportunity to do another.
Very nice photo essay! Nice barn, I'm envious! (my version below - not enough room to cuss a cat in there!)
CaliforniaRemodelingContractor.com
Nice job, John.
Question: How did you mill the shiplap on your siding? I've got a pile of nice dry (because it's taken me almost 3 years to get to this point) pine boards to do the siding on my barn/garage.
Mostly trying to decide how to process any boards which have noticeable sweep to them - was considering putting a long edge guide on the TS to straighten them out.
I've got a 3HP shaper with feed rollers, so I thought that would probably be the best way to do the rabbet. Before I found the irresistable deal on the shaper, I picked up a 3-1/4 HP router which I thought I'd use. Also considered dado head on TS.
Don
D:
Funny you should ask! If there was one area of disappointment in this project it was the material I got from a local sawmill for the siding. I had asked for rough cut pine boards 7/8" thick, but they came anywhere from 5/8 to 1 inch! Many more boards than I would have liked I had to cull out. At least most were pretty straight.
I had considered a handheld router at first. However, speed was an issue and I wanted at least a half inch overlap on the shiplap since I expected some shinkage from these boards which are still pretty green. In fact, I won't be surprised if I need to replace a handful of boards when the weather turns hotter and the sun beats on the south side. So...
Really my only choice as far as working quickly on site and getting to a decent overlap was a dado blade on my portable table saw. I set up the dado, removed the dust shroud underneath to prevent instant clogging, put infeed and outfeed rollers on either end, and pushed each board through just before I was putting it up on the barn. This allowed me to adjust the height of the dado blade in response to the thickness of the individual board and to push hard against the table saw fence to correct for any minor straightness issue on the board. Some of my boards were 13 feet long. If a board was really crooked I put it aside to cut it up for shorter peices on a gable end.
To correct minor curves in a board as I was nailing it up, I would secure one end, jamb a screwdriver at an angle into the strapping underneath and lever the board over to where it would meet the previous board before face nailing. This is supposed to be a rustic looking barn, so I didn't go too crazy. Come the warm weather I'll put a second coat of stain on the siding and cover the gaps caused by shrinkage. Any that shrink more than the 1/2" overlap will safely allow I'll pull off and reinstall a wider board or two narrower boards. My siding was random width to allow for such corrections.
If I were building this for a client, though, I would have gone with commercial kiln-dried rough cut shiplap siding instead.
J.
My boards are mostly right at 1". I never expect rough boards to be perfect, and for the price (free) I can't complain if they vary a bit.
When my father retired from the Air Force back in 1980, he picked up several hobbies, including being a part-time logger (has a skidder, log truck, bulldozer, backhoe, dump truck & a full setup for making maple syrup). Some of the lumber comes off his property, some from small logging jobs he does, and some from local individuals or tree services who call him to pick up the occasional log they've dropped.
He's got an arrangement with a local mill that he brings in logs & they split the resulting lumber.
My garage is closed in currently with used fiberglass roofing panels, so I can take my time getting the shiplap done. Figure I'll do a wall at a time, starting with the front which faces the road.
I'll probably plane down the thicker boards to a common size - probably 15/16. Then I'll either straighten the worst of the ones with sweep or do like you did and either cut them for the short pieces or pull them in. More effort will go into the front and the side facing our house - the back & opposite walls just face the woods.
Since this was my justification for buying the shaper, that's what I'll use for doing the rabbet if it works ok.
Don
Edited 1/27/2008 3:47 pm ET by DonNH
D:
The shaper should do it--my router bits couldn't give me the 1/2" overlap I wanted but your shaper bits will handle that no problem.
J.
Love it, love it, love it.
But I surely would have used a router and even a 3/4" straight bit with a fence, before I'd be humping 13' and longer boards over a site saw..but hey, its done, and it looks great.Spheramid Enterprises Architectural Woodworks
"Success is not spontaneous combustion, you have to set yourself on Fire"
Sorry I wasn't around for the original thread, as I could probably have saved you some anxiety.
I'm no engineer, just a design/builder who does his own structural engineering and teaches Engineering for the Homebuilder.
While this is not a simple engineering problem, it can be simplified and better understood if you turn your head sideways! (engineers on this forum, correct me if I'm off base).
First, the rafter thrust is simple to calculate: take the total live and dead loads of the roof and multiply by the ratio of run/rise. Assuming the collar ties at the 8' ceiling height are adequately fastened to properly triangulate the upper portion of the roof assembly, you can count only the loads on the remaining roof below the ties.
Then turn the cross-section sideways and think of the 3' section of wall above the floor joists as a cantilevered deck with a point load at the outer end. This DOES create very significant stresses on the that "cantilever".
A rule of thumb for cantilevered decks is that, if supporting a roof load with less than 28' span, you can have 1/8 the length of the framing member beyond the bearing point. But this, like any thumb rule, does not take into account the many variables, such as local snow loads and roof pitch.
If you want to calculate the stresses on the cantilevered studs, you'd use these formulas:
Cantilever, Point Load
Mmax = WL L = clear span (in)
(max. bending moment) W = total load (lbs)
D = WL3/3EI Wd = dead load (lbs)
(deflection) C|| = compression parallel to grain
Vmax = W E = modulus of elasticity (psi)
(vertical shear) b = breadth (in)
Hmax = 1.5W/bd d = depth (in)
(horizontal shear) f = Fb (fiber strength in bending) (in.lb)
If I couldn't engineer such a structure and wanted to play it safe, I would have tripled the top plate and doubled every other stud. You could also have reduced roof thrust by going to a 12:12 roof.
I would also have layed out the floor joists in line with each other and lapped the center joint with a cleat (which you inserted between the joist pairs as a spacer). This would have made laying the plywood subfloor much easier at the transition and still would have offered sufficient bearing surface on the center girder.
Solar & Super-Insulated Healthy Homes
R:
Good night! I don't want to open that can of worms again! ;-)
That is good information, actually. These calculations were further complicated by the fact that the saltbox design stiffened one side of the structure with triangulation there between two side walls, presumably making that side of the building stronger. I did bolt every connection I could, including the collar ties. Now that I took the risk of building the structure without an architect or engineer, it is pretty clear that my design will hold up. I even took detailed measurements as the stucture was being built to see if I could pick up any indication of spread--I could not. Even the rafter to ridge connections remain tight, without any indication of shrinkage, nevermind spread.
In the last thread I picked up a lot of flak for not hiring a structural engineer or architect, but the "few hundred dollars" suggested by these posters was way out of line for my neck of the woods. Hell, my plumber gets $720 a day! It would have been well into the thousands for an architect, and I couldn't find anyone locally who knew a structural engineer who works on small potatoes like this--they all work for large commercial firms. As it is my cost for this barn, including hiring out the foundation work, but nothing else except materials, is $50K. I figure if I built this for a client it would be $90-95K, minimum. That's a big nickel for a carpenter and my teacher wife living in one of the most expensive areas of the country.
J.
John,
What is the purpose of those short lengths of 2x placed on top of the main beam parallel to and between the overlapping ends of the 2nd story floor joists?
if you don't mind me asking
Peaceful,
easy feelin'.
Rez:
The floor joists overlap on the main beam because of the 24 foot span, and they also must tie the two opposing walls together, otherwise there would be nothing to resist the spread of the rafters in this balloon frame. Soo.. I could have (and arguably should have) offset the studs in the opposing walls by 1 1/2 inches so that the overlapped joists touch, but for the sake of simplicity, lining up plywood panels most efficiently and less thinking during heavy framing I didn't. Instead, I added a piece of 2x betweeen the joists where they overlap to make up for the thickness of the studs and bolted the whole assembly together.
J.
I thought that was the case but wanted to check see if there was something else.
Thanks
Peaceful,easy feelin'.
great looking barn. I'm jealous!
I have a 16' x 20' basement shop. I'm always running out of room for my projects.
And FWIW, Huston's in Watchung has a large inventory of mouldings. The Consolidated Lumber ( a moulding wholesaler) salesman once told me Huston's has one of the biggest supplies of trim of the various lumber yards he sells to.