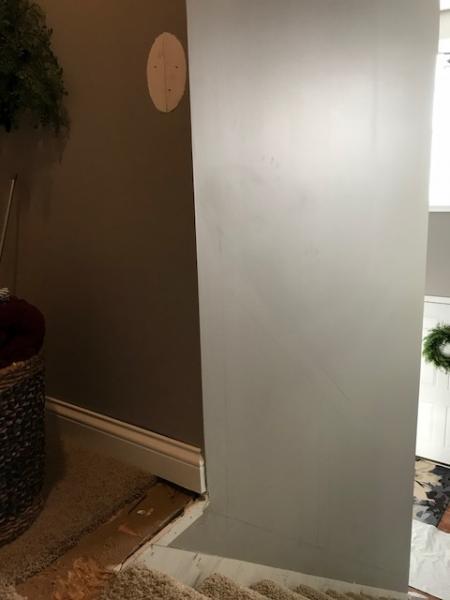
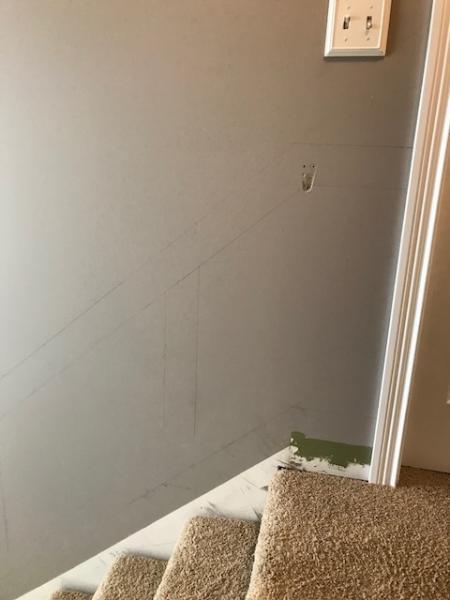
We just started a new project to remodel our stairway. Along with new newel posts, handrails and ballusters, we will be intalling wainscoting. Our stairway is straight and the hallway at the top turns 90 degrees to the right. The stairway wall on the right ( as viewed from the bottom) stops short of the top and is close to plumb with the front edge of the last step from the top. This creates a tricky transition from the stairway to the hallway. The top of the wainscot going up the stairway will be 34″ to match the height of the handrail (the handrail will be on the left side), but because the wall stops short, when I transition around the corner on the right. the height is at about 28″. To add more difficulty in the design, because the wall stops short I need to have a guardrail which will be about 37″ high that terminates into the wall (most likely a rectangular rossette). See the attached pics to get a better visual of what is going on. Newel posts and handrail are cherry and the wainscoting will be painted white. I am looking for suggestions on how to deal with this transition. Thanks.
MikeJ


Replies
MikeJ wrote:
We just started a new project to remodel our stairway. Along with new newel posts, handrails and ballusters, we will be intalling wainscoting. Our stairway is straight and the hallway at the top turns 90 degrees to the right. The stairway wall on the right ( as viewed from the bottom) stops short of the top and is close to plumb with the front edge of the last step from the top. This creates a tricky transition from the stairway to the hallway. The top of the wainscot going up the stairway will be 34" to match the height of the handrail (the handrail will be on the left side), but because the wall stops short, when I transition around the corner on the right. the height is at about 28". To add more difficulty in the design, because the wall stops short I need to have a guardrail which will be about 37" high that terminates into the wall (most likely a rectangular rossette). See the attached pics to get a better visual of what is going on. Newel posts and handrail are cherry and the wainscoting will be painted white. I am looking for suggestions on how to deal with this transition. Thanks.
MikeJ
How about you build a short wall on the right that solves your height problem at the transition?
I assume you are taking the rail and stile trims (wainscot) into that hall.
And are you sure of the 34" height for the rail? Here we need to go 36.
That would definitely solve the problem, but I don’t think it is going to look right in the space.
From what i’ve been able to find our local code says handrail should be 34”-38” above the nose of the tread and guard rails should be at least 36” above finished floor. The existing handrail was at 34 so That is what I am going with.
Thanks for for the reply.
Mike J
I should rephrase my answer. I think a short wall is going to close the space off too much, so I don't know if we are going to like the feel of it. I have to give you credit though, because I think it is the best solution to the problem. I think I am going to mock something up to see what my wife thinks.
The other solutions I have come up with are 1. To just have a mismatch in heighth where the two runs of wainsoct intersect. 2. Start the wainscot on the hallway wall at the heighth of where it meets the stairway wainscot (about 28"), run it a short distance and then bring it up to the 34" to match everything else. This would create a notch in the hallway wainscot to provide a space for the guardrail rosette. 3. Make the last stile at the top of the stairway match the 34" height of the hallway wainscot and then curve the top rail up to that height. I think this would look cool, but it might be beyond my skill set. Our wainscot is frame and panel with rabbeted panel moulding so if I curve the top rail then I will have to learn how to steam bend the panel moulding.
MikeJ
Options: Wrap the end stile around the corner
Options:
Run the end stile at the top of the stair up higher to match the height of the hallway stiles. Wrap the hallway top rail / cap around stairway corner, extending level. Run the stairway wainscotting into the end stile at angle.
That's a viable option that is similar to what I describe in option 3 above. The only problem with it is I have to have a guardrail atleast 36" high that terminates into the wall at that corner. So that is another part of the equation that makes this problem tricky.
Thanks for taking the time to draw this up. It definitely helps me visualize how it will look..
MikeJ
Options: Use some cherry to match the newell posts.
You can also wrap that corner with some 1x cherry and trim out the top and edges to match the style of your newell posts. This becomes part of your guard rail. The painted wainscotting can then butt up against that.
So basically make a 1/2 newel post for the wall and have the wainscoting on both walls butt into it at their respective heights? That's a possibility. The newel posts have some moulding on them that I would have to try and duplicate to match. I most likely won't be able to get them exact, but I might be able to get them close enough. I'll have to see if could do it with the router bits I currently have. It would definitely keep me from having to do something funky with the wainscoting. Thanks for the reply.
MikeJ
It will probably be wider than the newell post in oder to extend into the staircase far enough for the wainscotting to butt up properly, so a 1/2 newell will not work.
You can simulate a larger post partialy burried into the wall with two pieces of flat stock, one on the stairwell, one on the hallway, Make the hallway piece as wide as necessary to support the railing. The stairway piece should be wider than the stile. Both should be thicker than the wainscotting to provide a small reveal after any edge trim.
It is not necessary to duplicate all the detail of the post. Think of it as a variation of a theme rather than a copy. . Match the height of any horizontal elements. Trim the top and edges to match the style of the newell post. Trim profiles should be the same. Any recessed panels or flutes can probably be be left out without affecting the appearance.. If there are stopped chamfers on the post, these chould be copied to the new corner piece.
Draw it up on the wall to get a suitable size and proportion. Mock it up in MDF or similar before commiting to cherry.
Make sure the color matches! A mismatch will stand out much more than any minor variation in trim profile.
Good luck.
So I ended up doing what I normally do before I start a project like this, I drew up some designs in sketchup. Not sure why I didn't do this in the first place but anyways here is the winning design that my wife liked the best. The drawings only depict the wainscoting and some walls are removed in some of the shots for clarity. Every solution that was suggested or thought of myself had drawbacks or elements that just wouldn't work or be too much work to execute so this we feel is the best all-around compromise.
Thanks Calvin and catmandeux for your responses.
MikeJ
Project pics
I am terrible about taking pics during a project so I thought if I shared them on here I might be better about it. So here are a few to get started. The before pics are from a previous project so they don't really focus on the stairway, but you can see the original railing on the knee wall. On the 4th of July I was able to get the skirt board installed and the newel posts dry fitted. I still need to cut the newels to final heighth.
I encountered my first obstacle with the build immediately. The original skirt board was 1/2" veneered mdf and because of the wainscoting I had to go to 3/4". Because of the carpet that extra 1/4" was just enough to prevent the new skirt boards from sliding into place. Instead of planing the boards to fit or going and buying some 1/2" skirt boards (none of the big box stores around here carry actual skirt board so I had to call around and found one lumberyard that stocked it), I decided to trim the carpet. Not an easy task, but with some trial and error I figured out a way to do it cleanly. I don't think the 3/4" wainscoting sitting on top of 1/2" skirt board would have looked very good so I am happy with the results.
My next task is to put a backband around the door casing at the top of the stairs and then I will begin with the wainscoting. I have been wanting to do this project for a long time now so I am excited to finally be working on it. Thanks for looking.
MikeJ
Mike
thanks!