FHB Logo Facebook LinkedIn Email Pinterest Twitter X Instagram Tiktok YouTube Plus Icon Close Icon Navigation Search Icon Navigation Search Icon Arrow Down Icon Video Guide Icon Article Guide Icon Modal Close Icon Guide Search Icon Skip to content
Subscribe
Log In
  • How-To
  • Design
  • Tools & Materials
  • Restoration
  • Videos
  • Blogs
  • Forum
  • Magazine
  • Members
  • FHB House
  • Podcast
Log In

Fine Homebuilding Project Guides

Foundations and Masonry Work

Guide Home
  • Concrete & Masonry Basics
  • Building Foundations
  • Waterproofing Foundations
  • Retrofits and Add-ons
  • Masonry in the Landscape
  • Brick
How-To

Brick Walkway: Preparing the Base

Establish your grade and lay a base of compacted gravel and stone dust to ensure that your bricks stay exactly where you want them.

By Cody Macfie
  • X
  • facebook
  • linkedin
  • pinterest
  • email
  • add to favorites Log in or Sign up to save your favorite articles

Excavation

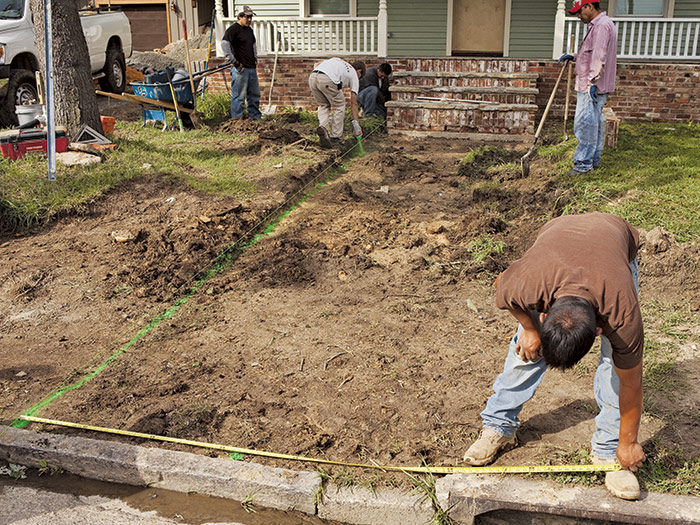
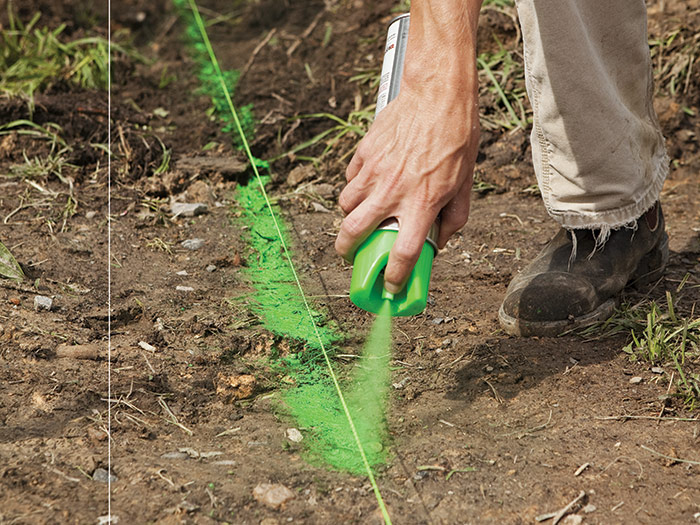
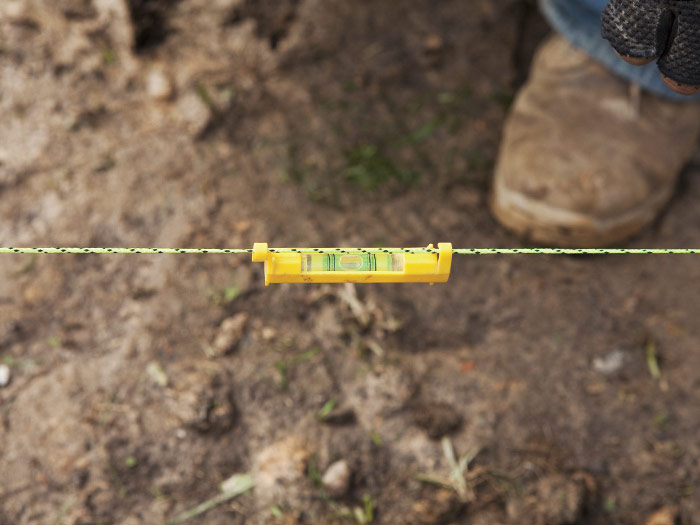
Establishing a rough layout for excavating a straight path is easier than for a curved path (though a straight path is not always as attractive). Drive stakes at each side of the walkway, tie mason twine to them, and adjust the stringlines so they are 90 degrees to the house or porch. You can use a framing square 1 to find the angle, or establish square using the 3-4-5 rule. Extend the stringlines the entire length of the walk. Make sure they are parallel and secure them to stakes at the street end of the path 2. Once the stringlines are set, mark reference lines on the ground for excavation 3.

Lay out for excavation
1. Lay out for excavation by running a stringline to the street. Use a framing square to set the line at 90° to the house.


make sure that both ends are roughly equal
2. Measure off the first stringline to locate the second parallel edge. Check to make sure that both ends are roughly equal.


Mark under the stringline
3. Mark under the stringline with marking spray. If you need to erase the line, simply scratch it out with your foot and re-spray.


If the grade is irregular, level the stringline using a line level. Measure down from the twine to gauge the excavation depth in any given spot 4.

level the stringline over the length of the walkway
4. Use a line level to level the stringline over the length of the walkway.


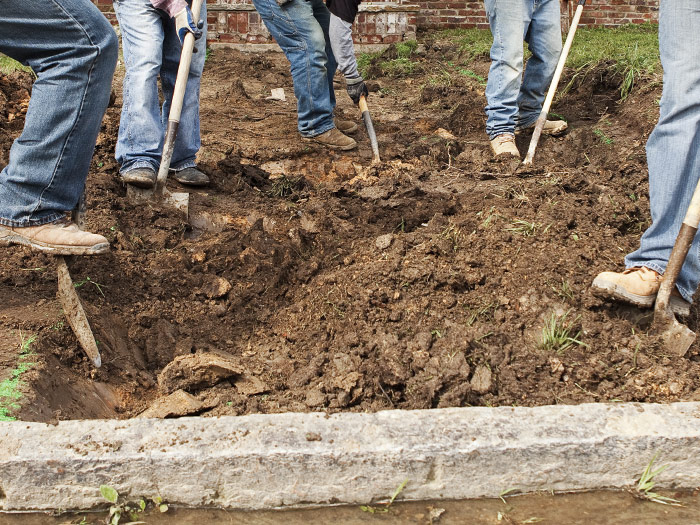
Dig down approximately 8 in., cutting the sides straight and plumb as you dig. This will give you enough depth for 3 in. of compacted gravel, 2 in. of quarry dust (stone dust) or sand, and the brick. Even for a narrow walk, 8 in. of excavated soil is a considerable amount, so find a spot in the yard where you can use some fill or plan on hauling it away 5.

bargain labor from your friends
5. Dig! Beg, borrow, and bargain labor from your friends and neighbors to make short work of an otherwise all-day job.


TRADE SECRET: If a finished landscape requires you to precisely lay out the finished walk before excavating, consider using batter boards that can remain in place for the duration of the project.


Get Help with the Digging

A digging crew can make short work of an otherwise all-day job. For the project shown here, a five-person crew dug the walkway bed and prepared it with gravel. They took roughly 11⁄2 hours to do this. That’s just about equal to an 8-hour day of nonstop labor for one person (or more, figuring in fatigue). Considering the work involved, it’s well worth plying some friends with some pizza in exchange for a little grunt-work help.


Installing the Base

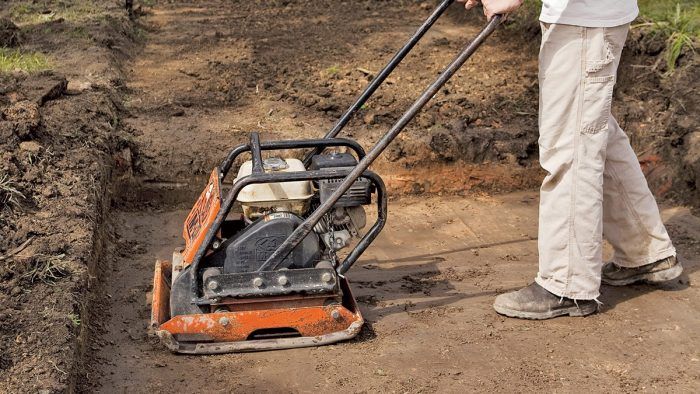
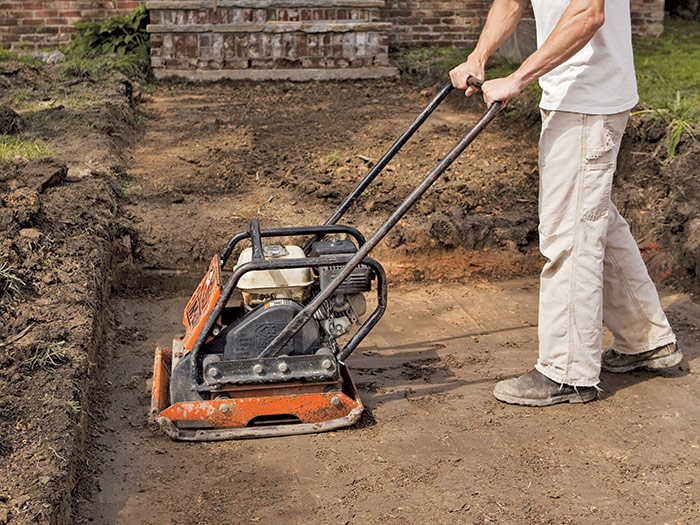
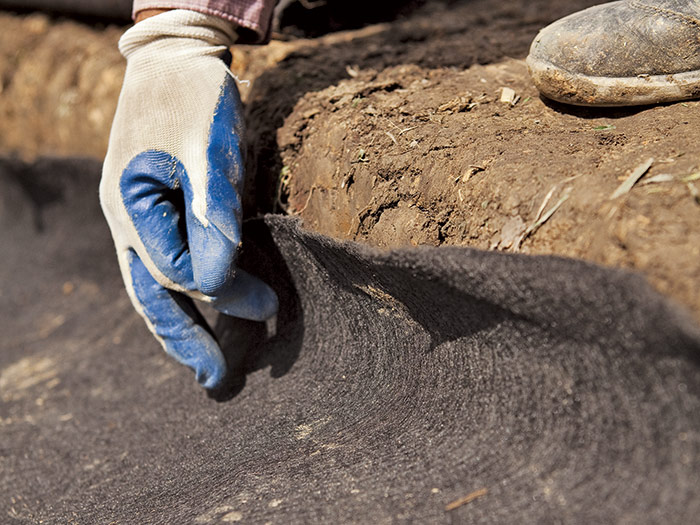
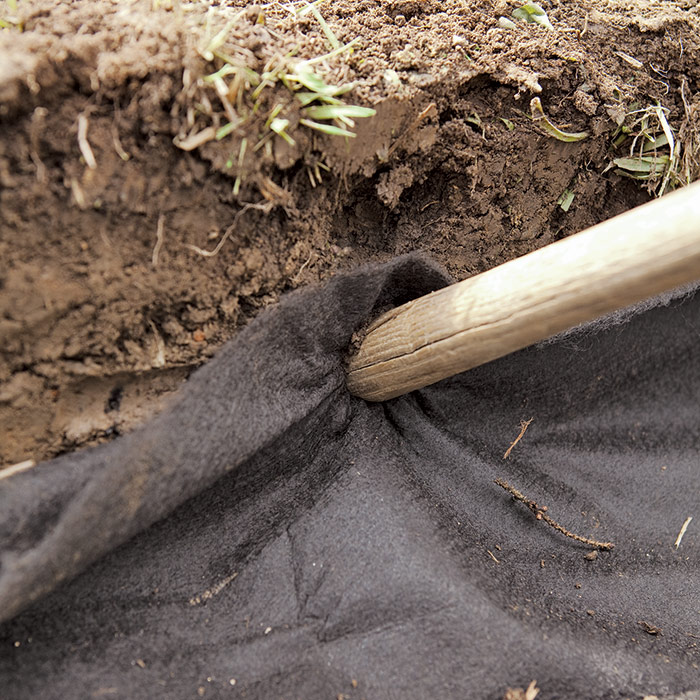
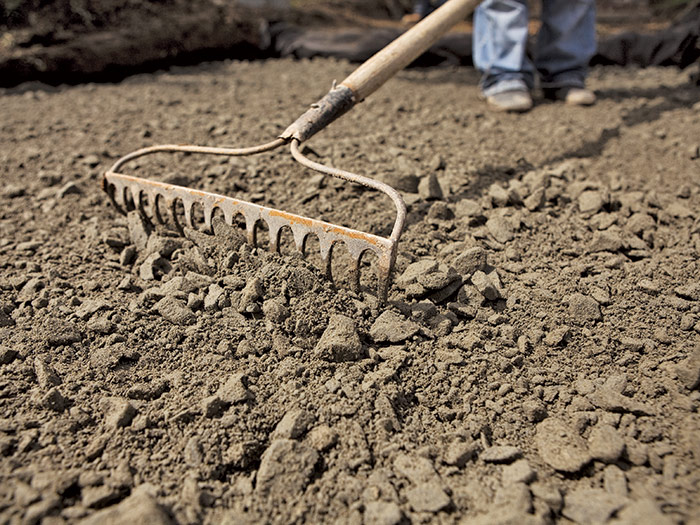
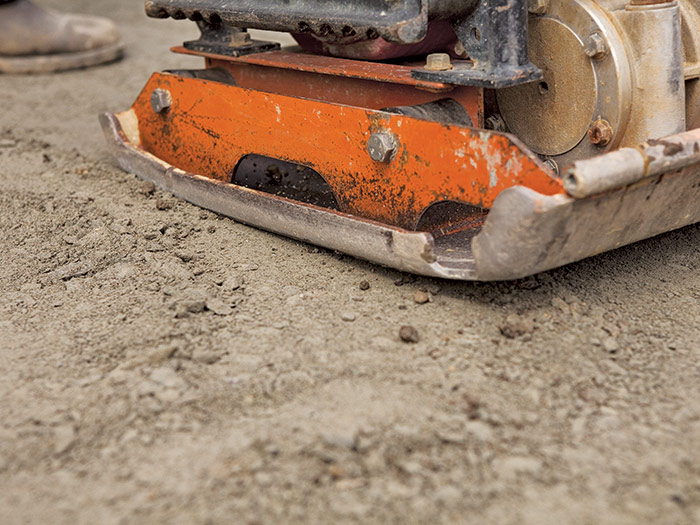
Once you’re done with the excavation, move a compactor over each area several times until the soil is hard and smooth. The longer you pack, the less chance settling will be an issue later 1. Then spread landscape fabric over the soil to discourage weeds from growing through the walkway 2. Fold the fabric up the sides of the excavation, secure with soil pins, and cut it just below finished grade. Spread gravel over the landscape fabric and rake it to a depth of 3 in. 3. Then repeatedly run the compactor over the gravel until the bed is hard and smooth 4.

Run a soil compactor over the bed area
1. Run a soil compactor over the bed area repeatedly and in different directions. Take special care to compact the perimeter thoroughly.


Fold the landscape fabric up the sides
2. Fold the landscape fabric up the sides of the excavation and cut it off just below the finished grade.


use the end of a shovel to press the fabric
TRADE SECRET:
If you don’t have soil pins to keep the fabric from falling down the side, use the end of a shovel to press the fabric into the dirt. When you remove the shovel end, the fabric should stay put. This method is not as secure as using soil pins but will hold the fabric in place at least until you can add the gravel.


Spread a 3-in. layer of gravel over the entire path
3. Spread a 3-in. layer of gravel over the entire path and smooth it with a garden or landscape rake.


Run the compactor over the entire graveled area
4. Run the compactor over the entire graveled area several times. Take several extra passes around the perimeter.


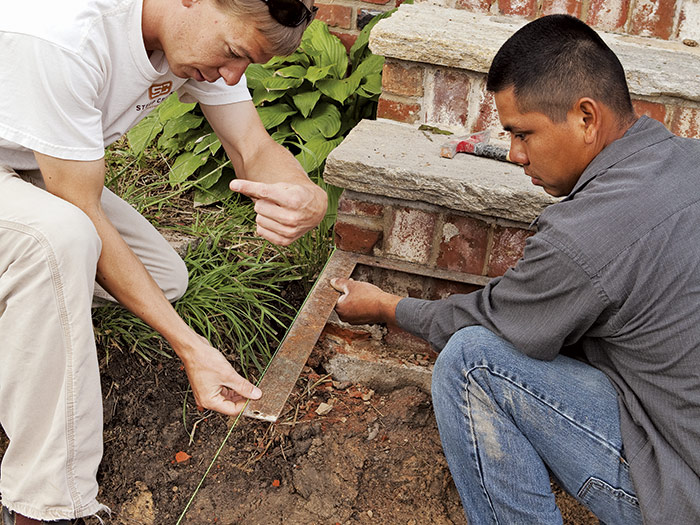
If your walkway has a step, install a footing and concrete block for it now.

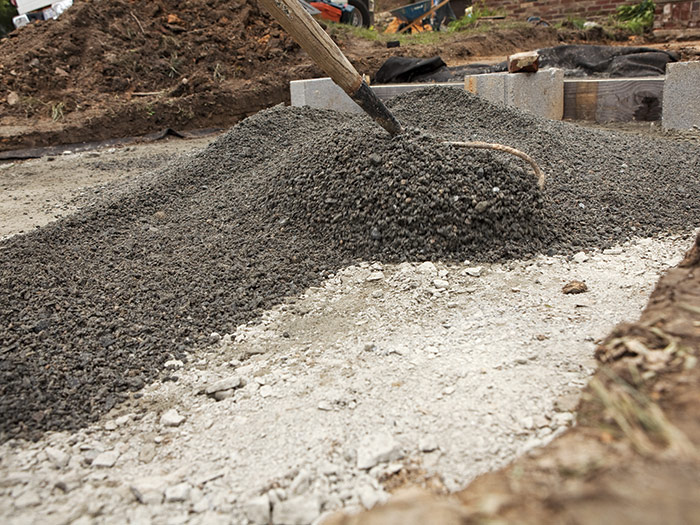
Next, add quarry dust (or “fines”) to a depth of 1 in., rake the surface smooth, and compact the entire area again 5.

Spread 1 in. of quarry dust over the entire surface
5. Spread 1 in. of quarry dust over the entire surface and compact it in the same manner as the gravel.


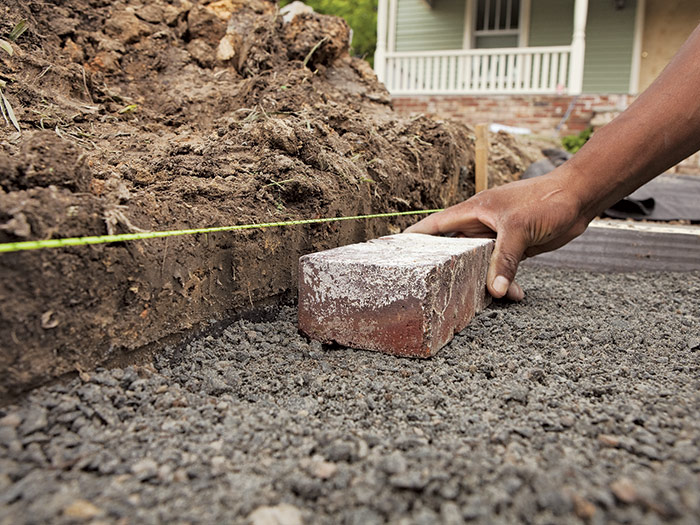
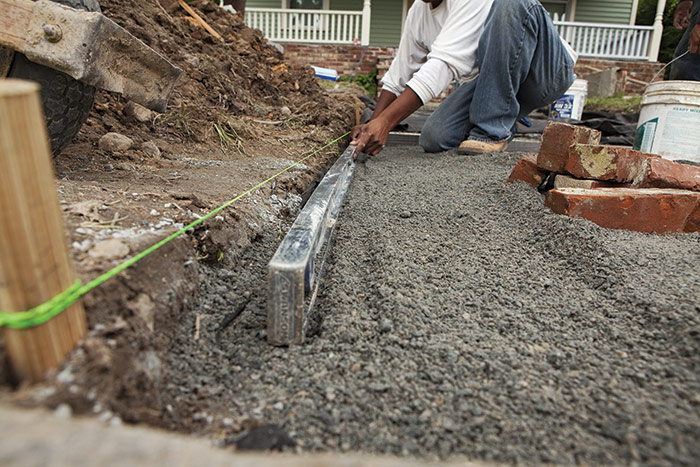
Now you’re ready to set up new stringlines to mark the elevation on the borders of the walkway. Unlike the reference lines used for excavation, the layout stringlines need to be as accurate as possible, so take the time to position them correctly. If you have a long walkway, or a complicated layout with multiple steps and turns, it’s worth the cost of renting a transit or laser level to really dial in the layout elevations. With a brick, check the elevation of the compacted quarry dust against the stringline. There should be a 1-in. gap between the top of the brick and the twine 6‚ to allow room for mortar under the perimeter bricks and sand under the bricks in the field.

Check the elevation
6. Check the elevation of the compacted quarry dust against the layout stringline. There should be a 1-in. gap above the brick.


TRADE SECRET: Use a level or a straight board to screed the fines flat under the string. Irregularities along the edges can throw off the overall flatness of the walkway, so it’s worth making the effort to get it right.

Use a level or a straight board to screed the fines flat


Masonry Complete

Excerpted from Masonry Complete (The Taunton Press, 2012) by Cody Macfie

Available at Amazon.com.

Previous: Brick Walkway: Planning and Prep Next: Brick Walkway: Setting the Bricks

Guide

Foundations and Masonry Work

Chapter

Brick

Sign up for eletters today and get the latest how-to from Fine Homebuilding, plus special offers.

Signing you up...

This site is protected by reCAPTCHA and the Google Privacy Policy and Terms of Service apply.
See all newsletters
See all newsletters

Log in or create an account to post a comment.

Sign up Log in

Become a member and get full access to FineHomebuilding.com

Foundations and Masonry Work

Foundations and Masonry Work

Trusted, comprehensive guidance from the pros for working with concrete and masonry

View Project Guide

View All Project Guides »

Become a member and get unlimited site access, including the Foundations and Masonry Work Project Guide.

Start Free Trial

Concrete & Masonry Basics
  • Choosing & Mixing Concrete
  • Concrete & Masonry Tools & Techniques
Building Foundations
  • Foundation Basics
  • Foundation Footings
  • Insulated Concrete Forms (ICFs)
Waterproofing Foundations
  • Waterproofing Strategies
  • Foundation Drains
Retrofits and Add-ons
Masonry in the Landscape
  • Patios, Walkways, and Driveways
  • Retaining Walls
  • Dry Stone Walls
  • Fire Pits
Brick

Fine Home Building

Newsletter Sign-up

  • Fine Homebuilding

    Home building tips, offers, and expert advice in your inbox.

  • Green Building Advisor

    Building science and energy efficiency advice, plus special offers, in your inbox.

  • Old House Journal

    Repair, renovation, and restoration tips, plus special offers, in your inbox.

Signing you up...

This site is protected by reCAPTCHA and the Google Privacy Policy and Terms of Service apply.
See all newsletters

Follow

  • Fine Homebuilding

    Dig into cutting-edge approaches and decades of proven solutions with total access to our experts and tradespeople.

    Start Free Trial Now
    • Facebook
    • Instagram
    • X
    • LinkedIn
  • GBA Prime

    Get instant access to the latest developments in green building, research, and reports from the field.

    Start Free Trial Now
    • Facebook
    • YouTube
  • Old House Journal

    Learn how to restore, repair, update, and decorate your home.

    Subscribe Now
    • Facebook
    • Instagram
    • X

Membership & Magazine

  • Online Archive
  • Start Free Trial
  • Magazine Subscription
  • Magazine Renewal
  • Gift a Subscription
  • Customer Support
  • Privacy Preferences
  • About
  • Contact
  • Advertise
  • Careers
  • Terms of Use
  • Site Map
  • Do not sell or share my information
  • Privacy Policy
  • Accessibility
  • California Privacy Rights

© 2025 Active Interest Media. All rights reserved.

Fine Homebuilding receives a commission for items purchased through links on this site, including Amazon Associates and other affiliate advertising programs.

  • Home Group
  • Antique Trader
  • Arts & Crafts Homes
  • Bank Note Reporter
  • Cabin Life
  • Cuisine at Home
  • Fine Gardening
  • Fine Woodworking
  • Green Building Advisor
  • Garden Gate
  • Horticulture
  • Keep Craft Alive
  • Log Home Living
  • Military Trader/Vehicles
  • Numismatic News
  • Numismaster
  • Old Cars Weekly
  • Old House Journal
  • Period Homes
  • Popular Woodworking
  • Script
  • ShopNotes
  • Sports Collectors Digest
  • Threads
  • Timber Home Living
  • Traditional Building
  • Woodsmith
  • World Coin News
  • Writer's Digest
Active Interest Media logo
X
X
This is a dialog window which overlays the main content of the page. The modal window is a 'site map' of the most critical areas of the site. Pressing the Escape (ESC) button will close the modal and bring you back to where you were on the page.

Main Menu

  • How-To
  • Design
  • Tools & Materials
  • Video
  • Blogs
  • Forum
  • Project Guides
  • Reader Projects
  • Magazine
  • Members
  • FHB House

Podcasts

  • FHB Podcast
  • ProTalk

Webinars

  • Upcoming and On-Demand

Podcasts

  • FHB Podcast
  • ProTalk

Webinars

  • Upcoming and On-Demand

Popular Topics

  • Kitchens
  • Business
  • Bedrooms
  • Roofs
  • Architecture and Design
  • Green Building
  • Decks
  • Framing
  • Safety
  • Remodeling
  • Bathrooms
  • Windows
  • Tilework
  • Ceilings
  • HVAC

Magazine

  • Current Issue
  • Past Issues
  • Magazine Index
  • Subscribe
  • Online Archive
  • Author Guidelines

All Access

  • Member Home
  • Start Free Trial
  • Gift Membership

Online Learning

  • Courses
  • Project Guides
  • Reader Projects
  • Podcast

More

  • FHB Ambassadors
  • FHB House
  • Customer Support

Account

  • Log In
  • Join

Newsletter

Get home building tips, offers, and expert advice in your inbox

Signing you up...

This site is protected by reCAPTCHA and the Google Privacy Policy and Terms of Service apply.
See all newsletters
See all newsletters

Follow

  • X
  • YouTube
  • instagram
  • facebook
  • pinterest
  • Tiktok

Join All Access

Become a member and get instant access to thousands of videos, how-tos, tool reviews, and design features.

Start Your Free Trial

Subscribe

FHB Magazine

Start your subscription today and save up to 70%

Subscribe

This is your last free article.

Don't miss another expert tip or technique from building pros. Start your free trial today.

Start your FREE trial

Already a member? Log in

We hope you’ve enjoyed your free articles. To keep reading, become a member today.

Get complete site access to expert advice, how-to videos, Code Check, and more, plus the print magazine.

Start your FREE trial

Already a member? Log in

Privacy Policy Update

We use cookies, pixels, script and other tracking technologies to analyze and improve our service, to improve and personalize content, and for advertising to you. We also share information about your use of our site with third-party social media, advertising and analytics partners. You can view our Privacy Policy here and our Terms of Use here.

Cookies

Analytics

These cookies help us track site metrics to improve our sites and provide a better user experience.

Advertising/Social Media

These cookies are used to serve advertisements aligned with your interests.

Essential

These cookies are required to provide basic functions like page navigation and access to secure areas of the website.

Delete My Data

Delete all cookies and associated data