
Slab Foundation for Cold Climates
Foam insulation below the concrete makes deep footings a thing of the past.
Synopsis: When senior editor Andy Engel decided to build a freestanding garage next to his house, he opted for a frost-protected shallow foundation rather than a conventional slab with footings below frost depth and a stemwall atop the footings. Because the garage would only be heated intermittently, he needed to install rigid foam under the slab as well as extending out from the building. In this article, Engel describes every step of the process, from planning the excavation to pouring the concrete.
Every builder knows that conventional footings must be placed lower than the deepest expected frost depth. My area’s 42-in. frost depth is one reason why slab foundations are rare and basements are common here; if you’re digging that far down anyway, a full basement doesn’t cost that much more. The exception is garages. A slab on grade is about the only economical way to build a floor you can park a truck on. Here in Connecticut, garages are typically built by excavating perimeter trenches to below frost depth, pouring concrete footings, and building concrete or CMU-block stemwalls atop the footings. The stemwalls are backfilled, and the soil inside the garage is compacted (or not, often enough). A layer of gravel is placed, followed by a plastic vapor barrier, and then a 4-in.-thick concrete slab is poured within the stemwalls. Sometimes a layer of foam insulation is placed between the gravel and the plastic.
However, the deep trenches create a fair amount of soil to get rid of, and the stemwall uses a lot of concrete. When I thought about building a garage next to my house, all of this was on my mind. Since I planned to do the work myself, the prospect of laying a block stemwall while stooped over in a trench also affected my thinking. My back resented that kind of abuse even before my hair turned gray. There had to be a better way.
Insulate the ground
I found an intriguing technique in the IRC known as a frost-protected shallow foundation. The idea behind this technique is that insulating the ground around a building keeps the earth below from freezing and negates the need to build concrete footings below frost depth. How far the foam has to extend depends on the climate zone. For that detail, the IRC references American Society of Civil Engineers (ASCE) document 3201: Design and Construction of Frost-Protected Shallow Foundations.
However, the IRC includes this detail only for heated buildings, where heat leaking from the building keeps the ground below from freezing. My garage would be heated only intermittently, so the code would view it as unheated. But ASCE 3201 provides more details than the IRC, including a way to build frost-protected shallow foundations for unheated buildings. The main difference between the details for a heated building and those for an unheated building is that the latter requires insulation below the slab as well as extending out from the building. Heat rising from the earth’s core keeps the ground below the foam from freezing. Since I had planned to insulate below the slab anyway, the only extra thing I’d have to do would be to extend that 2-in. layer of insulation about 4 ft. beyond the footing area. That seemed like a no-brainer, but I had to get it approved.
Absence from the IRC doesn’t forbid the use of a detail. It just means that the applicant has to satisfy the local building official that the detail complies with the intent of the code. I talked to my town’s building inspector and provided him with a copy of ASCE 3201 along with my permit application. Based on that, he approved my plans as an alternative to the IRC. In the end, the extra gravel and foam outside the building cost about $1500, a few hundred bucks less than I would have spent on blocks and mortar for the belowgrade stemwall I didn’t want to build.
Foundations have layers
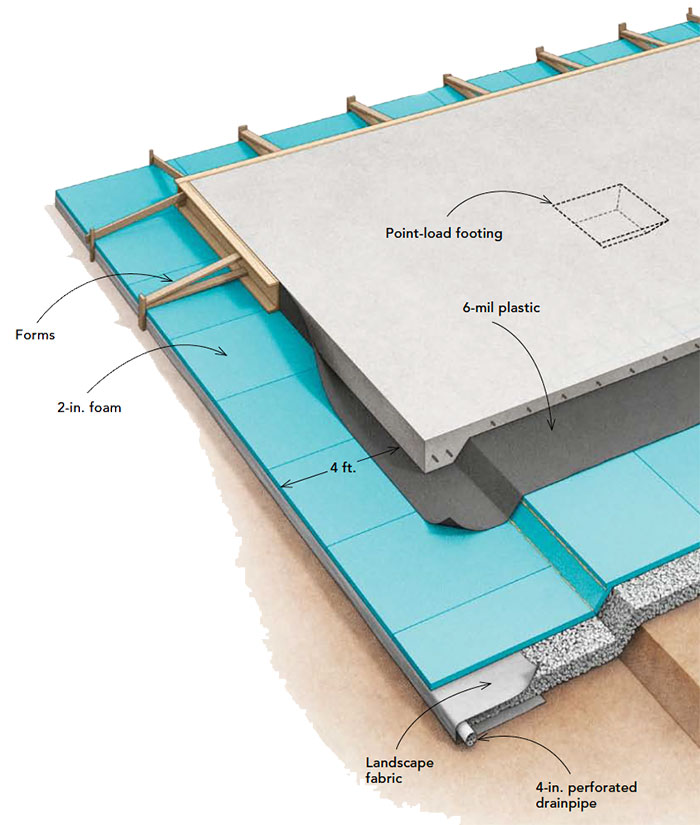
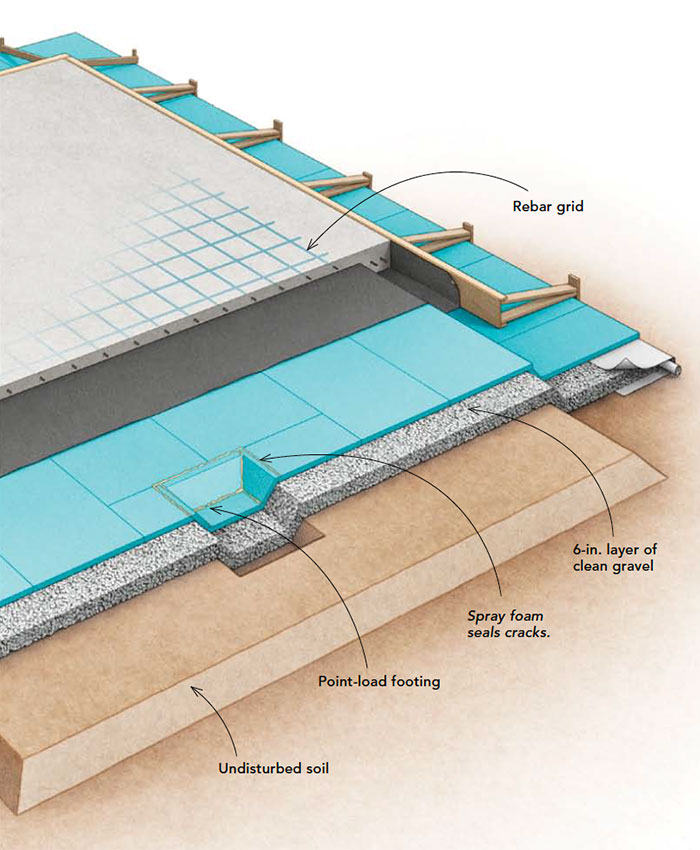
The bottom layer is the ground, stripped of organic soil, shaped to mirror the bottom of the planned slab, then compacted. Next is a layer of 3 ⁄ 4-in. gravel, which is followed by the extruded polystyrene (XPS) foam. Atop the foam is a 6-mil plastic sheet that serves as a vapor barrier.
Planning the excavation
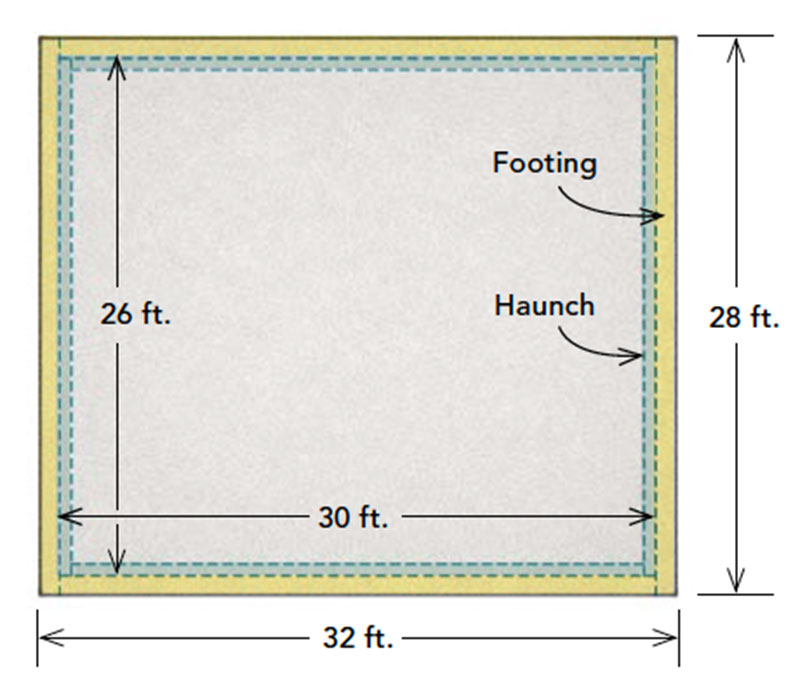
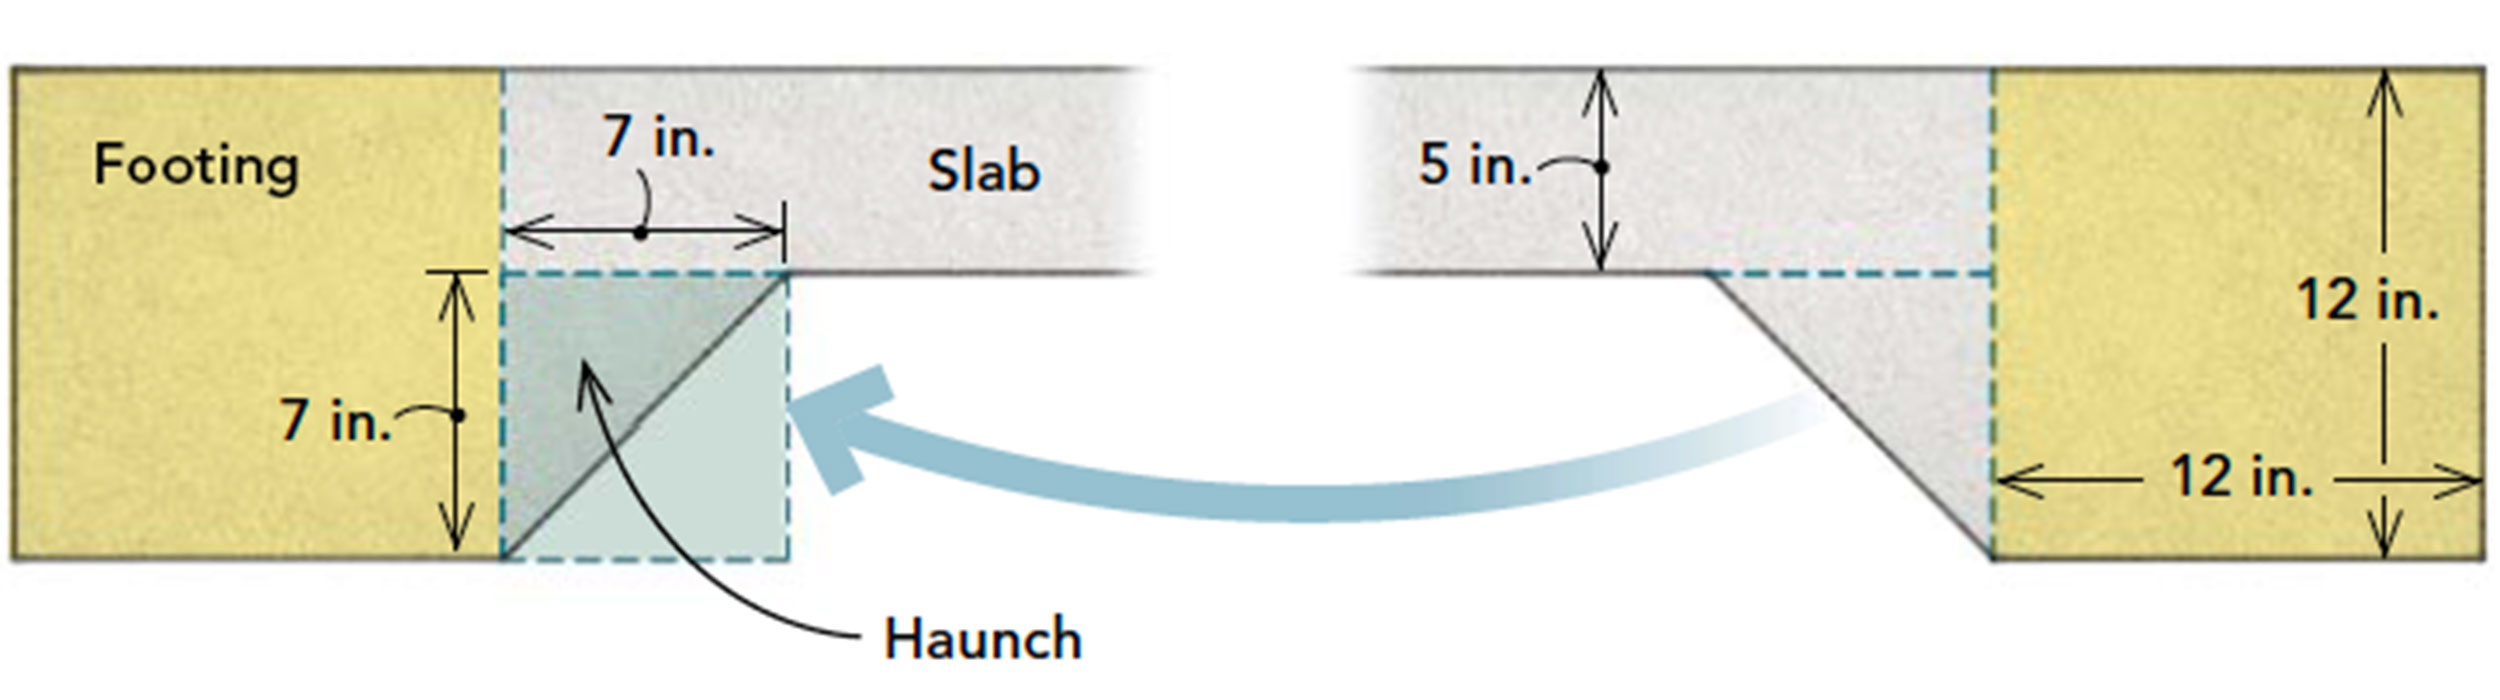
The ASCE design is a haunched, monolithic slab, where the integral slab and footings are poured at once. The perimeter footings would be 12 in. deep and 12 in. wide, sloping up at 45° on the inside from the bottom of the footing to the bottom of the slab. I made my slab 5 in. thick instead of the minimum 4 in. because I planned to park a 7000-lb. tractor on it—that’s about twice the weight of a typical car. Slabs and footings work by spreading loads out. Designers size footings to spread out the loads so that they’re less per square foot (or square inch—the unit of measure doesn’t matter) than the maximum the underlying material can support.
All other things being equal, thicker concrete is stronger concrete because compression loads spread outward in a cone shape at about a 45° angle. Consequently, the thicker a slab or footing, the larger the area that the load spreads over. For example, a point load on a 4-in.-thick slab spreads over about 50 sq. in., while one on a 5-in.-thick slab spreads over about 78 sq. in. That’s more than a 50% increase in bearing from 25% more concrete. Width factors in, too, of course. Because of how the loads propagate out at 45°, footings are usually designed to be twice as wide as they are deep.
I had to include additional footings in three spots to support column loads from the second floor and in one spot to support a masonry chimney. Like the perimeter footings, these footings were also haunched, avoiding sharp corners that would be more likely to crack the slab. The slab and footings would rest on 2-in.-thick rigid foam. Below the foam would be 6 in. of 3⁄4-in. clean gravel to promote drainage and to ease leveling.
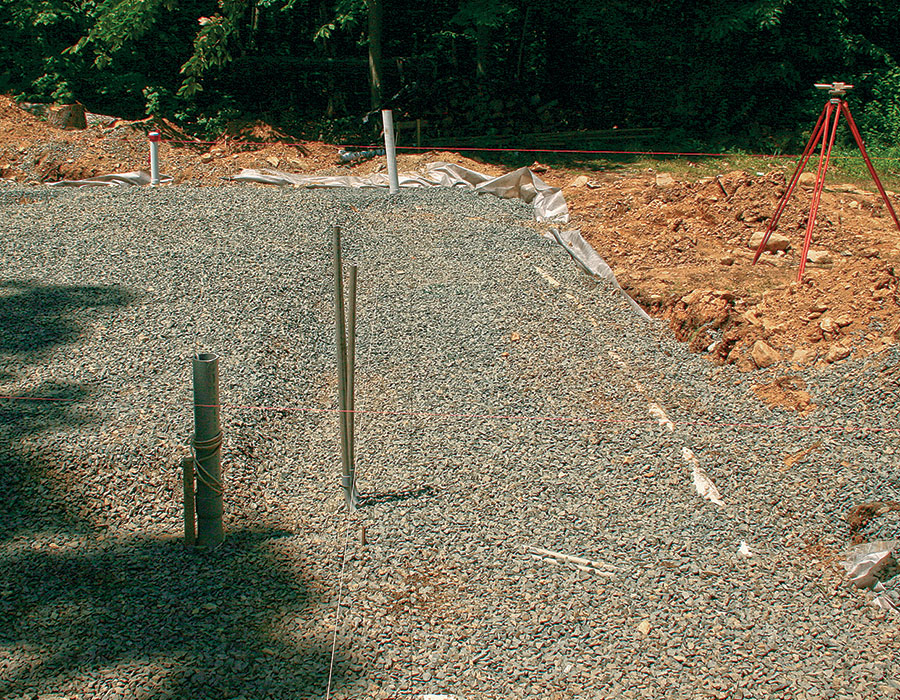
To determine the depth of the excavation, I decided where I wanted the top of the slab to be in relation to the elevation of the driveway, then I used a backhoe to dig out the depth of the concrete (either 12 in. or 5 in. below the driveway top, depending on whether that spot was footing or slab), plus 2 in. for the foam and 6 in. for the gravel. The deepest dig was around the perimeter and was 20 in. lower than the driveway elevation. Starting at the same elevation as the perimeter footings, I dug a little more than 4 ft. beyond them to accommodate the exterior foam and gravel, sloping this area about 1 ⁄ 4 in. per ft. away from the building for drainage. The whole dig’s center was left elevated, shaped like a low, truncated pyramid. Next, I dug for the column and chimney footings, and trenched for the underslab utilities. With the conduits and pipes laid and inspected, I backfilled and compacted those trenches, then compacted the entire excavated area.
Calculating gravel
Gravel is usually sold by the ton, and it weighs about 1.5 tons per yard. Simply calculate the cubic yards of gravel needed and divide that by 1.5 to determine the tonnage. Gravel orders are approximate; expect to receive and to pay for a bit more than you order.
Stone and foam keep the ground dry and warm
After finishing the excavation, I laid 6-ft.- wide filter fabric around the edge, with about 3 ft. of the fabric inside the hole. On top of that at the outside of the excavation went 4-in. perforated pipe, which connects to solid pipe draining to daylight. Then I spread 6 in. of 3 /4-in. clean gravel in the excavation, rough-leveling it with the backhoe. I folded the exposed fabric over the edge of the gravel to keep dirt from washing in along the edge.
Because the gravel’s top surface had to be flat to fully support the foam below the foundation, fine-tuning it there was fussy work. I used rakes, a builder’s level, and my son Kevin. We checked the elevation within the building area every couple of feet.
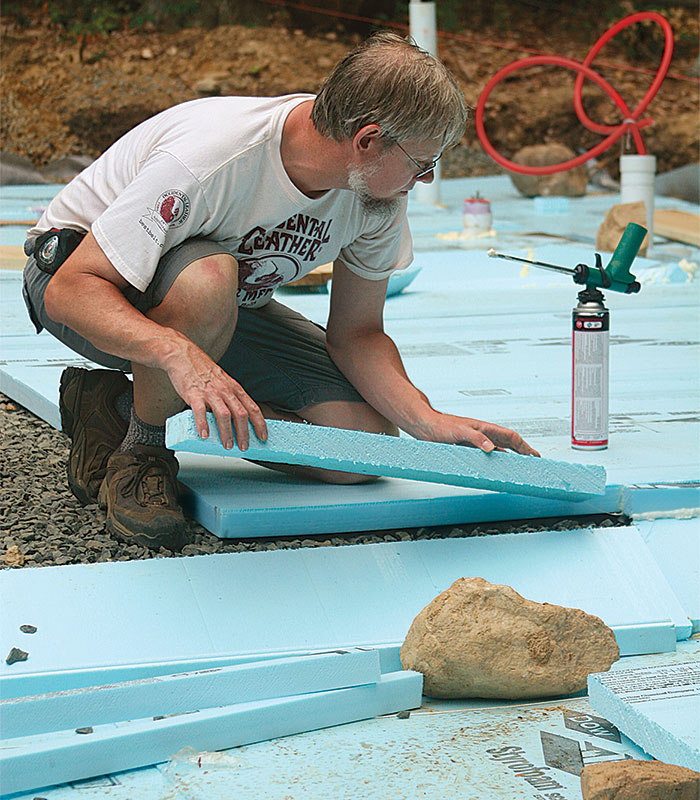
Using batter boards and string to outline the perimeter of the foundation, I laid the foam out on the gravel, following the contours of the truncated pyramid. I made long cuts with a tablesaw and short ones with a handsaw. Spray foam sealed any big gaps, and rocks and lumber laid on top of the foam kept the sheets from blowing away.
Build on top of foam? Are you crazy?
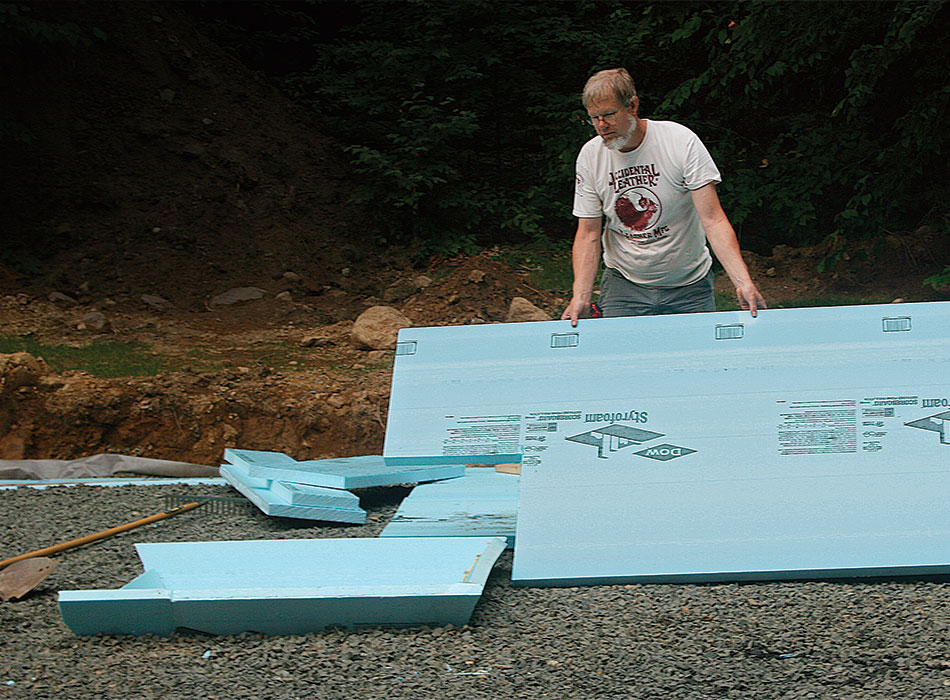
The compressive strength of the XPS foam I used is 25 psi. That works out to 3600 lb. per sq. ft. (psf). The default bearing capacity of soil in the IRC, which I used to calculate footing sizes, is 1500 psf. In essence, the foam has more than twice the assumed bearing capacity of the earth below. Foam comes in a variety of densities, so check with the manufacturer to be sure that what you use can handle the load. Calculating the amount of foam I needed was simple: length × width = sq. ft. of foam. Dividing that by 32 sq. ft. (the size of a 4×8 sheet of foam) gives the number of sheets.
Poplar makes cheap forms
For the forms, I bought green, rough-sawn 5/4×12 poplar from a local sawmill for about half the cost of 2×12 boards. Some of it I ripped into 4-in. ribs to strengthen and straighten the forms. Forming was simple–I just outlined the slab perimeter with the poplar. Using strings to be sure the forms were straight, I braced them about every 4 ft. to stakes driven into the dirt at the edge of the excavation. This was overkill, but if you’ve ever heard the awful cracking sound a form filled with wet concrete makes when it lets go, you know overkill is the way to do it. Once the forms were up, I covered the foam with 6-mil plastic.
The ASCE document called for two rows of #4 rebar in the footings, and I added a rebar grid to reinforce the slab. I laid this out before the pour, then cut and bent the pieces as needed. I placed the pieces in the concrete as the pour progressed so there would be less to trip on as my helpers and I placed and screeded the concrete. Where two pieces of rebar meet, they should overlap by at least 16 bar diameters. The diameter of #4 rebar is 1 ⁄ 2 in., so I overlapped the pieces at least 8 in.
No different from pouring any other slab
Concrete is available in a variety of strengths, with 2500 psi being the code minimum for residential footings. For a few dollars more per yard, I ordered 3500 psi. Because the garage would be unheated much of the time, I also ordered air entrainment, which introduces tiny air bubbles into the mix and reduces the chance of spalling caused by freeze-thaw cycles. That would be more important for a driveway than for an interior slab, but it only cost a buck a yard more.
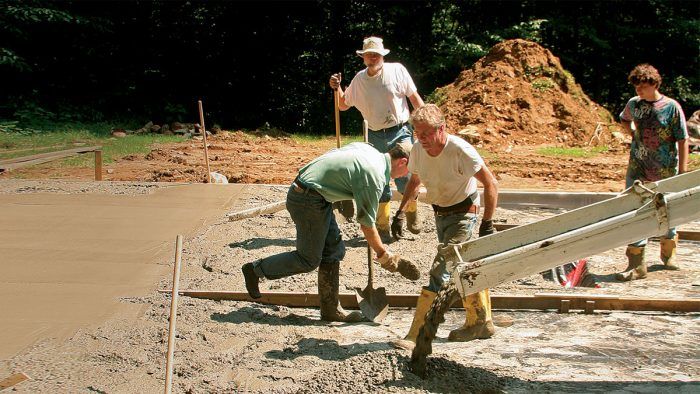
I always schedule concrete for a slab for first thing in the morning. If it’s cold, you have all day for it to set up. If it’s hot, you do the hardest work in the coolest part of the day. After finishing the slab, I covered the new concrete with plastic. To develop concrete’s full strength, it must be kept wet for as long as the chemical reaction between the portland cement and the water that causes it to cure continues. The curing slows as the reaction consumes the components, so the period soonest after the pour is the most important. If the slab dries out, the reaction stops permanently. Keeping it wet for even a day helps, and 28 days is ideal, if unrealistic in terms of construction schedules. I covered this slab for two weeks, flooding below the plastic with water each day.
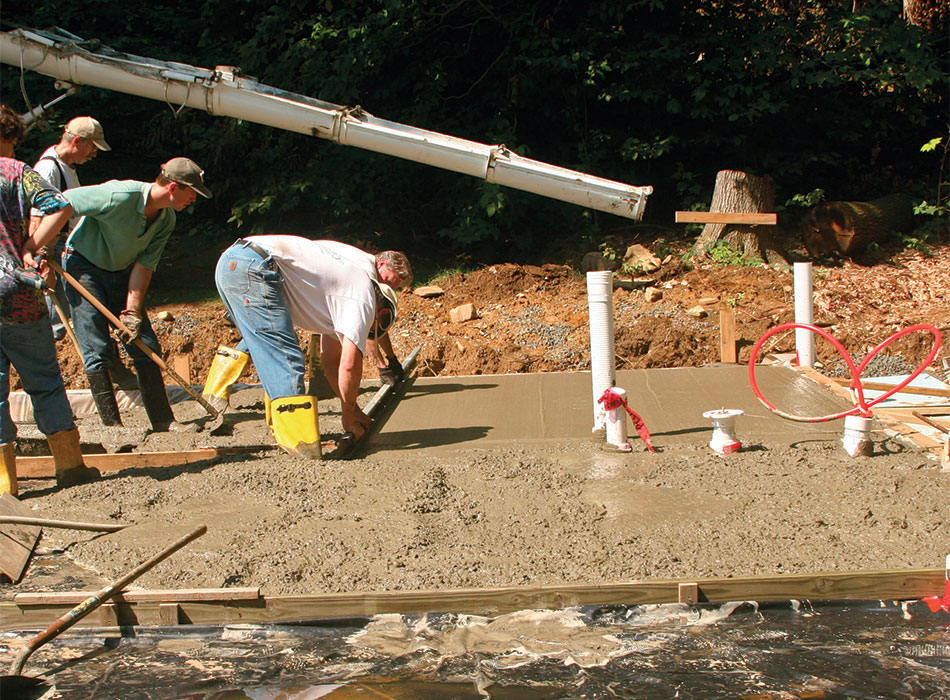
Concrete always cracks. One solution is to cut it with a saw into sections about 10 ft. sq., with the kerf depth about one quarter the thickness of the slab. These cuts weaken the slab so that it cracks along them and not randomly. Saw cuts look deliberate, and no one questions them. Cracks look like a defect, although they aren’t necessarily a structural problem. Cracking can happen early in the cure as water evaporates and the slab shrinks, or as temperature swings cause movement. Also, uncured concrete is easier to cut than cured material. So the day after the pour, I made the cuts with a diamond blade in a circular saw. To keep dirt out of the kerfs, I sealed them with polyurethane caulk.
So that I could backfill against the garage high enough to slope the ground away for drainage and to cover the exterior foam with the required minimum of 10 in. of soil, I laid three courses of block atop the outside of the slab. To tie the block and the slab together, I had set L-shaped pieces of rebar every 6 ft. before the concrete set. I laid the blocks so that the rebar ran up through their cores. After grouting these cores, I set the foundation bolts in the grout. I installed 1-in. rigid foam outside this wall—extending to the bottom of the footings—and then covered it with expanded wire lath and two coats of portland-cement plaster.
Since pouring the slab, we’ve had several winters with below-zero temperatures (including one February when it got above freezing for only eight hours). The framing has stayed plumb and level, and there are no cracks in the block walls or the slab. All told, the foundation is performing as expected. Plus, since I avoided laying block in a trench, I’m still able to walk upright.
Calculating concrete
Determining how many yards of concrete to order is usually a simple volume calculation, but the haunches added some complexity. I mentally broke the slab into pieces to figure the volume, then added an extra yard to be sure. Running short of concrete results in cold joints and finishing trouble. The $112 for that extra yard was cheap insurance.
The footings
Figure the 12-in.-wide by 12-in.-deep footing section. Its combined length is 116 ft.
1 ft. × 1 ft. × 116 ft. = 116 cu. ft.
The haunches
The haunches measure 7 in. on each leg and are about 112 ft. long. Rather than figure the volume of a triangle, combine the two triangles into a rectangular section that’s half the total length.
7 ⁄ 12 ft. × 7 ⁄ 12 ft. × 56 ft. = 19 cu. ft.
The slab
The slab measures 26 ft. × 30 ft. × 5 in.
26 ft. × 30 ft. × 5 ⁄ 12 ft. = 325 cu. ft.
The total cubic yardage*
116 cu. ft. + 325 cu. ft. + 19 cu. ft. = 460 cu. ft. To find cubic yards, divide cubic feet by 27.
460 ÷ 27 = about 17 cu. yd.
* The point-load footings used in this project are not typical and so are not included here.
—Senior editor Andy Engel is a former builder.
Photos courtesy of Patricia Steed.
Drawings: Christopher Mills.
From Fine Homebuilding #262

View Comments
I'd like to know how the author slopes the slab 1/8" per one foot when it's a monolithic slab? And he excavates down 1 ft for the edge. Does that mean the framing, sheathing and siding is at the grade level? Doesn't all wood need to be 8" above grade? Thanks for any help with this. I like this idea in concept.
Im am no concrete pro but not a fan of sheathing and siding touching ground especially here in Canada where the winter -30C will leave 3 feet of snow and ice resting on the base plates for a long season and the garage our house will be heated , unless laying concrete blocks all around who become pointless at this stage !
You did not mention if you compacted the gravel before the pour. I'm in the process of doing something similar and our gravel guy insists that the clean rock will compact poorly.
Shrinkage cracks (typical for most slabs & some walls) occur because of the restraint of the surrounding elements and/or the subbase materials and elevation variations. By placing this foundation on the foam insulation you have provided a slip plane that reduces or eliminates this kind of cracking. Sawcutting control joints the day after placing, and without any special treatment of the reinforcing, is fruitless - it's too late if shrinkage cracking was going to occur. I'd bet that if you removed the caulking you put in the sawcuts you will find no cracking.