Synopsis: Here are the basics of installing casing around an interior door written by a carpenter who prefers traditional methods and materials. Illustrations are included, with many details contained in the text.
Nowhere in house building is the workmanship more obvious than in interior trim, and doors are among its most visible locations. It takes skill, patience, and the proper tools to do good work. Perhaps more important, the use of some special techniques will lead to results that the craftsman can be proud of.
The wood most commonly used for trim is pine, though almost any wood will do—solid wood, that is. Various alternatives to solid wood are now available. Such materials as plastic and hardboard are more stable than solid wood and less likely to split. But while they may look like wood, they don’t feel like wood, smell like wood, or work like wood. There is really no substitute for the real thing. If you’re going to work with the best, use #1 clear material.
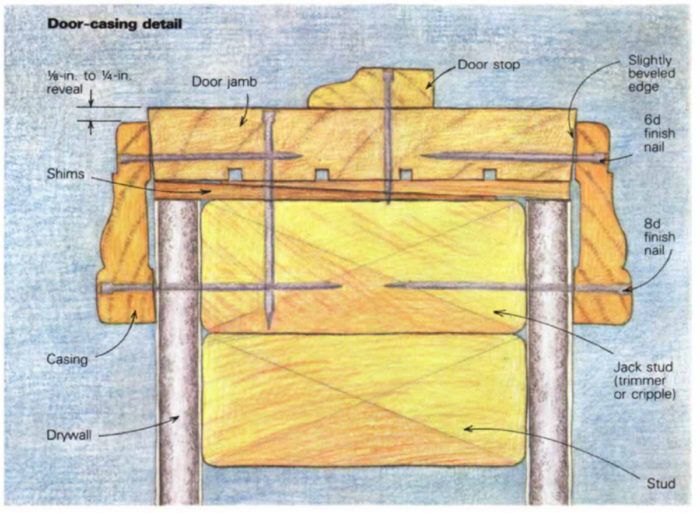
Casing stock often comes in random lengths from 7 ft. to 20 ft. Usually, however, you’ll find it in the standard lengths of 10 ft., 12 ft., 14 ft. and 16 ft. You can sometimes purchase complete trim packages for standard-size windows and doors. A door package will include two head casings (the horizontal pieces above the door) and four jamb casings or side casings (the vertical pieces at the sides of the door).
Door casings come in various widths and profiles, but all are partially relieved, or plowed, on the back surface. The relieved section is about 1/16 in. deep, and leaves a shoulder about 3/8 in. wide on each side of this trough. When the trim is installed around the opening, one shoulder rests on the door frame and the other rests on the wall. The relieved section bridges any high spots that might be between them, and allows the casing to make good contact with each.
A quick way to relieve shop-made casings is to run the stock on edge through a tablesaw, with the blade set at a slight angle. If you turn the stock end for end and repeat the cut, a triangular section from the back side will be removed, leaving two flat shoulders like those on mill-cut casings.
If the head casing is to be square-cut and laid on top of the side casings, it can’t be relieved along its entire length because the relieved area will show up at the ends of the head casing. On such pieces, relieve the trim using a dado blade on your tablesaw. Start and stop the blade just short of the casing ends.
For more drawings and details, click the View PDF button below: