FHB Logo Facebook LinkedIn Email Pinterest Twitter Instagram Plus Icon Close Icon Navigation Search Icon Navigation Search Icon Arrow Down Icon Video Guide Icon Article Guide Icon Modal Close Icon Guide Search Icon Skip to content
Subscribe

In every issue you'll find...

  • Expert insights on techniques and principles
  • Unbiased tool reviews
  • Step-by-step details to master the job
  • Field-tested advice and know-how
Subscribe Now!
Subscribe
  • How-To
  • Design
  • Tools & Materials
  • Videos
  • Blogs
  • Forum
  • Magazine
  • Members
  • FHB House
  • Podcast
  • Join
  • Log In
Subscribe
How-To

Replacing a Chimney Cap

Homeowners rarely see their chimney caps, and few people have ever called me to repair them. But when I'm asked to inspect a roof or an attic, I generally find myself looking down at the top of the chimney.

By Fred Lugano Issue 117

Synopsis: A deteriorating chimney cap can lead to all sorts of trouble as water works its way into masonry and freeze-and-thaw cycles do the rest. This article explains how to make a new mortar cap with a simple wooden form and strategically placed steel reinforcement.

Chimneys are built like heavy little houses.They have walls and a roof so that they stay dry inside. The roof, or cap, is usually a low-slope mortar bed suspended between the flues and the exterior walls. Often, these caps are built poorly and deteriorate rapidly. When the caps break and leak, water flows into the masonry walls, staining the exterior with salts from the mortar. Combustion residue that washes off the flue tiles can flow inside the house to produce stains and odors. In cold climates, soaked bricks freeze, split and spall. The whole chimney can really take a beating.

Homeowners rarely see their chimney caps, and few people have ever called me to repair them. But when I’m asked to inspect a roof or an attic, I generally find myself looking down at the top of the chimney. Obviously, leaks here should be stopped before new roofing or insulation is installed.

Protect the roof during the job

Repairing the cap can be messy work. Unless it is about to be replaced, the roof should be protected from foot traffic, tools and wet cement. Working on roof-mounted tarps or drop cloths is not recommended. On lower slopes, I sometimes stand on cleated sheets of plywood or oriented-strand board (OSB) that is supported by roofjacks. When the roof is too steep to stand on, you can work tarps around roof brackets and planks to provide coverage without compromising safety.

By the time I get an order to replace a chimney cap, it is usually so thoroughly destroyed that demolition is a minor concern. A few taps from a 20-oz. hammer are all it takes to clean it off. And because little material was used to make these old caps, the remains fit nicely in an old drywall bucket. After the loose, broken and missing bricks are fixed and dusted off, I can begin the formwork.

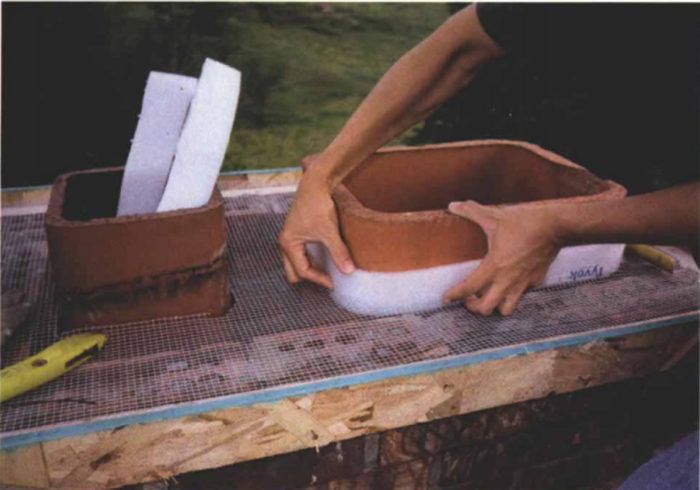
A simple form, wire mesh and rebar make a better pour

To build the cap, I want to contain the perimeter, support the bottom and isolate the flue tiles against thermal expansion. First, I ring the chimney with a frame of 2x lumber. This gives the drip edge a healthy overhang. Strips of OSB give the form a minimum depth of 1 in. I nail the strips to the frame with 6d nails 12 in. o. c. to keep the 2xs from splitting. This form is light but strong enough to contain the little pour. A few small wedges between the frame and the brick level the form at the right height to the chimney.

For more photos and details, click the View PDF button below:

Sign up for eletters today and get the latest how-to from Fine Homebuilding, plus special offers.

Signing you up...

This site is protected by reCAPTCHA and the Google Privacy Policy and Terms of Service apply.
See all newsletters
See all newsletters
×

Get home building tips, offers, and expert advice in your inbox

Signing you up...

This site is protected by reCAPTCHA and the Google Privacy Policy and Terms of Service apply.
See all newsletters
See all newsletters
View PDF

New Feature

Fine Homebuilding Forums

Ask questions, offer advice, and share your work

Log in or create an account to post a comment.

Sign up Log in

Become a member and get full access to FineHomebuilding.com

Up Next

Video Shorts

Featured Story

Dress Up a Ceiling With Reclaimed Beams

Old timbers get new life as a decorative element in a cottage renovation.

Featured Video

SawStop's Portable Tablesaw is Bigger and Better Than Before

The 10-in. Jobsite Saw PRO has a wider table, a new dust-control port, and a more versatile fence, along with the same reliable safety mechanism included in all SawStop tablesaws.

Related Stories

  • Smart Deck Spacers
  • Tips for Choosing and Installing a Woodstove
  • Dress Up a Ceiling With Reclaimed Beams
  • Code Requirements for Fireplace Clearances

Discussion Forum

Recent Posts and Replies

  • |
  • |
  • |
  • |
  • |
  • |
View More Create Post

Highlights

Fine Homebuilding All Access
Fine Homebuilding Podcast
Tool Tech
Plus, get an extra 20% off with code GIFT20

"I have learned so much thanks to the searchable articles on the FHB website. I can confidently say that I expect to be a life-long subscriber." - M.K.

Get home building tips, offers, and expert advice in your inbox

Signing you up...

This site is protected by reCAPTCHA and the Google Privacy Policy and Terms of Service apply.
See all newsletters
See all newsletters

Video

View All
  • Podcast 535: Air-Sealing Cape Houses, Smart Watches for Builders, and Repairing Spalling Concrete
  • Sealing a Concrete Floor
  • Podcast 479: One Story or Two, Basement Bunkers, and the Best DIY Spray Foam
  • Building Better with Insulated Concrete Forms (ICFs)
View All

Other Materials

View All Other Materials Articles
  • Installing a creme colored aluminum soffit
    A Vented Soffit That Blends In
  • metal braces between roof trusses
    Steel Brace for Roof Trusses
  • Schluter's Primer-U primer being applied
    Prime Substrates for Better Tile Adhesion
  • adhesive glue
    Not Just Glue—Three Unique Adhesives
View All Other Materials Articles

BOOKS, DVDs, & MERCH

Shop the Store
  • Pretty Good House
    Buy Now
  • 2022 Fine Homebuilding Archive
    Buy Now
  • Code Check Building 4th Edition
    Buy Now
Shop the Store

Fine Homebuilding Magazine

  • Issue 313 - Feb/March 2023
    • Practical System for a Seismic Retrofit
    • Fine Homebuilding Issue #313 Online Highlights
    • Practical System for a Seismic Retrofit
  • Issue 312 - Dec 2022/Jan 2023
    • Tool Test: Cordless Tablesaws
    • Gray-Water System for a Sustainable Home
    • Insulate a Cape Roof to Avoid Ice Dams
  • Issue 311 - November 2022
    • 7 Steps to a Perfect Exterior Paint Job
    • Options for Smarter Home-Energy Tracking
    • The Fine Homebuilding Interview: James Metoyer
  • Issue 310 - October 2022
    • Choosing a Tile-Leveling System
    • Choosing Between HRVs and ERVs
    • Custom Built-in Cabinets Made Easy
  • Issue 309 - Aug/Sept 2022
    • 10 Steps to Install Crown Molding on Cabinets
    • How to Get Sturdy Walls Without OSB
    • Choosing the Right Construction Tape for the Job

Fine Homebuilding

Follow

  • twitter
  • facebook
  • instagram
  • pinterest

Newsletter

Get home building tips, offers, and expert advice in your inbox

Signing you up...

This site is protected by reCAPTCHA and the Google Privacy Policy and Terms of Service apply.
See all newsletters
See all newsletters

Membership & Magazine

  • Online Archive
  • Start Free Trial
  • Magazine Subscription
  • Magazine Renewal
  • Gift a Subscription
  • Customer Support
  • Privacy Preferences

Taunton Network

  • Green Building Advisor
  • Fine Woodworking
  • Fine Gardening
  • Threads
  • About
  • Contact
  • Advertise
  • Careers
  • Copyright
  • Terms of Use
  • Site Map
  • Do not sell or share my information
  • Privacy Policy
  • Accessibility
  • California Privacy Rights

© 2023 The Taunton Press, Inc. All rights reserved.

X
X
This is a dialog window which overlays the main content of the page. The modal window is a 'site map' of the most critical areas of the site. Pressing the Escape (ESC) button will close the modal and bring you back to where you were on the page.

Main Menu

  • How-To
  • Design
  • Tools & Materials
  • Video
  • Blogs
  • Forum
  • Reader Projects
  • Magazine
  • Members
  • FHB House

Podcasts

  • FHB Podcast
  • ProTalk

Webinars

  • Upcoming and On-Demand

Account

  • Log In
  • Join

Podcasts

  • FHB Podcast
  • ProTalk

Webinars

  • Upcoming and On-Demand

Popular Topics

  • Kitchens
  • Business
  • Bedrooms
  • Roofs
  • Architecture and Design
  • Green Building
  • Decks
  • Framing
  • Safety
  • Remodeling
  • Bathrooms
  • Windows
  • Tilework
  • Ceilings
  • HVAC

Magazine

  • Current Issue
  • Past Issues
  • Magazine Index
  • Subscribe
  • Online Archive
  • Author Guidelines

All Access

  • Member Home
  • Start Free Trial
  • Gift Membership

Shop the Store

  • Books
  • DVDs
  • Taunton Workshops

More

  • FHB Ambassadors
  • Reader Projects
  • Podcast
  • Customer Support

Account

  • Log In
  • Join

Newsletter

Get home building tips, offers, and expert advice in your inbox

Signing you up...

This site is protected by reCAPTCHA and the Google Privacy Policy and Terms of Service apply.
See all newsletters
See all newsletters

Follow

  • twitter
  • facebook
  • instagram
  • pinterest

Join All Access

Become a member and get instant access to thousands of videos, how-tos, tool reviews, and design features.

Start Your Free Trial

Subscribe

FHB Magazine

Start your subscription today and save up to 70%

Subscribe

We hope you’ve enjoyed your free articles. To keep reading, become a member today.

Get complete site access to expert advice, how-to videos, Code Check, and more, plus the print magazine.

Start your FREE trial

Already a member? Log in