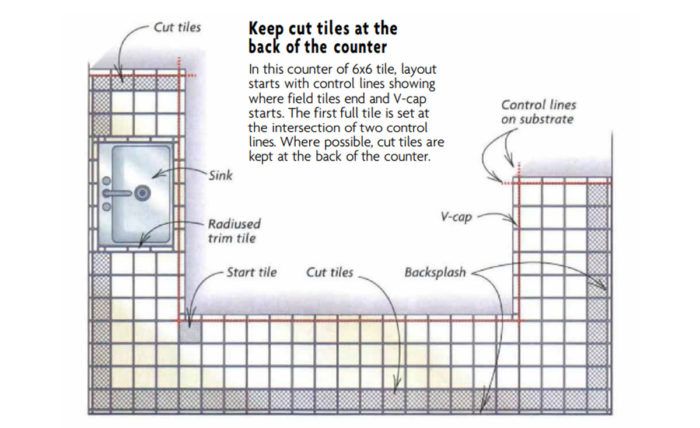
Tiling a Kitchen Counter
Start with a sturdy wood underlayment, and plan the layout to get cut tiles in the back.
Synopsis: This is a thorough explanation of how to install a tile countertop over a mortar bed, the preferred method of many West Coast tilers. The author details layout and substrate preparation, mortar mixes, and installation. Sidebars focus on cutting tile for inside and outside corner, plus the use of cement backerboard as an alternative to mortar.
It took two days to complete my first shower, including the time I spent at the library reading up on how to do it. That was 26 years ago. Since then, I’ve laid hundreds of tile floors and counters. My San Francisco-area tile contracting company often works in housing developments where a journeyman tilesetter with only one helper can set a tile counter in a single day. Even if you don’t set as much tile as we do, installing a kitchen counter should be a straightforward and relatively speedy process.
Tile can be set on either a mortar bed or cement board. Around here, counters are almost always set on a mortar bed 3/4 in. thick. I think that produces the best tile job — it’s strong, durable and easily leveled. Whichever substrate you choose, the process of laying out the counter and installing the tile is identical.
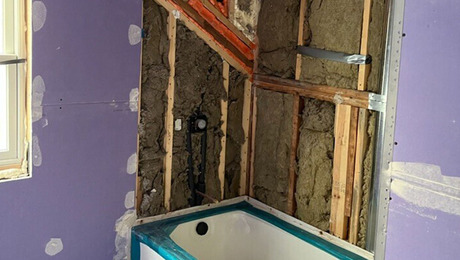
Before you put down either cement board or a mortar bed, make sure you have a solid wood base on top of the cabinets. I use a 3/4-in. exterior-grade plywood (although you can also use 1×6 boards with 1/4-in. gaps between them). If you use plywood, it’s a good idea to make a series of cuts through the sheet with a circular saw to prevent the rough top from warping. Snap a series of parallel lines 6 in. to 8 in. apart along the length of the plywood, then make 6-in. to 8-in. long cuts along the lines, leaving 6 in. to 8 in. between them. Where overhangs are larger than about 8 in., you must provide adequate support — with corbels, for example — to prevent movement in the plywood that would crack the tile or grout.
Protect cabinets from moisture
Mortar is wet stuff, so we install a moisture barrier over the rough top of the cabinet. You may use an asphalt-impregnated paper such as 30-30 kraft paper, 15-lb. roofing felt or 4-mil polyethylene film. When we staple the material to the rough top, we let it hang all the way to the floor to protect the cabinets as we install tile. Excess paper can be trimmed away later. Paper should cover all rough-top edges, including those around the sink cutout and any other openings. Seams should be lapped at least 2 in. If you are installing backsplash tiles over a mortar bed, extend the paper up the wall beyond where the tile will end to protect the wall. Or use masking tape to protect untiled areas of the wall above the backsplash.
A mortar bed should be reinforced with some kind of metal lath. The kind approved by the Tile Council of America is a galvanized, expanded type that should weigh at least 2 1/2 lb. per sq. yd. We use 1-in., 20-ga. galvanized stucco netting or chicken wire. I like to run the wire on the deck and up the wall to within 1/2 in. of where the tile will stop, provided the backsplash tile does not extend up the wall more than roughly 8 in. If your plan is to carry the tile all the way to the bottom of the upper cabinets, then cut the wire at the juncture between deck and backsplash and install a separate piece of wire on the wall.
For more photos, drawings, and details, click the View PDF button below: