Replacing a Mudsill
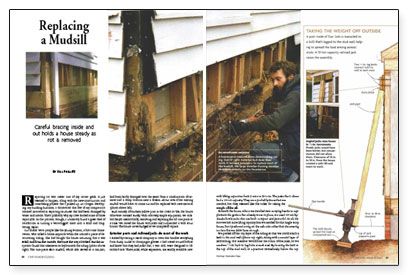
Careful bracing inside and out holds a house steady as rot is removed.

Synopsis: The author explains his method of removing weather- or insect-damaged mudsills at the bottom of a framed wall and replacing them with new material. He includes details on how to support the structure safely with jacks while work is ongoing.
Repairing rot was never one of my career goals. It just seemed to happen, along with the new-construction and remodelling projects that I picked up. As I began developing my building business, I discovered that few of my competitors seemed interested in repairing structures that had been damaged by water and insects. That’s probably why my crew landed some of those repair jobs. In the process, though, I ultimately found a great deal of satisfaction in turning a waterlogged mess into a solid and long lasting repair.
Our clients were people like the young woman, a first-time homeowner, who called a home inspector when she noticed a piece of deteriorating siding. She had bought the house assuming that it was solid, and from the outside, that’s just the way it looked. But the inspector found that extensive rot lay beneath the siding. The one-piece 4×10 mudsill, which also served as a rim joist, had been badly damaged over the years from a combination of termites and a damp location near a stream. About 80% of the existing mudsill would have to come out and be replaced with new material.
Built entirely of southern yellow pine in the 1940s or ’50s, the house otherwise seemed sturdy. With relatively simple equipment, we tackled the job methodically, removing and replacing the sill one piece at a time. We raised the house with jacks and suspended it with stout braces. The house never budged as we completed repairs.
Exterior posts and railroad jacks do most of the work
I started by visiting a rental company in town that handles everything from dump trucks to champagne glasses. I had nosed around before and knew that they had jacks that, I was told, were designed to lift railroad cars. These jacks, while expensive, are readily available new with lifting capacities from 5 tons to 20 tons. The jacks that I chose had a 10-ton capacity. They were probably more than we needed, but they seemed like the ticket for taking the weight off the sill.
Beneath the house, where we installed new carrying beams to supplement the girders that already were in place, we used 10-ton hydraulic bottle jacks that are both compact and powerful. In all, I’m sure we had more lifting capacity than we needed for this single-story house, but I preferred erring on the safe side rather than discovering too late that we didn’t have enough.
We peeled off the top layer of the siding so that we could attach a 2×10 to the stud wall. Along with a second layer of 2x blocking, this member would bear the strain of the jacks, so we used two 1/2-in. by 6-in. lag bolts at each stud. By locating the 2×10 at the top of the stud wall, in a position immediately below the top. We checked periodically inside the house to make sure we were not cracking any plaster.
For more photos, drawings, and details, click the View PDF button below:
Fine Homebuilding Recommended Products
Fine Homebuilding receives a commission for items purchased through links on this site, including Amazon Associates and other affiliate advertising programs.

Stabila Classic Level Set

11" Nail Puller

Protective Eyewear


