FHB Logo Facebook LinkedIn Email Pinterest Twitter Instagram Plus Icon Close Icon Navigation Search Icon Navigation Search Icon Arrow Down Icon Video Guide Icon Article Guide Icon Modal Close Icon Guide Search Icon Skip to content
Subscribe
Log In
  • How-To
  • Design
  • Tools & Materials
  • Videos
  • Blogs
  • Forum
  • Magazine
  • Members
  • FHB House
  • Podcast
Log In
How-To

Building a Wall in Place

When you lack headroom and a helper, the best way to erect a wall is piece by piece

By Tom O'Brien Issue 160

The most efficient way to frame a wall is to assemble the plates and studs on the floor, then tilt the completed panel into position. Building walls this way requires abundant floor space, enough people to raise the panels safely, and plenty of headroom.

If all you lack is a bit of headroom—say you’re erecting a wall under an existing ceiling, and you need a smidgen of extra ceiling height to allow raising the wall—you can design the wall to include a double top plate, but fasten the doubler to the ceiling ahead of time. This way, the wall assembly is tilted up easily and moved into position beneath the doubler.

But if you’re working in a confined area or if you’re working alone and don’t want to risk injuring yourself by lifting a big wall alone, the only way to frame the wall may be to build it in place, piece by piece.
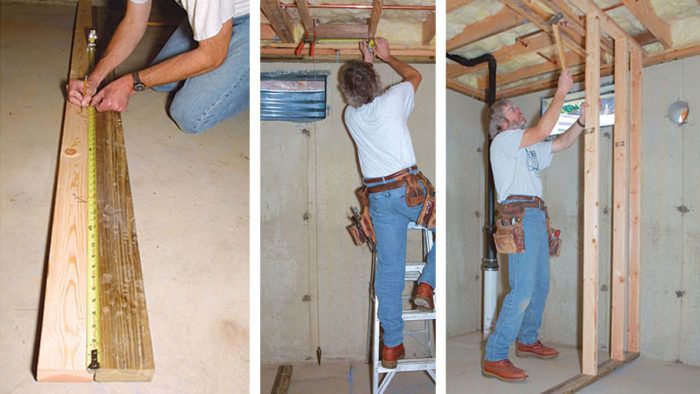
Plates go in first

Step 1: A chalkline marks the bottom plate. Before snapping a chalkline to mark the edge of the framing, scratch a prominent X on the floor to mark which side of the line the wall goes on. If you’re working alone, a concrete block can be used to hold the dumb end of the line.

Step 2: Plumb up for the top plate. A plumb bob is a more reliable layout tool than a spirit level because it never goes out of whack. To avoid the tedium of centering a swinging plumb bob over the chalkline, clamp the string to a convenient joist, then measure the distance between the plumb bob’s tip and the chalkline. Transfer that measurement to the ceiling. If the wall runs parallel to the joists, you’ll need to install 2×4 blocking between the joists (approximately 4 ft. o.c.) so that you’ve got something to nail the top plate to.

Step 3: Mark stud locations before anchoring the plates. With the plates side by side and the ends flush, mark the stud locations. Use a square to complete the layout lines across both plates.

Step 4: Fasten top and bottom plates. If you’re working alone, a stud can temporarily support one end of the top plate while you nail the other end. For wood-to-wood connections, drive a pair of 16d nails wherever the plate overlaps a framing member. For wood to concrete, drive one 21/2-in. concrete nail at least every 2 ft.

Old-school concrete fasteners still have their place

A powder-actuated tool may be the fast way to attach wood framing to concrete, but it’s not necessary. To fasten a few linear feet of pressure-treated bottom plate to a basement floor, all you really need is a box of 21/2-in. cut nails and a 2-lb. drilling hammer (Estwing; www.estwing.com; 815-397-9558). Unlike a framing hammer, a drilling hammer has the mass to drive concrete nails quickly and cleanly, and its soft face poses no risk of shattering when it strikes a concrete nail. For best results, orient the nail with its wide side parallel to the grain; drive it with short, carefully aimed taps (less than 2 ft. long); and leave the head slightly proud of the surface.

Each stud is custom-fit

Step 5: Mark studs in place. Rest the bottom of the stud on the edge of the plate (photo below), and pencil a line where the stud meets the top plate. To ensure a tight fit when cutting the stud, leave a sliver of “daylight” on top of the line. Because few studs are perfect, crown each one—the arrow on the stud denotes an outward bow—and face all the crowns in the same direction.

Step 6: Toenail the bottom first. Begin by placing a stud about 1/4 in. from its layout mark; then back it up with your foot. Start a 10d nail on the other side, about 1 in. up from the plate and 1 in. in from the edge. Drive the nail at a steep angle. Each hammer blow should drive the stud closer to the line, but it doesn’t have to be perfect; after the first nail is driven home, use subsequent nails to tweak the position. Two nails on one side and one on the other complete the process. To avoid a hit on the head from falling lumber, grip the side of the stud with your free hand while you start the first nail.

Photos by: Andy Engel

Sign up for eletters today and get the latest how-to from Fine Homebuilding, plus special offers.

Signing you up...

This site is protected by reCAPTCHA and the Google Privacy Policy and Terms of Service apply.
See all newsletters
See all newsletters
×

Get home building tips, offers, and expert advice in your inbox

Signing you up...

This site is protected by reCAPTCHA and the Google Privacy Policy and Terms of Service apply.
See all newsletters
See all newsletters

New Feature

Fine Homebuilding Forums

Ask questions, offer advice, and share your work

Log in or create an account to post a comment.

Sign up Log in

Become a member and get full access to FineHomebuilding.com

Up Next

Video Shorts

Featured Story

PVC for a Rot-Proof Fence

Built with rot-proof material with traditional tools and techniques, this classic border is engineered to never sag.

Featured Video

Video: Build a Fireplace, Brick by Brick

Get an overview of the process of creating a traditional-style fireplace that burns well and meets current building codes from experienced mason Mike Mehaffey.

Related Stories

  • Podcast 550: PRO TALK With Carpentry Program Instructor Sandy Thistle and Graduate David Abreu
  • Strategies for Venting a Roof Valley
  • Podcast 547: Basement Insulation, Historic Preservation Resources, and Shipping Container ADUs
  • Podcast 547: Members-only Aftershow—Fine Homebuilding House memories

Discussion Forum

Recent Posts and Replies

  • |
  • |
  • |
  • |
  • |
  • |
View More Create Post

Highlights

Fine Homebuilding All Access
Fine Homebuilding Podcast
Tool Tech
Plus, get an extra 20% off with code GIFT20

"I have learned so much thanks to the searchable articles on the FHB website. I can confidently say that I expect to be a life-long subscriber." - M.K.

Get home building tips, offers, and expert advice in your inbox

Signing you up...

This site is protected by reCAPTCHA and the Google Privacy Policy and Terms of Service apply.
See all newsletters
See all newsletters

Video

View All
  • Podcast 545: Mystery Fasteners, Basement-Ceiling Insulation, and Mixed-Use Malls
  • Podcast 527: Sloping Decks, Brick-Filled Framing, and Skylights
  • Adding a Vented Roof Deck
  • Air-Sealing Exposed Rafter Tails
View All

Walls

View All Walls Articles
  • Avoid Sound Transfer by Isolating Electrical Gang Boxes
  • Wood folding glass doors opening to a pool
    Get Stunning Views With Folding Glass Doors
  • Structural ­connections for a Strong Wall
    How to Get Sturdy Walls Without OSB
  • fix a damp wall
    How to Remediate A Damp Exterior Wall Cavity
View All Walls Articles

BOOKS, DVDs, & MERCH

Shop the Store
  • 2023 Tool Guide
    Buy Now
  • 2022 Fine Homebuilding Archive
    Buy Now
  • Pretty Good House
    Buy Now
  • Code Check Building 4th Edition
    Buy Now
  • Shop the Store

Fine Homebuilding Magazine

  • Issue 314 - April/May 2023
    • 7 Options for Countertops
    • Tool Test: Wood-Boring Bits
    • Critical Details for Ductless Heat Pumps
  • Issue 313 - Feb/March 2023
    • Practical System for a Seismic Retrofit
    • Fine Homebuilding Issue #313 Online Highlights
    • Practical System for a Seismic Retrofit
  • Issue 312 - Dec 2022/Jan 2023
    • Tool Test: Cordless Tablesaws
    • Gray-Water System for a Sustainable Home
    • Insulate a Cape Roof to Avoid Ice Dams
  • Issue 311 - November 2022
    • 7 Steps to a Perfect Exterior Paint Job
    • Options for Smarter Home-Energy Tracking
    • The Fine Homebuilding Interview: James Metoyer
  • Issue 310 - October 2022
    • Choosing a Tile-Leveling System
    • Choosing Between HRVs and ERVs
    • Custom Built-in Cabinets Made Easy

Fine Homebuilding

Follow

  • twitter
  • facebook
  • instagram
  • pinterest

Newsletter

Get home building tips, offers, and expert advice in your inbox

Signing you up...

This site is protected by reCAPTCHA and the Google Privacy Policy and Terms of Service apply.
See all newsletters
See all newsletters

Membership & Magazine

  • Online Archive
  • Start Free Trial
  • Magazine Subscription
  • Magazine Renewal
  • Gift a Subscription
  • Customer Support
  • Privacy Preferences

Taunton Network

  • Green Building Advisor
  • Fine Woodworking
  • Fine Gardening
  • Threads
  • About
  • Contact
  • Advertise
  • Careers
  • Copyright
  • Terms of Use
  • Site Map
  • Do not sell or share my information
  • Privacy Policy
  • Accessibility
  • California Privacy Rights

© 2023 The Taunton Press, Inc. All rights reserved.

X
X
This is a dialog window which overlays the main content of the page. The modal window is a 'site map' of the most critical areas of the site. Pressing the Escape (ESC) button will close the modal and bring you back to where you were on the page.

Main Menu

  • How-To
  • Design
  • Tools & Materials
  • Video
  • Blogs
  • Forum
  • Reader Projects
  • Magazine
  • Members
  • FHB House

Podcasts

  • FHB Podcast
  • ProTalk

Webinars

  • Upcoming and On-Demand

Podcasts

  • FHB Podcast
  • ProTalk

Webinars

  • Upcoming and On-Demand

Popular Topics

  • Kitchens
  • Business
  • Bedrooms
  • Roofs
  • Architecture and Design
  • Green Building
  • Decks
  • Framing
  • Safety
  • Remodeling
  • Bathrooms
  • Windows
  • Tilework
  • Ceilings
  • HVAC

Magazine

  • Current Issue
  • Past Issues
  • Magazine Index
  • Subscribe
  • Online Archive
  • Author Guidelines

All Access

  • Member Home
  • Start Free Trial
  • Gift Membership

Shop the Store

  • Books
  • DVDs
  • Taunton Workshops

More

  • FHB Ambassadors
  • Reader Projects
  • Podcast
  • FHB House
  • Customer Support

Account

  • Log In
  • Join

Newsletter

Get home building tips, offers, and expert advice in your inbox

Signing you up...

This site is protected by reCAPTCHA and the Google Privacy Policy and Terms of Service apply.
See all newsletters
See all newsletters

Follow

  • twitter
  • facebook
  • instagram
  • pinterest

Join All Access

Become a member and get instant access to thousands of videos, how-tos, tool reviews, and design features.

Start Your Free Trial

Subscribe

FHB Magazine

Start your subscription today and save up to 70%

Subscribe

We hope you’ve enjoyed your free articles. To keep reading, become a member today.

Get complete site access to expert advice, how-to videos, Code Check, and more, plus the print magazine.

Start your FREE trial

Already a member? Log in