A Safer Step Stool
See how to make an easy to build step stool from scraps of wood in your workshop.
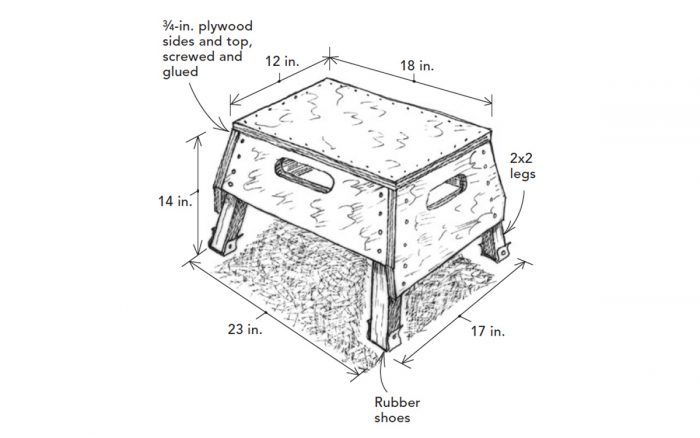
I’ve been a remodeler and a handyman for more than 20 years now, and in that time I’ve really come to appreciate the simple perfection of my little step stool. Its dimensions and materials point to the source of its components: I made them out of scraps rescued from the burn pile.
The thing I like best about my little stool is its stability. Because the sides are tapered, it’s a lot harder to tip over than a stool with straight sides. Its 14-in. height makes it narrow enough to fit between stud walls framed on 16-in. centers, but still tall enough for me to reach the top of a wall in a room with 8-ft. ceilings.
To protect floors and add even more stability, I wrapped the 2×2 feet with inner-tube rubber shoes. The stool doubles as a little workbench for cutting, painting, and hammering. And at the end of the day, I can flip the stool over and use it as a box to carry tools and supplies back to the truck.
—Mike Niemeyer, Lawrenceburg, IN
Edited and Illustrated by Charles Miller
From Fine Homebuilding #170
Old House Journal Recommended Products
Fine Homebuilding receives a commission for items purchased through links on this site, including Amazon Associates and other affiliate advertising programs.

8067 All-Weather Flashing Tape

Affordable IR Camera

Handy Heat Gun







View Comments
This will be a first time project for me. Can you please let me know what angles you made for the legs and if you just used screws/nails or what kind of joining process for the legs to the bottom of the stand. Thanks in advance for the help.
Compound angle of 13degrees worked for me. Very stable stool.
Tiger, great first project. You have enough information in the sketch to layout a full size pattern. Good practice for not needing angles and such to be provided. Use your framing square and draw a center line, work both left and right at the base and the top and voila! You’ll have your angle you can pick up with your handy speed square or bevel gauge. Screws or coated nails. Have fun!
Gecatiger,
This was published in issue 170 from May 2005, so you're unlikely to get an answer from the original contributor. Looking at the measurements that have been provided, the legs have been cut at a 10º angle (14" rise, 2½" run). The drawing says that the panels were glued and screwed in place. 1¾" x 8 screws would probably do the job. I hope this is helpful.