Insulated Skylight Shaft
If you have or plan to install a skylight in your home, get the insulation details right to avoid problems with comfort and condensation.
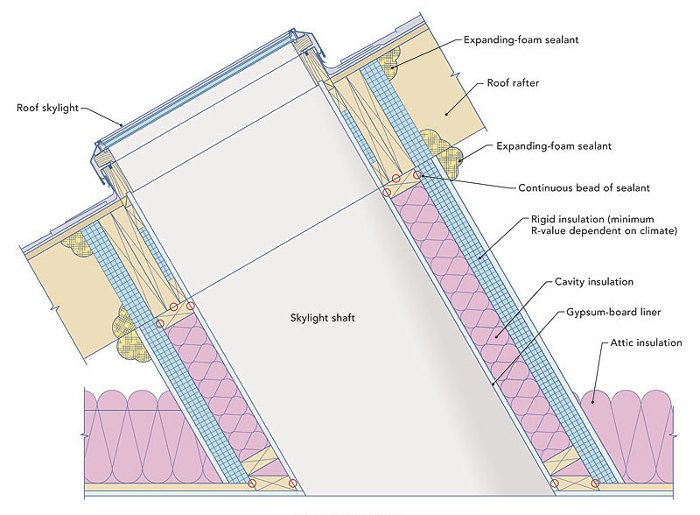
If the skylight shaft is insulated with an air-permeable insulation such as fiberglass or cellulose, the insulation must be enclosed on the attic side with a durable layer that acts as an air barrier. While it’s possible to use drywall or OSB for this layer, it makes more sense to use rigid foam, because the foam raises the R-value of the entire assembly.
Steve Baczek, Architect
If you install a skylight in the roof over an attic, you’ll need to build a shaft to connect the skylight with the ceiling below.
Skylight-shaft walls are sometimes vertical, but more typically, they are sloped to create a splayed opening. Because the shaft walls separate the interior of the house from an unconditioned attic, it’s essential that they be well insulated. If the skylight shaft is splayed, it makes more sense to insulate the shaft like a roof rather than a wall. In other words, the higher the R-value of the insulation, the better.
In the past, builders paid little attention to sealing air leaks in skylight shafts, and insulation usually consisted of a few fiberglass batts. As time passed, many of these batts flopped over backward onto the attic floor. Such a casual approach to skylight-shaft insulation is no longer acceptable.
Skylight shafts must be built with close attention to airtightness If there are air leaks in the shaft, the house will have a steady stream of warm air escaping all winter long. The shaft will act like a chimney, robbing heat from the house.
Enclose fiberglass batts
Of all the various types of insulation used in houses, fiberglass batts perform the worst. Unlike blown-in insulation, batts don’t conform well to irregular cavities, and unlike foam insulation products, fiberglass insulation is air-permeable. If you want to use fiberglass batts in spite of these disadvantages, you need to pay close attention to installation details. First, frame the shaft with 2x6s instead of 2x4s to provide more room for insulation. Cut the batts precisely, and install them with care so that all the framing cavities are completely filled with insulation, without any voids or areas of compression.
To perform well, fiberglass batts need to be enclosed by an air barrier on all six sides. The shaft framing must include a top plate and a bottom plate, and any cracks or penetrations in the plates must be caulked. To complete the air barrier on the attic side of the studs, it’s essential to install a layer of plywood, OSB, drywall, Thermo-ply, or rigid foam. This layer should be installed in an airtight manner, with all seams caulked or taped.
Boost R-value
Rigid foam is the best choice for the attic-side air barrier. Foam insulation improves the thermal performance of the assembly in two ways: by adding R-value and by interrupting thermal bridging through the studs. To avoid moisture problems, the rigid foam must be thick enough to keep the stud cavities above the dew point in winter. That means that you’ll need at least 3 in. of rigid foam in northern Minnesota or northern Maine (climate zone 7); at least 2 in. in Montana and Vermont (climate zone 6); and at least 1-1⁄2 in. in Nevada, Nebraska, and Massachusetts (climate zone 5). In climate zone 4 and warmer zones, you don’t have to worry about the thickness of the foam layer.
Any of the three main types of rigid foam—extruded polystyrene (XPS), expanded polystyrene (EPS), or polyisocyanurate— work in this location. All rigid-foam seams should be sealed with caulk, canned spray foam, or a high-quality tape. By far, the easiest type of foam to tape is foil faced polyisocyanurate, which can be sealed with ordinary housewrap tape.
Because rigid foam performs so well, many builders skip the fiberglass and rely solely on rigid foam to insulate a skylight shaft. As long as the rigid-foam layer is thick enough to meet at least minimum code requirements for walls—exceeding minimum code values is even better—this is an excellent approach. If the stud bays remain empty, make sure that the cavities are sealed against air leakage on all sides, and that there are no breaks in the continuity of the rigid foam.
It’s also possible to insulate attic shafts with cellulose, blown-in fiberglass, or mineral-wool batts. Like fiberglass batts, these types of insulation are airpermeable, so they need to be enclosed with an air barrier on all six sides.
If you insulate a skylight shaft with spray polyurethane foam, you can use either open-cell or closed-cell foam. Spray foam works well in this location, because it acts as an air barrier as well as an insulation layer.
Most building codes require that any spray-foam insulation or rigid-foam insulation that faces an attic be covered by a layer of drywall for fire protection. In some jurisdictions, however, building inspectors make an exception for Thermax, a brand of polyisocyanurate foam that has passed fire-safety tests. If you’re using rigid foam and if your inspector allows exposed Thermax in attics, that’s probably the brand you’ll want to use.
Insulating the rough opening
Skylight-shaft walls extend from the ceiling drywall or the top of the ceiling joists to the skylight rough opening. In most cases, the skylight rough opening will be framed with double 2x10s or double 2x12s. The rough opening should be insulated by installing rigid foam on the attic side of the framing. The foam can be attached with foam-compatible construction adhesive or cap nails. Of course, the thicker the foam, the better.
After insulating a skylight shaft, you should verify that the insulation layer and the air barrier are continuous with the insulation and the air barrier below the shaft and above the shaft. The top of the skylight insulation should maintain continuity with the rigid foam around the rough opening. Patch any gaps in the thermal barrier or the air barrier with canned spray foam.
Energy Star-home requirements
Builders of Energy Star homes are required to comply with the requirements spelled out in the Thermal Bypass Checklist. This checklist calls for skylight-shaft walls to have “continuous top and bottom plates or sealed blocking,” the shaft walls to be “fully insulated,” and the insulation to be “aligned with an air barrier at both the interior and exterior.”
The Energy Star-home program recommends, but does not require, that air barriers be made of a rigid material. In other words, Thermo-ply is better than housewrap.
More details
Some of these details are new to Green Building Advisor’s energy-smart collection. GBA Pro members get full access to the detail library, which contains almost 2500 details on building better, tighter, more-energy-efficient houses. To browse through the collection, go to GreenBuildingAdvisor.com/detail-drawings.
Fine Homebuilding Recommended Products
Fine Homebuilding receives a commission for items purchased through links on this site, including Amazon Associates and other affiliate advertising programs.
Hook Blade Roofing Knife
Shingle Ripper
Fall Protection




View Comments
Insulation is the best way to secure your house from climate change.
I love these wonderful detailed drawings that are never followed in the field. Slap it up and cover it up before anyone can inspect it. ...and that's assuming the general or building inspector knows 1. how it's supposed to be installed and 2. will actually inspect it. ..same thing with window flashing details, zip system, IBS2000 load sharing connectors (special diagonal bracing). About 20 years ago, I even discovered a crack in a backsplash that the installer tried to cover up with caulk, hoping we wouldn't find it.
Is it just me or...? People will accept any sort of a thrown together multi-hundred thousand dollar home, but a car that will be in the scrap yard in 15 years has to be absolutely perfect in every way.