FHB Logo Facebook LinkedIn Email Pinterest Twitter X Instagram Tiktok YouTube Plus Icon Close Icon Navigation Search Icon Navigation Search Icon Arrow Down Icon Video Guide Icon Article Guide Icon Modal Close Icon Guide Search Icon Skip to content
Subscribe
Log In
  • How-To
  • Design
  • Tools & Materials
  • Restoration
  • Videos
  • Blogs
  • Forum
  • Magazine
  • Members
  • FHB House
  • Podcast
Log In

Discussion Forum

Discussion Forum

attaching headers to posts

KylefromKy | Posted in Construction Techniques on April 22, 2009 06:52am

Hi all,
I’m planning to build what might be best described as a post and beam style picnic shelter, only it’s intended to cover a retired RV from the elements. (I live in Kentucky, what can I say?) The covered area will be about 11′ wide, 36′ long and 11′ tall, with rafters and gable roof above that.
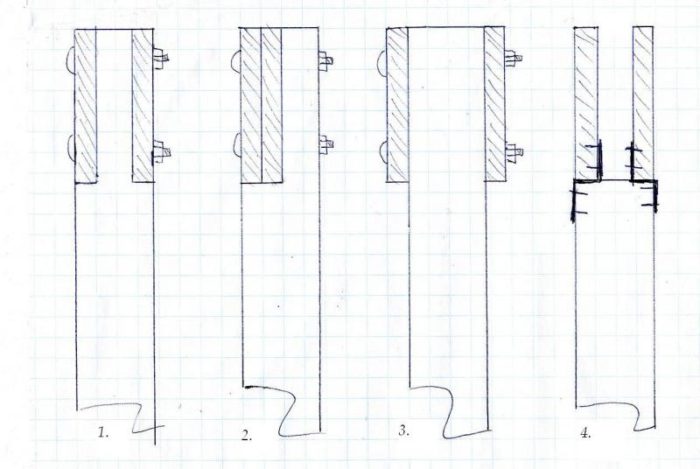
I’m thinking of using pressure treated 6×6 posts for the supports, with double 2×12’s for headers (to span about 12′) and wondering if there is a recommended way to attach the 2×12’s to the headers. Attached are 4 ways I could think of.
#1, 2, and 3 are variations using 1/2″ carriage bolts and #4 uses Simpson type metal connectors with the headers on top of the posts.
I’m partial to #2 because that leaves a space to the right of the headers for attaching collar ties, but will it significantly weaken a 6×6 to cut a 3″ rabbit out of it?
Also, what do folks think is the best way to mount the posts to the ground? Bury them in dirt or concrete, or use some type of stand-off atop a concrete base?
I appreciate any advice concerning these questions, and anything else that may be helpful!
Thanks a bunch,
Kyle

“Argue for your limitations, and sure enough they’re yours.”
Reply
  • X
  • facebook
  • linkedin
  • pinterest
  • email
  • add to favorites Log in or Sign up to save your favorite articles

Replies

  1. User avater
    shelternerd | Apr 22, 2009 08:17am | #1

    I like #2 the best by far.

    m

    ------------------

    "You cannot work hard enough to make up for a sloppy estimate."

  2. User avater
    Ted W. | Apr 22, 2009 09:10am | #2

    #2 because the joists can be fastened together. That way you have a true double joist, as opposed to 2 single joists.

    Rabbeting the 6x6 shouldn't be any problem, but let's hear what others have to say on that matter.

    ~ Ted W ~

    Cheap Tools! - MyToolbox.net
    Meet me at House & Builder!

  3. BillBrennen | Apr 22, 2009 09:22am | #3

    I also like #2 the best. The notch weakens the 6x6, but it is at the end, not subjected to much bending, so what is the big deal about it? The joists are solidly supported and can be tied together and the 3x6 alongside them prevents rolling over.

    So long as you use treated posts, burying them in the earth is stronger because it helps prevent racking, like a pole barn does. If they sit on top of concrete in the air, ALL the racking forces have to be resisted by diagonals or shearwalls.

    Bill

  4. Piffin | Apr 22, 2009 01:44pm | #4

    #2 without a doubt


    Welcome to the
    Taunton University of
    Knowledge FHB Campus at Breaktime.
     where ...
    Excellence is its own reward!

  5. User avater
    BossHog | Apr 22, 2009 02:06pm | #5

    I'd also suggest #2. But #1 would likely be OK also.

    No way would I accept #3 or #4.

    The trouble with the legal profession is that 98 percent of its members give the rest a bad name.

    1. Piffin | Apr 22, 2009 02:09pm | #6

      For #1 I'd use scrap deadwood for blocking to maintain a connection between the two. overall a lot more work to do that one, but can be more aesthetically pleasing in some situations. 


      Welcome to the Taunton University of Knowledge FHB Campus at Breaktime. where ... Excellence is its own reward!

  6. MikeHennessy | Apr 22, 2009 02:26pm | #7

    Hmm. Everybody likes #2, but if it's exposed to the elements, those two boards will trap water between 'em, leading to premature rot. If you go with #2, some 1/4" spacers between 'em will let 'em drain.

    Mike Hennessy
    Pittsburgh, PA

    1. Piffin | Apr 22, 2009 02:32pm | #8

      On a deck, I'd use vycor over them, but this is up under a roof where only rare wind suction will leave a few drips on that joint. 


      Welcome to the Taunton University of Knowledge FHB Campus at Breaktime. where ... Excellence is its own reward!

  7. Henley | Apr 22, 2009 02:59pm | #9

    Poor old number 4 never had a chance.

    1. User avater
      Ted W. | Apr 22, 2009 05:16pm | #15

      Poor old number 4 never had a chance.

      #4 is just #1 without the toung in the middle, which is needed to stiffen it.

      I would have voted for #4 if the rafters were moved together, get rid of the simpson ties, notch the post on one side and set them down in it, and through bolted with the 1/2" carriage bolts left over from not doing #2.

      ~ Ted W ~

      Cheap Tools! - MyToolbox.netMeet me at House & Builder!

      Edited 4/22/2009 10:16 am by Ted W.

  8. Boats234 | Apr 22, 2009 04:01pm | #10

    And the answer is??? A resounding #2

    If you need some engineering back up, go to link and view fact sheet #13

    http://www.fema.gov/rebuild/mat/mat_fema499.shtm

    I'd boom up to some 8x8's and use rough cut 3x12's for girders. Compare the price and see what ya think.

  9. KylefromKy | Apr 22, 2009 04:11pm | #11

    Thanks much for all the quick and mostly unanimous responses. #2 it will be!

    I agree with BillBrennan regarding the strength of burying the posts in the ground, but I'm curious how long they will last compared to being above ground on concrete. (I neglected to mention the possibility that one day the RV might be hauled away and the structure could be closed in and converted to a shop or storage shed.) If I do bury them, how deep and is there any need for concrete around them?

    Piffin is right about the headers - they will be under the roof and mostly out of the weather, but that brings up another question: Is there any need for the roof framing (headers, collar ties and rafters) to be made from pressure treated lumber, or would it be safe to use non-treated?

    Thanks again for the all the opinions. It's very encouraging.
    "Argue for your limitations, and sure enough they're yours."

    p.s. Thank you all for being kind enough not to comment on my misspelling of the word "rabbet". I guess it's still too close to Easter!

    Edited 4/22/2009 9:33 am ET by KylefromKy


    Edited 4/22/2009 9:50 am ET by KylefromKy

    1. dovetail97128 | Apr 22, 2009 04:45pm | #12

      Might check this site out. Pick a plan and you can see construction details.

      http://www.public.iastate.edu/~mwps_dis/mwps_web/hy_plans.html#Anchor73110 here is the main page
      http://www.ebackroad.com/0mwpsorg-freefarmplans.html

      Edited 4/22/2009 9:46 am by dovetail97128

    2. User avater
      JeffBuck | Apr 22, 2009 04:50pm | #13

      concrete around the post helps hold moisture and speeds up the rot.

      pack it tight with tamped gravel.

      Jeff

           Buck Construction

       Artistry In Carpentry

           Pittsburgh Pa

    3. Tomrocks21212 | Apr 22, 2009 05:23pm | #16

      # 2 without a doubt. I built this structure in 1988, took the pic a couple of years ago. I wouldn't worry about longevity if you put it together right.

      1. KylefromKy | Apr 22, 2009 05:51pm | #17

        Hi Tom,
        Nice joinery for an outbuilding! It looks like you used pressure treated for the headers and rafters, is that right? Did you bury the posts, and if so, how?
        "Argue for your limitations, and sure enough they're yours."

        Edited 4/22/2009 11:27 am ET by KylefromKy

        1. Tomrocks21212 | Apr 22, 2009 09:11pm | #19

          It's all PT. The footings were poured to ground level, and shot with a transit. Steel post bases were bolted in place, and all pieces were cut about 3/4 of a mile away and hauled up the hill on a farm wagon, and assembled there. I only needed the generator to drill bolt holes for the lumber connections. Everything else was pre-cut to length.It's at my buddy's rifle range, so whenever I go there to shoot, I take a couple of wrenches to make sure the connections are still tight.The plywood scabs you see he installed so he could have blown-in cellulose installed, sprayed up against the fiberglass (for sound absorption). After about a year, environmental conditions, plus a lot of muzzle blast, removed about 90% of the cellulose.

          1. KylefromKy | Apr 23, 2009 01:46am | #21

            Thanks, Tom.
            That does sound like a long lasting type of construction.I'm wavering between the relative ease of burying the PT posts vs. instinctively mounting them above ground on concrete, which seems destined to last longer. I live on a farm that's littered with decaying pole buildings, (from the 1950's and 60's, granted they're not PT) whose posts are rotted at the base and shortened by 6-12" causing the rooflines to sag and the rest of the framing to bend and break. (Sounds kind of like me come to think of it). After seeing the degradation, I'd like to make sure the buildings I construct have the best chance possible.(oh, you said wrenches, not wenches.)"Argue for your limitations, and sure enough they're yours."Edited 4/22/2009 6:51 pm ET by KylefromKy

            Edited 4/22/2009 7:19 pm ET by KylefromKy

    4. User avater
      EricPaulson | Apr 22, 2009 05:55pm | #18

      http://www.permacolumn.com/ 


      "When the spirits are low, when the day appears dark, when work becomes monotonous, when hope hardly seems worth having, just mount a bicycle and go out for a spin down the road, without thought on anything but the ride you are taking." — Sherlock Holmes, 1896

  10. woodhak | Apr 22, 2009 04:59pm | #14

    strucurally #1 & #2 are equally strong... nothing wrong with #3 but #4 looks questionable..

  11. DanH | Apr 23, 2009 01:03am | #20

    What we did on our deck was to notch the top of the post, insert a piece of 5/4 decking in the notch, and then bolt the headers either side of that. This avoids creating a weak spot at the bottom of the tenon when you use the tenon method.

    The modern conservative is engaged in one of man's oldest exercises in moral philosophy; that is, the search for a superior moral justification for selfishness. -John Kenneth Galbraith
    1. KylefromKy | Apr 23, 2009 01:48am | #22

      Hi Dan,
      Thanks for the reply.
      I'm having trouble visualizing that...you don't happen to have a photo or drawing, do you?
      "Argue for your limitations, and sure enough they're yours."

      1. DanH | Apr 23, 2009 02:32am | #23

        Nothing I can do quickly. Basically, a vertical notch is made in the top of the post, as wide as the 5/4 stock is thick and maybe 8 inches deep. The 5/4 piece is inserted into the slot and thru-bolted in place, then the headers are placed on top of the post either side of the 5/4 piece and thru-bolted to it. (Obviously, with 6x6 posts you could use something thicker than 5/4, but the 5/4 worked out well for our 4x4 posts.)If you use 5/4 bullnose decking (or maybe a piece of 2x, for 6x6 posts) and use a piece that's an inch or two wider than the post it produces a fairly attractive detail.
        The modern conservative is engaged in one of man's oldest exercises in moral philosophy; that is, the search for a superior moral justification for selfishness. -John Kenneth Galbraith

        1. KylefromKy | Apr 23, 2009 02:55am | #24

          OK, Now I see.
          Thanks!
          "Argue for your limitations, and sure enough they're yours."

  12. RedfordHenry | Apr 23, 2009 05:19am | #25

    Yep, #2.  And I'd probably skip the carriage bolts and go with GRK lags. 

  13. mike_maines | Apr 23, 2009 05:28am | #26

    Under a short deck or somewhere looks didn't matter I'd go with #2, with 1/4" spacers as noted. 

    If this is going to be seen, I think #1 or #3 look best.  I would add 2x4 bolsters under #3 though. 

    What can I say, I like symmetry. 

    1. KylefromKy | Apr 23, 2009 05:32pm | #27

      Thanks for all the replies. It has been very helpful.
      I'll try to post some photos along the way. I hope to start next week!
      Kyle
      "Argue for your limitations, and sure enough they're yours."

Log in or create an account to post a comment.

Sign up Log in

Become a member and get full access to FineHomebuilding.com

Video Shorts

Categories

  • Business
  • Code Questions
  • Construction Techniques
  • Energy, Heating & Insulation
  • General Discussion
  • Help/Work Wanted
  • Photo Gallery
  • Reader Classified
  • Tools for Home Building

Discussion Forum

Recent Posts and Replies

  • |
  • |
  • |
  • |
  • |
  • |
View More Create Post

Up Next

Video Shorts

Featured Story

Custom Built-ins With Job-Site Tools

From building boxes and fitting face frames to installing doors and drawers, these techniques could be used for lots of cabinet projects.

Featured Video

A Modern California Home Wrapped in Rockwool Insulation for Energy Efficiency and Fire Resistance

The designer and builder of the 2018 Fine Homebuilding House detail why they chose mineral-wool batts and high-density boards for all of their insulation needs.

Related Stories

  • Guest Suite With a Garden House
  • Podcast Episode 688: Obstructed Ridge Vent, Buying Fixer-Uppers, and Flashing Ledgers
  • FHB Podcast Segment: Finding the Right Fixer-Upper
  • Keeping It Cottage-Sized

Highlights

Fine Homebuilding All Access
Fine Homebuilding Podcast
Tool Tech
Plus, get an extra 20% off with code GIFT20

"I have learned so much thanks to the searchable articles on the FHB website. I can confidently say that I expect to be a life-long subscriber." - M.K.

Get home building tips, offers, and expert advice in your inbox

Signing you up...

This site is protected by reCAPTCHA and the Google Privacy Policy and Terms of Service apply.
See all newsletters
See all newsletters

Fine Homebuilding Magazine

  • Issue 332 - July 2025
    • Custom Built-ins With Job-Site Tools
    • Fight House Fires Through Design
    • Making the Move to Multifamily
  • Issue 331 - June 2025
    • A More Resilient Roof
    • Tool Test: You Need a Drywall Sander
    • Ducted vs. Ductless Heat Pumps
  • Issue 330 - April/May 2025
    • Deck Details for Durability
    • FAQs on HPWHs
    • 10 Tips for a Long-Lasting Paint Job
  • Issue 329 - Feb/Mar 2025
    • Smart Foundation for a Small Addition
    • A Kominka Comes West
    • Making Small Kitchens Work
  • Issue 328 - Dec/Jan 2024
    • How a Pro Replaces Columns
    • Passive House 3.0
    • Tool Test: Compact Line Lasers

Fine Home Building

Newsletter Sign-up

  • Fine Homebuilding

    Home building tips, offers, and expert advice in your inbox.

  • Green Building Advisor

    Building science and energy efficiency advice, plus special offers, in your inbox.

  • Old House Journal

    Repair, renovation, and restoration tips, plus special offers, in your inbox.

Signing you up...

This site is protected by reCAPTCHA and the Google Privacy Policy and Terms of Service apply.
See all newsletters

Follow

  • Fine Homebuilding

    Dig into cutting-edge approaches and decades of proven solutions with total access to our experts and tradespeople.

    Start Free Trial Now
    • Facebook
    • Instagram
    • X
    • LinkedIn
  • GBA Prime

    Get instant access to the latest developments in green building, research, and reports from the field.

    Start Free Trial Now
    • Facebook
    • YouTube
  • Old House Journal

    Learn how to restore, repair, update, and decorate your home.

    Subscribe Now
    • Facebook
    • Instagram
    • X

Membership & Magazine

  • Online Archive
  • Start Free Trial
  • Magazine Subscription
  • Magazine Renewal
  • Gift a Subscription
  • Customer Support
  • Privacy Preferences
  • About
  • Contact
  • Advertise
  • Careers
  • Terms of Use
  • Site Map
  • Do not sell or share my information
  • Privacy Policy
  • Accessibility
  • California Privacy Rights

© 2025 Active Interest Media. All rights reserved.

Fine Homebuilding receives a commission for items purchased through links on this site, including Amazon Associates and other affiliate advertising programs.

  • Home Group
  • Antique Trader
  • Arts & Crafts Homes
  • Bank Note Reporter
  • Cabin Life
  • Cuisine at Home
  • Fine Gardening
  • Fine Woodworking
  • Green Building Advisor
  • Garden Gate
  • Horticulture
  • Keep Craft Alive
  • Log Home Living
  • Military Trader/Vehicles
  • Numismatic News
  • Numismaster
  • Old Cars Weekly
  • Old House Journal
  • Period Homes
  • Popular Woodworking
  • Script
  • ShopNotes
  • Sports Collectors Digest
  • Threads
  • Timber Home Living
  • Traditional Building
  • Woodsmith
  • World Coin News
  • Writer's Digest
Active Interest Media logo
X
X
This is a dialog window which overlays the main content of the page. The modal window is a 'site map' of the most critical areas of the site. Pressing the Escape (ESC) button will close the modal and bring you back to where you were on the page.

Main Menu

  • How-To
  • Design
  • Tools & Materials
  • Video
  • Blogs
  • Forum
  • Project Guides
  • Reader Projects
  • Magazine
  • Members
  • FHB House

Podcasts

  • FHB Podcast
  • ProTalk

Webinars

  • Upcoming and On-Demand

Podcasts

  • FHB Podcast
  • ProTalk

Webinars

  • Upcoming and On-Demand

Popular Topics

  • Kitchens
  • Business
  • Bedrooms
  • Roofs
  • Architecture and Design
  • Green Building
  • Decks
  • Framing
  • Safety
  • Remodeling
  • Bathrooms
  • Windows
  • Tilework
  • Ceilings
  • HVAC

Magazine

  • Current Issue
  • Past Issues
  • Magazine Index
  • Subscribe
  • Online Archive
  • Author Guidelines

All Access

  • Member Home
  • Start Free Trial
  • Gift Membership

Online Learning

  • Courses
  • Project Guides
  • Reader Projects
  • Podcast

More

  • FHB Ambassadors
  • FHB House
  • Customer Support

Account

  • Log In
  • Join

Newsletter

Get home building tips, offers, and expert advice in your inbox

Signing you up...

This site is protected by reCAPTCHA and the Google Privacy Policy and Terms of Service apply.
See all newsletters
See all newsletters

Follow

  • X
  • YouTube
  • instagram
  • facebook
  • pinterest
  • Tiktok

Join All Access

Become a member and get instant access to thousands of videos, how-tos, tool reviews, and design features.

Start Your Free Trial

Subscribe

FHB Magazine

Start your subscription today and save up to 70%

Subscribe

Enjoy unlimited access to Fine Homebuilding. Join Now

Already a member? Log in

We hope you’ve enjoyed your free articles. To keep reading, become a member today.

Get complete site access to expert advice, how-to videos, Code Check, and more, plus the print magazine.

Start your FREE trial

Already a member? Log in

Privacy Policy Update

We use cookies, pixels, script and other tracking technologies to analyze and improve our service, to improve and personalize content, and for advertising to you. We also share information about your use of our site with third-party social media, advertising and analytics partners. You can view our Privacy Policy here and our Terms of Use here.

Cookies

Analytics

These cookies help us track site metrics to improve our sites and provide a better user experience.

Advertising/Social Media

These cookies are used to serve advertisements aligned with your interests.

Essential

These cookies are required to provide basic functions like page navigation and access to secure areas of the website.

Delete My Data

Delete all cookies and associated data