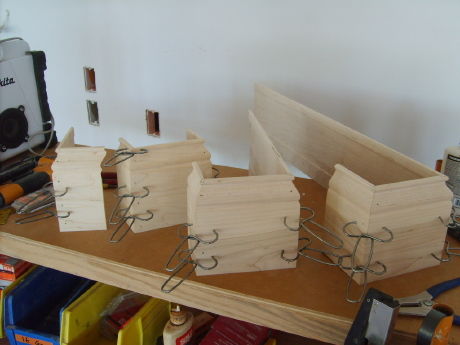
Baseboards are not the most fun. I assemble as much of the base as I can on a work cart.
Here are a few pics:
Baseboards are not the most fun. I assemble as much of the base as I can on a work cart.
Here are a few pics:

Learn how to plan, fabricate, and install a chute to conveniently send your dirty clothes from an upstairs bathroom or hallway to your laundry room below.


"I have learned so much thanks to the searchable articles on the FHB website. I can confidently say that I expect to be a life-long subscriber." - M.K.


Replies
Wicked.
What method do you use for determining the angle for slightly-non-square corners? I consider myself a novice - I've only set the saw at 46* or 47* and hoped for the best.
Edited 6/13/2008 10:34 pm ET by Biff_Loman
I use a bevel guage and a Starrett miter protractor:http://www.starrett.com/pages/1242_perfect_miter_cuts_every_time.cfm
Suh-weet.
BTW those corners ranged from 87* to 92* (43-1/2* to 46* miters).
What is that wheely deal you're sitting on?
Racatachttp://forums.taunton.com/tp-breaktime/messages?msg=105678.1http://www.racatac.com/'Man who say it cannot be done should not interrupt man doing it' ~ Chinese proverb
I really gotta get me some of those clips. --------------------------------------------------------
Cheap Tools at MyToolbox.netSee some of my work at TedsCarpentry.com
Ted,In case you need it, here is the source of the miter clamps:http://www.collinstool.com/base.php?page=tools.htmI find them very useful.
Thanks for fielding that one.BC
Bif ...
cut a couple "test pieces" at 45 deg each.
then .. cut both a L and R at 44 ... and 46.
mark them ... in sharpie.
inside and outside.
and those are your new test's.
each corner ... real quick like ... start with the 45's .... then figure out which set or combo are gonna work ... and go from there.
I do the same with any trim. Crown mold to casing.
have a 6" or so scrap on hand and work it.
old houses and weird angles ... just start with longer scraps.
Jeff Buck Construction
Artistry In Carpentry
Pittsburgh Pa
Jeff
I sorta do it that way too, but most of the time I can look at a outside corner and tell if its gonna need a 46 or 47 miter. I like the scrap pieces though cause they fit in your bag and are a quick tell-all.
Doug
scraps also help me guess at the 0.5 angles.
Jeff Buck Construction
Artistry In Carpentry
Pittsburgh Pa
I was watching "ask this old house" and learned a new way to make a perfect miter (I find it amusing to see what issues home owners have).
Tom was called in to fix the crown in a kitchen that the home owner did, except for one last piece on a 45deg cabinet. He ended up taking two 1x4s and holding them flat against the ceiling, one on each adjacent wall. He pushed them toward each other so they overlapped about 5inches, then on one marked where the other crossed it (at both edges)
He then took the blocks down and draw a diagonal line between the marks from where the first mark touched the face to where the second mark touched the back. That diagonal line is exactly the angle to use for the miter. Cool trick, and no measure ment needed.
Episode 625
Installing crown molding on kitchen cabinetsTom helped a homeowner who tried to install crown molding on a bank of new kitchen cabinets. The homeowner ran into trouble when he tried to cut two inside miters for a corner cabinet. Tom suggested removing all of the molding that the homeowner had already installed and starting from scratch. To get the exact angles for both the inside and outside miters, Tom made a set of wooden "gauge blocks" for each corner. He then used these blocks to transfer the exact angles to his electric miter saw. Tom then fastened the molding to the cabinets using headless "pin" nails, which leave holes that are nearly invisible.
I've been frustrated with base for years, as silly as it sounds. I just recently started using the same methods (clamps, protractor) and what a difference. Now I don't mind it so much.
Nice to have a little breakthrough, every once in a while.I do enjoy the challenge of large baseboards. This job has 6" base.
My hat is off to you! Great work and thinking through the problem.
Bob
Thanks Bob.
wouldn't a two piece base with the same profile give you a better, easier job without double the labor ?
carpenter in transition
I've done it both ways. Tall, one-piece, base has a learning curve...but once you pick up a few tricks, you can get good results and save time--IMO.Any taller than 6" and the base and cap is prudent.I use the same pre-assembly approach, regardless of height (on short, outside corner, runs of base). I think it is easier, faster and produces better results to use a work table when practical.Cheers,Brian